Panasonic NN-SE284 Installation Instructions - Page 6
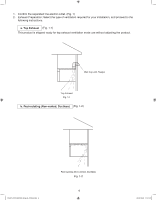
c. Rear Exhaust
 |
View all Panasonic NN-SE284 manuals
Add to My Manuals
Save this manual to your list of manuals |
Page 6 highlights
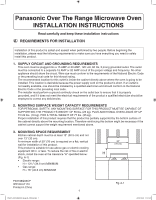
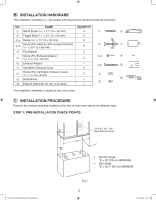
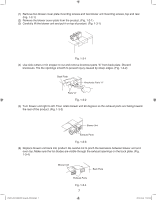
(5) Replace blower cover plate onto the product. Secure blower unit with two screws, one through the blower plate, and the other through oven back plate. Secure blower plate onto the product top with two screws. (Fig. 1-2-4) Blower Unit Mounting Screws Blower Unit Blower Unit Mounting Screws Blower Plate Back Plate Blower Unit Mounting Screws Fig. 1-2-4 (6) Slide two tabs of ventilation exhaust covers u into two small square openings of blower cover plate so that two large openings are covered. Secure each with one screw i. (Fig. 1-2-5) Make sure two tabs are inserted into square holes and the screw heads are not protruding from blower cover plate surface. c. Rear Exhaust Fig. 1-2-5 IP3297_F03138Q03CP_Eng_00_101028.indd 6 Wall Cap with Flapper Rear Exhaust Fig. 1-3 6 2010-10-28 11:51:29
-
 1
1 -
 2
2 -
 3
3 -
 4
4 -
 5
5 -
 6
6 -
 7
7 -
 8
8 -
 9
9 -
 10
10 -
 11
11 -
 12
12 -
13
-
14
 |
 |
