Panasonic NN-SE284 Installation Instructions - Page 9
Step 2: Using The Template
 |
View all Panasonic NN-SE284 manuals
Add to My Manuals
Save this manual to your list of manuals |
Page 9 highlights
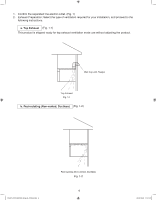
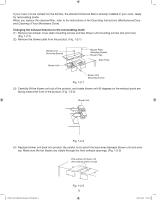
STEP 2: USING THE TEMPLATE It is recommended that the bracket assembly be mounted to a flush wall of 2" × 4" (5 cm × 10 cm) stud and 1/2" (1.25 cm) minimum thickness drywall construction. 1. To prepare the bottom surface of the top cabinet and the wall, holes must be drilled or cut into these surfaces. A template is provided for preparing these holes. Read the instructions on the template before taping it to the bottom of the cabinet and the wall. 2. Wall and Cabinet preparation 2-1. Draw a vertical center line on wall and a center line of the cabinet. (Fig. 2-1) t Top Exhaust Opening q e r Wall Template w q e r Center Line Fig. 2-1 y Rear Exhaust Opening 2-2. Locate wall studs by tapping or test drilling and mark vertical center line along the wall studs on wall template. If there are no wall studs in the opening area, DO NOT install the product. Consult your builder. Note: Cabinets with recessed bottoms sometimes require filler board to be used to create a flush surface for the two mounting screws. (Fig. 2-2) IP3297_F03138Q03CP_Eng_00_101028.indd 9 Recessed Bottom Filler Board Center Line Fig. 2-2 9 2010-10-28 11:51:30
-
 1
1 -
2
-
3
-
 4
4 -
 5
5 -
 6
6 -
 7
7 -
 8
8 -
 9
9 -
 10
10 -
 11
11 -
 12
12 -
 13
13 -
 14
14
 |
 |
