Panasonic PT AE700U Lcd Projector - Page 13
BASIC OPERATION, TURNING ON THE POWER, Adjusting the size - remote
 |
UPC - 410000150467
View all Panasonic PT AE700U manuals
Add to My Manuals
Save this manual to your list of manuals |
Page 13 highlights
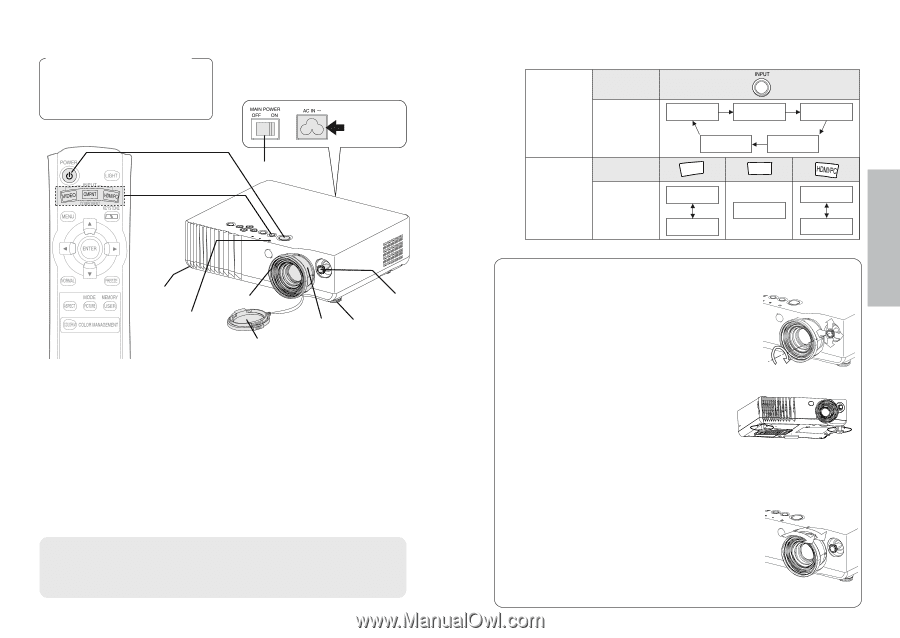
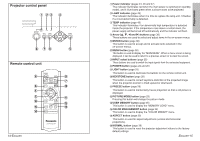
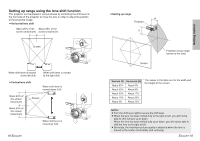
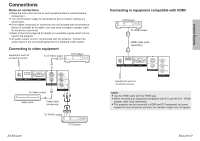
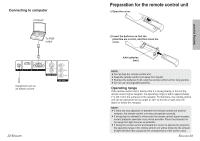
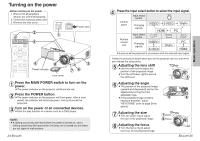
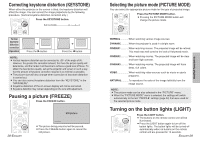
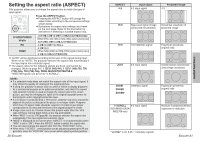
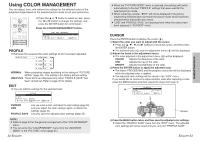
Turning on the power Before turning on the power 1. Ensure that all peripheral devices are connected properly. 2. Connect the accessory power cord. 3. Remove the lens cover. ˛$ ˛# ˛& Power cord ˛( ˛* Power indicator ˛' ˛) ˛( Lens cover #Press the MAIN POWER switch to turn on the power. BThe power indicator on the projector will illuminate red. $Press the POWER button. BThe power indicator on the projector will flash green. After a short period, the indicator will illuminate green, and a picture will be projected. %Turn on the power of all connected devices. BStart the play function of a device such as a DVD player. NOTE: B A rattling sound may be heard when the power is turned on, and a tinkling sound may be heard when the lamp unit is turned on, but these are not signs of malfunctions. 24-ENGLISH & Press the input select button to select the input signal. Input select button Control panel Changing signals VIDEO S-VIDEO YPBPR HDMI PC Remote control unit Input select button Changing signals VIDEO VIDEO S-VIDEO CMPNT YPBPR PC HDMI BA picture will be projected in accordance with the selected input signal. Follow the procedure below when you set the projector up first, and when you change the setup place. ' Adjusting the lens shift BUse the shift lever to adjust the position of the projected image. BTurn the shift lever right to secure the shift lever. ˛' ( Adjusting the angle BThe position of the projected image (upward and downward) can be fine adjusted by turning the front adjustable legs. BIf the projected image contains ˛( ˛( keystone distortion, adjust "KEYSTONE" (refer to page 28 for details). ) Adjusting the size BTurn the zoom ring to adjust the size of the projected image. * Adjusting the focus BTurn the focus ring to adjust the focus of the projected image. ˛)Zoom ˛*Focus ENGLISH-25 Basic operation
-
 1
1 -
2
-
3
-
4
-
5
-
6
-
7
-
 8
8 -
 9
9 -
 10
10 -
 11
11 -
 12
12 -
 13
13 -
 14
14 -
 15
15 -
 16
16 -
 17
17 -
 18
18 -
19
-
20
-
21
-
22
-
23
-
24
-
25
-
26
-
27
-
28
-
29
-
30
-
31
-
32
 |
 |