Panasonic PT-DW5000U Dlp Projector- English/french - Page 25
How To Install And Remove The Projection Lens (optional), How To Install The Projection Lens
 |
UPC - 791871111338
View all Panasonic PT-DW5000U manuals
Add to My Manuals
Save this manual to your list of manuals |
Page 25 highlights
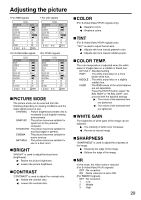
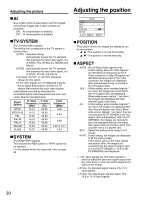
How to install and remove the projection lens (optional) How to install the projection lens Align the guide of the projection lens with the guide groove in the main unit. Turn the lens clockwise until it clicks into place. Guide groove Guide Guide groove Guide Lens signal contact Projection lens Attention • Turn the lens counterclockwise and confirm that the lens does not come off. How to remove the projection lens Turn the lens counterclockwise as far as it will go. While holding down the lens lock button, turn the lens further counterclockwise. Remove the lens. Lens lock button Note • Before replacing the lens, turn off the projector's power. • Do not touch the lens signal contact. Dust or dirt may cause defective contact. • Do not touch the surface of the projection lens with your bare hands. • Store the replaced lens where it will be free from vibration and impact. How to adjust the lens How to adjust the lens focus, lens zoom and lens up/down position movement (optical shift) The focus, zoom and up/down position of the images projected on the screen can be adjusted while the projector is positioned appropriately in relation to the screen. Press the LENS button on the remote control or on the control panel of the main unit. Pressing the button changes the setup screen in the order of "LENS FOCUS", "LENS ZOOM" and "LENS SHIFT". Choose an item and adjust it using buttons. Caution Be careful not to catch your fingers between the lens and shroud when shifting the lens. Note • When a lens without zoom functions is used, the lens zoom adjustment menu will still displayed, but no operations can be performed using the items on this menu. • By shifting the lens up/down position, it is possible to make adjustments upward or downward from the standard position in the direction of the upper 50 % of the projected screen height. • Operations can be performed faster by holding down the buttons for about 3 or more seconds. How to adjust the lens position to the left or right When the lens left/right adjustment dial is turned clockwise, the screen moves toward the left; conversely, when it is turned counterclockwise, it moves toward the right. The maximum travel distance toward the left or right is 10 % of the projection screen width. The screen moves toward the right The screen moves toward the left Lens left/right adjustment dial Maximum adjustment position Attention • Move the lens left/right adjustment dial to any position up to the maximum adjustment position to make the adjustment. Turning the dial with undue force may cause malfunctioning. 25
-
 1
1 -
2
-
3
-
4
-
5
-
6
-
7
-
8
-
9
-
10
-
11
-
12
-
13
-
14
-
15
-
16
-
17
-
18
-
19
-
 20
20 -
 21
21 -
 22
22 -
 23
23 -
 24
24 -
 25
25 -
 26
26 -
 27
27 -
 28
28 -
 29
29 -
 30
30 -
31
-
32
-
33
-
34
-
35
-
36
-
37
-
38
-
39
-
40
-
41
-
42
-
43
-
44
-
45
-
46
-
47
-
48
-
49
-
50
-
51
-
52
-
53
-
54
-
55
-
56
-
57
-
58
-
59
-
60
-
61
-
62
-
63
-
64
-
65
-
66
-
67
-
68
 |
 |
