Panasonic PT-DW5000U Dlp Projector- English/french - Page 28
Basic Menu Operations, Returning To The Previous Menu Items Shown In Transparent Characters
 |
UPC - 791871111338
View all Panasonic PT-DW5000U manuals
Add to My Manuals
Save this manual to your list of manuals |
Page 28 highlights
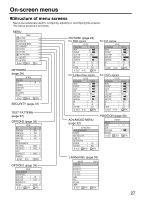
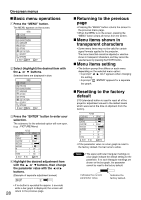
On-screen menus Basic menu operations Press the "MENU" button. The MENU appears on the screen. MENU PICTURE POSITION ADVANCED MENU LANGUAGE OPTION1 OPTI0N2 TEST PATTERN SECURITY NETWORK SELECT ENTER EXIT Select (highlight) the desired item with the or buttons. Selected items are displayed in blue. MENU PICTURE POSITION ADVANCED MENU LANGUAGE OPTION1 OPTI0N2 TEST PATTERN SECURITY NETWORK SELECT ENTER EXIT Press the "ENTER" button to enter your selection. The submenu for the selected option will now open. (e.g. : PICTURE Menu) PICTURE MODE BRIGHT CONTRAST COLOR TEMP. WHITE GAIN SHARPNESS NR AI SYSTEM SELECT PICTURE ADJ GRAPHIC 32 32 DEFAULT 10 06 OFF ON RGB RETRN Highlight the desired adjustment item with the or buttons, then change the parameter value with the or buttons. (Example of separate adjustment screen) BRIGHT 32 28 • If no button is operated for approx. 5 seconds while a bar graph is displayed, the screen will return to the previous page. Returning to the previous page • Pressing the "MENU" button returns the screen to the previous menu page. • When the MENU is on the screen, pressing the "MENU" button clears all menus from the screen. Menu items shown in transparent characters • Some menu items may not be valid for certain signal formats applied to the projector. The menu items that cannot be adjusted or used are shown in transparent characters, and they cannot be selected even by pressing the ENTER button. Menu items setting • The bottom prompt line differs on each menu depending on the selected menu option: • A prompt " ADJ" appears when changing the setting. • A prompt " ENTER" appears for a separate bar graph. Resetting to the factory default STD (standard) button is used to reset all of the projector adjustment values to the default levels which were set at the time of shipment from the factory. PICTURE MODE BRIGHT CONTRAST COLOR TEMP. WHITE GAIN SHARPNESS NR AI SYSTEM SELECT PICTURE ADJ GRAPHIC 32 32 DEFAULT 10 06 OFF ON RGB RETRN • If the parameter value on a bar graph is reset to the factory default, the bar turns to white. Note • The upper and lower triangular markings on a bar graph indicate the default setting for the parameter. If no such triangular markings are shown on the bar graph, the parameter cannot be reset to the factory default. Indicates the current parameter value. Indicates the factory default.
-
 1
1 -
2
-
3
-
4
-
5
-
6
-
7
-
8
-
9
-
10
-
11
-
12
-
13
-
14
-
15
-
16
-
17
-
18
-
19
-
20
-
21
-
22
-
 23
23 -
 24
24 -
 25
25 -
 26
26 -
 27
27 -
 28
28 -
 29
29 -
 30
30 -
 31
31 -
 32
32 -
 33
33 -
34
-
35
-
36
-
37
-
38
-
39
-
40
-
41
-
42
-
43
-
44
-
45
-
46
-
47
-
48
-
49
-
50
-
51
-
52
-
53
-
54
-
55
-
56
-
57
-
58
-
59
-
60
-
61
-
62
-
63
-
64
-
65
-
66
-
67
-
68
 |
 |
