Panasonic SC-BTT195 SCBTT190 User Guide - Page 15
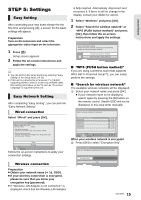
STEP 5: Settings, Easy Setting, Easy Network Setting - home theater system
 |
View all Panasonic SC-BTT195 manuals
Add to My Manuals
Save this manual to your list of manuals |
Page 15 highlights
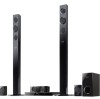
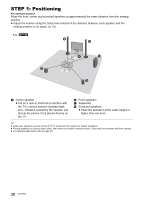
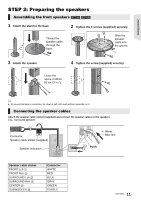
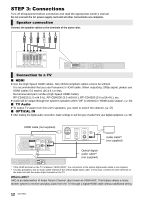
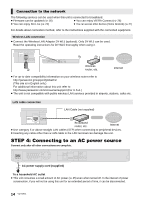
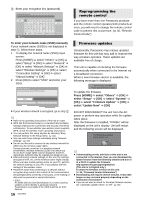
STEP 5: Settings Easy Setting After connecting your new home theater for the first time and pressing [Í], a screen for the basic settings will appear. Preparation Turn on the television and select the appropriate video input on the television. 1 Press [Í]. Setup screen appears. 2 Follow the on-screen instructions and apply the settings. ≥ You can perform this setup anytime by selecting "Easy Setting" in the Setup menu. (> 35) ≥ If this unit is connected to a Panasonic TV (VIERA) supporting HDAVI Control 2 or later via an HDMI cable, then setting information on the TV such as "On-screen Language" is acquired by this unit. Easy Network Setting After completing "Easy Setting", you can perform "Easy Network Setting". Wired connection Select "Wired" and press [OK]. Easy Network Setting Select a connection mode. Current setting : Wired LAN cable connection: Connect a LAN cable to the unit and select "Wired." Wireless LAN connection: Connect the Wireless LAN Adaptor (DY-WL5) to the USB port and select "Wireless." Wired Wireless OK RETURN Follow the on-screen instructions to apply your connection settings. Wireless connection Preparation ≥ Obtain your network name (> 16, SSID). ≥ If your wireless connection is encrypted, please be sure that you know your encryption key (password). ≥ If "Wireless LAN Adaptor is not connected." is displayed, check that the Wireless LAN Adaptor is fully inserted. Alternatively, disconnect and reconnect it. If there is still no change in the display, consult your dealer for advice. 1 Select "Wireless" and press [OK]. 2 Select "Search for wireless network" or "WPS (PUSH button method)" and press [OK], then follow the on-screen instructions and apply the settings. Wireless Settings Select a connection method. Please refer to the operating instructions of your wireless access point about connection methods. Search for wireless network WPS (PUSH button method) ∫ "WPS (PUSH button method)" If you are using a wireless router that supports WPS (Wi-Fi Protected SetupTM), you can easily perform the settings. ∫ "Search for wireless network" The available wireless networks will be displayed. 1 Select your network name and press [OK]. ≥ If your network name is not displayed, search again by pressing the [R] button on the remote control. Stealth SSID will not be displayed, in this case enter manually. Wireless Settings Select a wireless network for connection. Network name (SSID) XXXXXXXXXX XXXXXXXXXX XXXXXXXXXX XXXXXXXXXX XXXXXXXXXX XXXXXXXXXX XXXXXXXXXX Reception OPTION OK R Search again RETURN GBY When your wireless network is encrypted 2 Press [OK] to select "Encryption Key". Wireless Settings Enter the encryption key (password) of the wireless network. Encryption Key Set 15 VQT3X51 Getting started
-
 1
1 -
2
-
3
-
4
-
5
-
6
-
7
-
8
-
9
-
 10
10 -
 11
11 -
 12
12 -
 13
13 -
 14
14 -
 15
15 -
 16
16 -
 17
17 -
 18
18 -
 19
19 -
 20
20 -
21
-
22
-
23
-
24
-
25
-
26
-
27
-
28
-
29
-
30
-
31
-
32
-
33
-
34
-
35
-
36
-
37
-
38
-
39
-
40
-
41
-
42
-
43
-
44
-
45
-
46
-
47
-
48
-
49
-
50
-
51
-
52
 |
 |