Panasonic TH-103PB1U Operating Instructions - Page 34
Setting the Remote Control
 |
View all Panasonic TH-103PB1U manuals
Add to My Manuals
Save this manual to your list of manuals |
Page 34 highlights
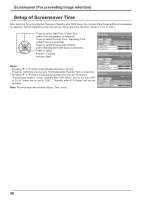
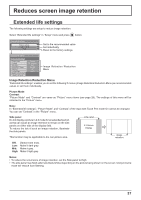
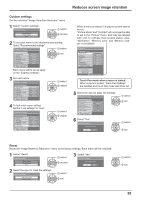
Touch-Pen Settings Set Touch Pen mode. Select "Touch-Pen Settings" in "Setup" menu and press button. Touch-Pen Settings Touch-Pen Mode Touch Only SLOT INPUT HDMI DVI PC NETWORK Off When a Terminal Board with dual input terminals is installed, "SLOT INPUT" is Off displayed as "SLOT INPUT A" and "SLOT INPUT B". Off Off Off Touch-Pen Mode Select an appropriate setting for the function of the electronic pen used. Touch Only: Contact-type Touch Pen Touch & Remote: Contact-type Touch Pen and remote pointer SLOT INPUT - NETWORK Set "On" or "Off" for each input terminal. If you switch to the input terminal that is set to "On", the mode becomes Touch Pen mode. "Touch-Pen: On" is displayed in Touch Pen mode. Touch-Pen On Notes: • When the following signal input, "Touch-Pen Settings" are disabled: 50i/50p/25p/24sF/24p signals and PC format signals with 50 Hz vertical frequency. • The electronic pen cannot be used when VIDEO or COMPONENT input is selected. • The electronic pen cannot be used during Digital Zoom. (see page 21) • When using the electronic pen, adjust "Pos./Size" so that the screen of the computer can be correctly displayed. (see page 23) Setting the Remote Control You can also turn Touch Pen mode On/Off with the FUNCTION buttons on the remote control. (see page 42) In Touch Pen mode, the menus and functions are restricted as follows. Pos./Size menu Picture menu Setup menu Signal Extended life settings MULTI DISPLAY Setup Portrait Setup Options menu ASPECT Controls 1:1 Pixel Mode: On Over scan: Off Picture Mode: Fixed to "Normal" (see page 26) FRAME CREATION: Off Picture Mode: Fixed to "Normal" (see page 37) MULTI DISPLAY Setup: Off Portrait Setup: Off Display size: Unavailable Rotate: Unavailable 16:9 34
-
 1
1 -
2
-
3
-
4
-
5
-
6
-
7
-
8
-
9
-
10
-
11
-
12
-
13
-
14
-
15
-
16
-
17
-
18
-
19
-
20
-
21
-
22
-
23
-
24
-
25
-
26
-
27
-
28
-
 29
29 -
 30
30 -
 31
31 -
 32
32 -
 33
33 -
 34
34 -
 35
35 -
 36
36 -
 37
37 -
 38
38 -
 39
39 -
40
-
41
-
42
-
43
-
44
-
45
-
46
-
47
-
48
-
49
-
50
-
51
-
52
-
53
-
54
-
55
-
56
-
57
-
58
-
59
-
60
-
61
-
62
-
63
-
64
-
65
 |
 |
