Panasonic TH-103PB1U Operating Instructions - Page 44
Setup for MULTI DISPLAY
 |
View all Panasonic TH-103PB1U manuals
Add to My Manuals
Save this manual to your list of manuals |
Page 44 highlights
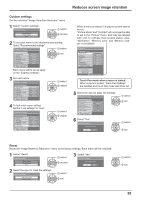
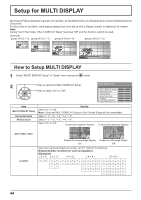
Setup for MULTI DISPLAY By lining up Plasma Displays in groups, for example, as illustrated below, an enlarged picture may be displayed across all screens. For this mode of operation, each plasma display has to be set up with a Display number to determine its location. Note: During Touch Pen mode, "MULTI DISPLAY Setup" becomes "Off" and this function cannot be used. (Example) group of 4 (2 × 2) group of 9 (3 × 3) group of 16 (4 × 4) group of 25 (5 × 5) How to Setup MULTI DISPLAY 1 Select "MULTI DISPLAY Setup" in "Setup" menu and press button. 2 Press to select the MULTI DISPLAY Setup. MULTI DISPLAY Setup Press to select "On" or "Off". MULTI DISPLAY Setup Off Horizontal Scale × 2 Vertical Scale × 2 Seam hides video Off Location A1 Video Wall Uniformity Off Item MULTI DISPLAY Setup Horizontal Scale Vertical Scale Details Select "On" or "Off". Note: If you set MULTI DISPLAY Setup to On, Portrait Setup will be unavailable. Select "× 1", "× 2", "× 3", "× 4", "× 5". Select "× 1", "× 2", "× 3", "× 4", "× 5". Select "On" or "Off". To hide joints between displays. To show joints between displays. Seam hides video Location Suitable for moving image display. Suitable for still image display. On Off Select the required arrangement number. (A1-E5 : Refer to the following) Display Number locations for each arrangement. (Examples) ( 2 × 1) ( 2 × 3 ) ( 4 × 2 ) ( 4 × 4 ) ( 5 × 5 ) A1 A2 A3 A4 A5 B1 B2 B3 B4 B5 C1 C2 C3 C4 C5 D1 D2 D3 D4 D5 E1 E2 E3 E4 E5 44
-
 1
1 -
2
-
3
-
4
-
5
-
6
-
7
-
8
-
9
-
10
-
11
-
12
-
13
-
14
-
15
-
16
-
17
-
18
-
19
-
20
-
21
-
22
-
23
-
24
-
25
-
26
-
27
-
28
-
29
-
30
-
31
-
32
-
33
-
34
-
35
-
36
-
37
-
38
-
 39
39 -
 40
40 -
 41
41 -
 42
42 -
 43
43 -
 44
44 -
 45
45 -
 46
46 -
 47
47 -
 48
48 -
 49
49 -
50
-
51
-
52
-
53
-
54
-
55
-
56
-
57
-
58
-
59
-
60
-
61
-
62
-
63
-
64
-
65
 |
 |
