Panasonic V4525S PVV4525S User Guide - Page 21
Copying Tapes (Dubbing
 |
UPC - 037988971381
View all Panasonic V4525S manuals
Add to My Manuals
Save this manual to your list of manuals |
Page 21 highlights
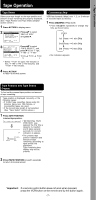
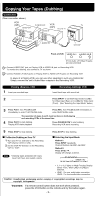
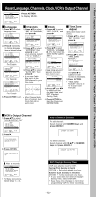
Copying Your Tapes (Dubbing) Connection (Rear connection shown.) VCR (HiFi) VIDEO OUT R L AUDIO OUT IN FROM ANT. VCR (HiFi) OUT TO TV VIDEO IN R L R L AUDIO IN TV VHF/UHF Front of VCR VIDEO IN 2 L-AUDIO IN2-R (Front Audio L/R Video IN jacks are also provided) 1 Connect VIDEO OUT jack on Playing VCR to VIDEO IN jack on Recording VCR. To monitor the dubbing, also connect a TV as shown. 2 Connect AUDIO L/R OUT jacks on Playing VCR to AUDIO L/R IN jacks on Recording VCR. In place of a Playing VCR, you can use other equipment, such as a Camcorder. Simply connect the unit's Audio/Video outputs to the Recording VCR. Playing (Source) VCR 1 Insert pre-recorded tape. Recording (Editing) VCR Insert blank tape with record tab. 2 Press INPUT* to set VCR Input mode to LINE1 for Video Input (Rear) or to LINE2 for Video Input (Front). (See "Selecting the Input Mode" below.) 3 Press PLAY, then PAUSE/SLOW immediately to enter PLAY/PAUSE mode. Press REC, then PAUSE/SLOW immediately to enter REC/PAUSE mode. The operation of steps 4 and 5 must be done on both playing and recording VCRs at the same time. 4 Press PLAY to start dubbing. Playing VCR starts playback. Press PAUSE/SLOW to start dubbing. Recording VCR starts recording. 5 Press STOP to stop dubbing. Press STOP to stop dubbing. To Monitor Dubbing on Your TV 1 Turn your TV on and tune to the Recording VCR channel (CH3 or CH4). 2 Set the VCR/ TV Selector on the Recording VCR to "VCR." Note • Dubbing tapes protected with Copy Guard will have poor quality results. Selecting the Input Mode Method 1: Press INPUT repeatedly. Channel Number ↔ LINE1 ↔ LINE2 Method 2: Press CH / . Display will change as below. 123 (CABLE) (TV) LINE2 LINE1 125 or 69 • "L1" or "L2" lights on Multi-Function Display (about 4 sec.) when LINE1 or LINE2 is selected. • LINE1: For rear audio/video connection. LINE2: For front audio/video connection. Caution : Unauthorized exchanging and/or copying of copyrighted recordings may be copyright infringement. *Important: If a remote control button does not work when pressed, press the VCR button on the remote and try the button again. - 9 -
-
 1
1 -
2
-
3
-
4
-
5
-
6
-
7
-
8
-
9
-
10
-
11
-
12
-
13
-
14
-
15
-
 16
16 -
 17
17 -
 18
18 -
 19
19 -
 20
20 -
 21
21 -
 22
22 -
 23
23 -
 24
24
 |
 |
