Panasonic V4525S PVV4525S User Guide - Page 4
Connections / Initial Setup (Ready to Play - vcr
 |
UPC - 037988971381
View all Panasonic V4525S manuals
Add to My Manuals
Save this manual to your list of manuals |
Page 4 highlights
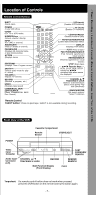
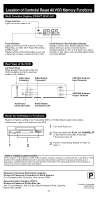
Connections / Initial Setup (Ready to Play) Make all cable or antenna connections before plugging into an AC outlet. Plugging the VCR Power Cord into an AC wall outlet starts auto channel and clock set. Connecting (Select a method) For ANT./Cable ➛ VCR ➛ TV 1 Connect cable from Antenna/Cable to VCR's IN 1 FROM ANT. jack. 2 Connect VCR's OUT TO TV 2 jack to TV's ANT. IN jack with included RF Cable. For DSS/Cable Box ➛ VCR ➛ TV 1 Connect your cable box's OUT jack to the VCR's IN FROM ANT. jack with an RF cable. 2 Connect VCR's OUT TO TV jack to TV's ANT. IN jack 1 2 with included RF Cable. Over tightening "Nut type" RF coaxial cables may damage jacks. Finger tighten only. Initial Setup (Ready to Play) 1 Turn TV on and tune to channel 3. 2 Plug VCR Power Cord into AC wall outlet. VCR comes on and auto channel and clock set starts. • If screen below does not appear... check all connections. Try tuning TV to channel 4. • To change VCR's output channel, see "VCR's Output Channel" (p. 12) in Advanced Operations book. Plug VCR Power plug into an AC wall outlet. 3 Settings are made automatically. When complete, this screen appears. If "AUTO CLOCK SET IS INCOMPLETE" appears, manually set clock (below). AUTO CLOCK SET IS I NCOMPLETE CH AUTO SET PROCEEDING PLEASE SET CLOCK BY PRESSING ACT I ON KEY CANCEL : STOP AUTO CLOCK SET PROCEEDING Manual Clock Set If Auto Clock Set was incomplete. 1 Press ACTION* on remote to display CLOCK menu. CANCEL : STOP If you use a cable box, turn it on and set it to the Public Broadcasting Station (PBS) channel in your time zone. If you use a DSS receiver, it must be turned off. Notes • Function buttons are void during Initial Setup. • To eject a tape during Auto Set, press EJECT on remote or STOP twice on VCR. Then make settings manually. (See Advanced Operations book, p. 12.) • If Auto Clock Set takes more than 30 minutes, press STOP and perform settings manually. (See Advanced Operations book, p. 12.) 2 Press to select the month and to set. In the same manner, select and set the date, year, time, and DST (Daylight Saving Time). 3 Press ACTION to start clock and exit. - 4 -
-
 1
1 -
 2
2 -
 3
3 -
 4
4 -
 5
5 -
 6
6 -
 7
7 -
 8
8 -
 9
9 -
 10
10 -
11
-
12
-
13
-
14
-
15
-
16
-
17
-
18
-
19
-
20
-
21
-
22
-
23
-
24
 |
 |
