Panasonic V4525S PVV4525S User Guide - Page 6
Timer Recording - review
 |
UPC - 037988971381
View all Panasonic V4525S manuals
Add to My Manuals
Save this manual to your list of manuals |
Page 6 highlights
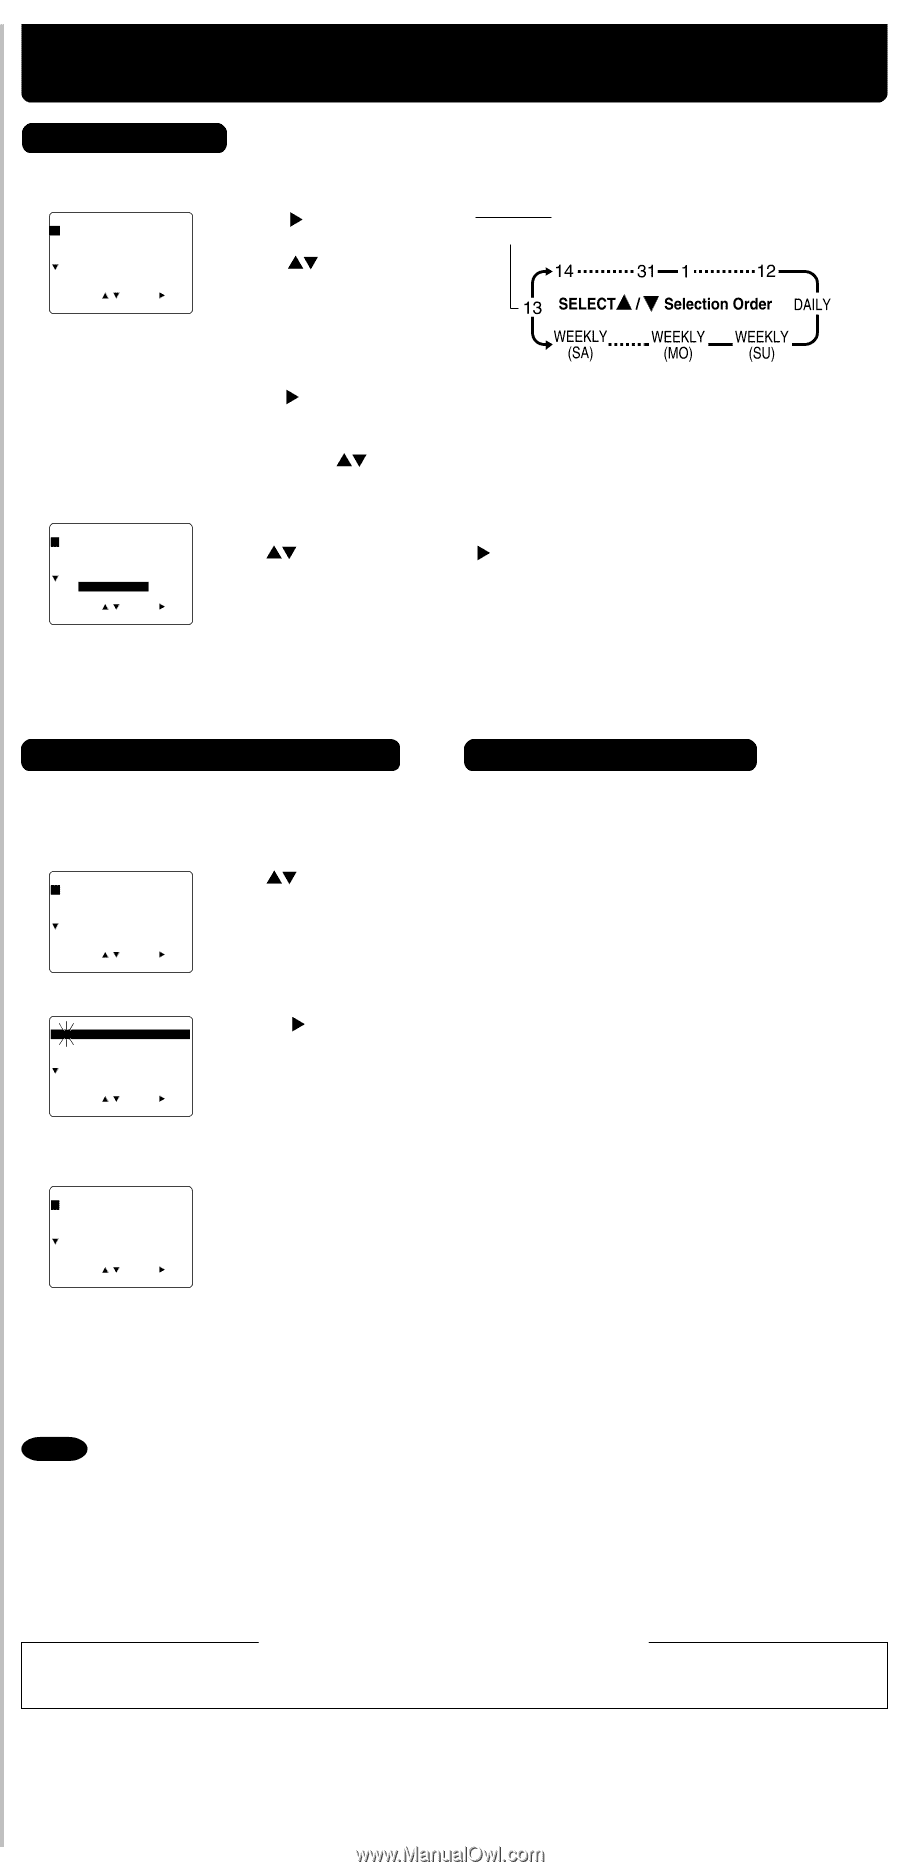
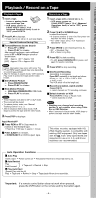
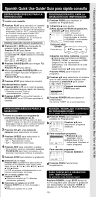
Timer Recording Timer Recording 1 Press PROG* to display program screen. 2 P DT START STOP CH SPD 1 2 3 4 SELECT : SET : END : PROG 1) Press . 2) Set record DATE, Example Today press to select: 1~31= one time, or DAILY= Monday~Friday, or WEEKLY= same time each week (see right). 3) Set remaining items, press to set START/ STOP times, CH (channel) or LINE input (p. 9 of Advanced Operations book), and tape speed (p. 3). Then press to select. Press PROG to end programming. 3 P DT START STOP CH SPD 1 13 2:00p 3:20p 02 SLP 2 3 4 SET COMPLETED CANCEL : ADD/DLT SELECT : SET : END : PROG To Enter More Programs Press to select and press to set an unused program. Then repeat step 2. Or, press PROG to exit. 4 Press POWER off to set the timer recording. ("TIMER" lights on Multi Function Display.) Review, Replace, or Clear Program (Recording is not in progress) a Press PROG to display program screen. b P DT START STOP CH SPD 1 13 2:00p 3:20p 02 SLP 2 14 7:00p 7:30p 10 SP 3 4 Press to select desired program. CANCEL : ADD/DLT SELECT : SET : END : PROG c To Replace program... P DT START STOP CH SPD 1 13 2:00p 3:20p 02 SLP 2 14 7:00p 7:30p 10 SP 3 4 SELECT : SET : EXIT : PROG 1) Press to display. 2) Repeat Step 2 (above) to set new programs. or To Clear program... P DT START STOP CH SPD 1 2 14 7:00p 7:30p 10 SP 3 4 Press ADD/DLT. SELECT : SET : END : PROG d Press PROG to end the programming. Cancel a Timer Recording (Recording is in progress) Press POWER and then STOP within 10 seconds to cancel the Timer Recording. (The TIMER indicator goes out on Multi Function Display.) Notes • If you are using a Cable Box, VCR Timer Programming Channel (Step 2 above) must be set to the Cable Box output channel and your Cable Box must be manually set to the desired channel. The Cable Box must be left on. • If a power interruption occurs while programming the timer, the timer program(s) may be canceled. If "TIMER PROGRAMS WERE LOST DUE TO POWER INTERRUPTION" appears on-screen, please re-enter the timer programs. Important notes when using DSS receiver • When recording programs via DSS receiver, DSS receiver must be left on. • When recording programs via an antenna or cable, DSS receiver must be turned off. - 6 -
-
 1
1 -
 2
2 -
 3
3 -
 4
4 -
 5
5 -
 6
6 -
 7
7 -
 8
8 -
 9
9 -
 10
10 -
 11
11 -
 12
12 -
13
-
14
-
15
-
16
-
17
-
18
-
19
-
20
-
21
-
22
-
23
-
24
 |
 |