Panasonic VDRD220 Dvd Camcorder - Page 49
Recording yourself, Recording with the video, light, Press the MENU button, then select, ADVANCED]
 |
View all Panasonic VDRD220 manuals
Add to My Manuals
Save this manual to your list of manuals |
Page 49 highlights
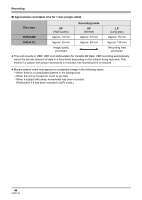
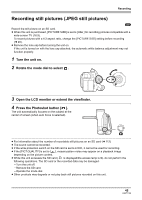
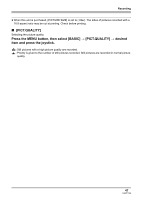
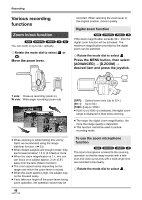
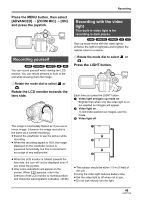
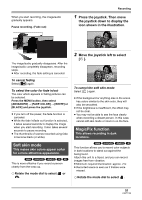
Recording Press the MENU button, then select [ADVANCED] # [ZOOM MIC] # [ON] and press the joystick. MENU Recording yourself (RAM) (-RW‹VR›) (-RW‹V›) (-R) (SD) You can record yourself while viewing the LCD monitor. You can record persons in front of the unit while showing them the image. ¬ Rotate the mode dial to select or . Rotate the LCD monitor towards the lens side. Recording with the video light This built-in video light is for recording in dark places. (RAM) (-RW‹VR›) (-RW‹V›) (-R) (SD) Gain up mode works with the video light to enhance the light's brightness and brighten the natural colors in a scene. ¬ Rotate the mode dial to select or . Press the LIGHT button. LIGHT Each time you press the LIGHT button: 1 Video light and gain up mode on: Brighter than when only the video light is on, but washed out images will appear. 2 Video light on: To eliminate washed out images, use this mode. 3 Video light off The image is horizontally flipped as if you see a mirror image. (However the image recorded is the same as a normal recording.) ≥ Extend the viewfinder to see the picture while recording. ≥ When the recording aspect is 16:9, the image displayed on the viewfinder screen is squeezed horizontally, but this is normal and not a sign of any malfunction. ≥ When the LCD monitor is rotated towards the lens side, the icon will not be displayed even if you press the joystick. ≥ Only some indications will appear on the screen. When [°] appears, return the direction of the LCD monitor to normal position and check the warning/alarm indication. (l 96) 1 r 2 3 ≥ The subject should be within 1.5 m (5 feet) of the unit. ≥ Using the video light reduces battery time. ≥ Set the video light to off when not in use. ≥ Do not look directly into the light. 49 LSQT1146
-
 1
1 -
2
-
3
-
4
-
5
-
6
-
7
-
8
-
9
-
10
-
11
-
12
-
13
-
14
-
15
-
16
-
17
-
18
-
19
-
20
-
21
-
22
-
23
-
24
-
25
-
26
-
27
-
28
-
29
-
30
-
31
-
32
-
33
-
34
-
35
-
36
-
37
-
38
-
39
-
40
-
41
-
42
-
43
-
 44
44 -
 45
45 -
 46
46 -
 47
47 -
 48
48 -
 49
49 -
 50
50 -
 51
51 -
 52
52 -
 53
53 -
 54
54 -
55
-
56
-
57
-
58
-
59
-
60
-
61
-
62
-
63
-
64
-
65
-
66
-
67
-
68
-
69
-
70
-
71
-
72
-
73
-
74
-
75
-
76
-
77
-
78
-
79
-
80
-
81
-
82
-
83
-
84
-
85
-
86
-
87
-
88
-
89
-
90
-
91
-
92
-
93
-
94
-
95
-
96
-
97
-
98
-
99
-
100
-
101
-
102
-
103
-
104
-
105
-
106
-
107
-
108
-
109
-
110
-
111
-
112
-
113
-
114
-
115
-
116
-
117
-
118
-
119
-
120
-
121
-
122
-
123
-
124
 |
 |
