Panasonic VDRD220 Dvd Camcorder - Page 80
WITH A VCR, Recording dubbing images, onto other video devices
 |
View all Panasonic VDRD220 manuals
Add to My Manuals
Save this manual to your list of manuals |
Page 80 highlights
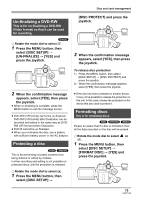
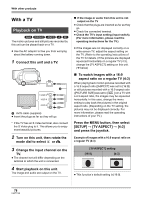
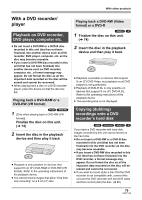
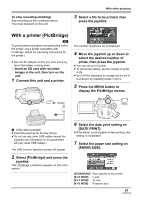
With other products 1 [Only when you record (dub) a DVD-RW or a DVD-R] Finalize the disc on the unit. (l 74) 2 Insert the disc in the DVD recorder, then copy (dub) the contents onto the hard disk. You can record (dub) images played back on this unit onto other video devices. You can create a playlist by gathering the scenes you want to record (dub), then record (dub) the scenes in this playlist only to other devices. (l 66) ≥ Use the AC adaptor to free you from worrying about the battery running down. 1 Connect this unit and a video device. ≥ For details on how to copy (dub) the images onto the hard disk, refer to the operating instructions of the DVD recorder. ≥ If your DVD recorder has an SD card slot, you can write the still picture files recorded on an SD card with this unit to a disc or the hard disk. ≥ You cannot record images that allow "One time only recording" on a 8 cm (3z) disc. ≥ If you copy (dub) images recorded on a DVDRW (Video format) or a DVD-R disc, the title name of the images after copying (dubbing) becomes the date they were dubbed. If you record (dub) images directly from the disc or with the AV/S cable and then play them back on a wide-screen TV, they may be squeezed horizontally. In this case, refer to the operating instructions of the device you are recording (dubbing) to or read the operating instructions of the wide-screen TV and set the aspect setting to 16:9 (Full). With a VCR Recording (dubbing) images onto other video devices (RAM) (-RW‹VR›) (-RW‹V›) (-R) A * S VIDEO IN VIDEO IN AUDIO IN A AV/S cable (supplied) ≥ Insert the plugs as far as they will go. * If the video device has an S Video terminal, also connect the S Video plug into it. This allows you to enjoy more beautiful pictures. 2 Turn on this unit, then rotate the mode dial to select . 3 Change the input channel on the video device and TV. ≥ The channel set will differ depending on the terminal to which the unit is connected. 4 Start playback on this unit. Then start recording on the connected device. ≥ See the operating instructions of the video device for details. 80 LSQT1146
-
 1
1 -
2
-
3
-
4
-
5
-
6
-
7
-
8
-
9
-
10
-
11
-
12
-
13
-
14
-
15
-
16
-
17
-
18
-
19
-
20
-
21
-
22
-
23
-
24
-
25
-
26
-
27
-
28
-
29
-
30
-
31
-
32
-
33
-
34
-
35
-
36
-
37
-
38
-
39
-
40
-
41
-
42
-
43
-
44
-
45
-
46
-
47
-
48
-
49
-
50
-
51
-
52
-
53
-
54
-
55
-
56
-
57
-
58
-
59
-
60
-
61
-
62
-
63
-
64
-
65
-
66
-
67
-
68
-
69
-
70
-
71
-
72
-
73
-
74
-
 75
75 -
 76
76 -
 77
77 -
 78
78 -
 79
79 -
 80
80 -
 81
81 -
 82
82 -
 83
83 -
 84
84 -
 85
85 -
86
-
87
-
88
-
89
-
90
-
91
-
92
-
93
-
94
-
95
-
96
-
97
-
98
-
99
-
100
-
101
-
102
-
103
-
104
-
105
-
106
-
107
-
108
-
109
-
110
-
111
-
112
-
113
-
114
-
115
-
116
-
117
-
118
-
119
-
120
-
121
-
122
-
123
-
124
 |
 |
