Panasonic WV-NW484S Network Camera - Page 33
Heater Unit, How to Install the Heater Unit - with heater
 |
UPC - 791871505403
View all Panasonic WV-NW484S manuals
Add to My Manuals
Save this manual to your list of manuals |
Page 33 highlights
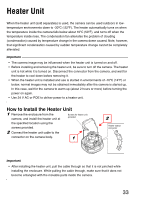
Heater Unit When the heater unit (sold separately) is used, the camera can be used outdoors in lowtemperature environments down to -30ºC (-22ºF). The heater automatically turns on when the temperature inside the camera falls below about 10ºC (50ºF), and turns off when the temperature inside rises. The condensation fan alleviates the problem of clouding (condensation) caused by temperature change in the camera dome caused. Note, however, that significant condensation caused by sudden temperature change cannot be completely alleviated. Important • The camera image may be influenced when the heater unit is turned on and off. • Before installing and removing the heater unit, be sure to turn off the camera. The heater unit is hot while it is turned on. Disconnect the connector from the camera, and wait for the heater to cool down before removing it. • When the heater unit is installed and use is started in environments of -10ºC (14ºF) or below, normal images may not be obtained immediately after the camera is started up. In this case, wait for the camera to warm up (about 2 hours or more) before turning the power on again. • Use 24 V AC or POE to deliver power to a heater unit. How to Install the Heater Unit 1 Remove the enclosure from the camera, and install the heater unit at Screws for heater unit provided the specified location using the screws provided. 2 Connect the heater unit cable to the connector on the camera body. 1 2 Heater output connector Important • After installing the heater unit, pull the cable through so that it is not pinched while installing the enclosure. While pulling the cable through, make sure that it does not become entangled with the movable parts inside the camera. 33
-
 1
1 -
2
-
3
-
4
-
5
-
6
-
7
-
8
-
9
-
10
-
11
-
12
-
13
-
14
-
15
-
16
-
17
-
18
-
19
-
20
-
21
-
22
-
23
-
24
-
25
-
26
-
27
-
 28
28 -
 29
29 -
 30
30 -
 31
31 -
 32
32 -
 33
33 -
 34
34 -
 35
35 -
 36
36 -
 37
37 -
 38
38 -
39
-
40
-
41
-
42
-
43
-
44
-
45
-
46
-
47
-
48
-
49
-
50
 |
 |
