Panasonic WV-NW484S Network Camera - Page 38
Monitor Images on a PC continued, Setup Manual
 |
UPC - 791871505403
View all Panasonic WV-NW484S manuals
Add to My Manuals
Save this manual to your list of manuals |
Page 38 highlights
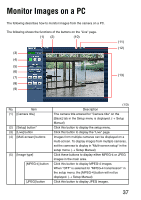
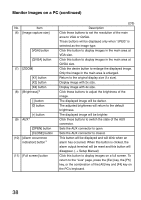
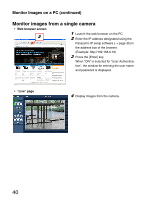
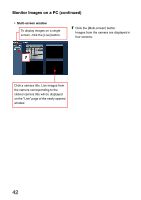
Monitor Images on a PC (continued) No. Item (6) [Image capture size] [VGA] button [QVGA] button (7) [ZOOM] [X1] button [X2] button [X4] button (8) [Brightness]*2 [-] button [0] button [+] button (9) AUX*2 [OPEN] button [CLOSE] button (10) [Alarm occurrence indication] button*2 (11) [Full screen] button (2/3) Description Click these buttons to set the resolution of the main area to VGA or QVGA. These buttons will be displayed only when "JPEG" is selected as the image type. Click this button to display images in the main area at VGA size. Click this button to display images in the main area at QVGA size. Click the desire button to enlarge the displayed image. Only the image in the main area is enlarged. Return to the original display size (1x size). Display image with 2x size. Display image with 4x size. Click these buttons to adjust the brightness of the image. The displayed image will be darker. The adjusted brightness will return to the default brightness. The displayed image will be brighter. Click these buttons to switch the state of the AUX connector. Sets the AUX connector to open. Sets the AUX connector to closed. This button will be displayed and will blink when an alarm has occurred. When this button is clicked, the alarm output terminal will be reset and this button will disappear. (→ Setup Manual) Click this button to display images on a full screen. To return to the "Live" page, press the [Esc] key, the [F5] key, or the combination of the [Alt] key and [F4] key on the PC's keyboard. 38
-
 1
1 -
2
-
3
-
4
-
5
-
6
-
7
-
8
-
9
-
10
-
11
-
12
-
13
-
14
-
15
-
16
-
17
-
18
-
19
-
20
-
21
-
22
-
23
-
24
-
25
-
26
-
27
-
28
-
29
-
30
-
31
-
32
-
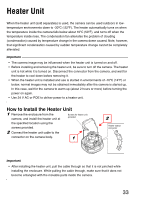 33
33 -
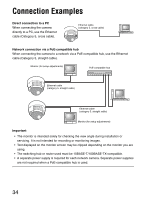 34
34 -
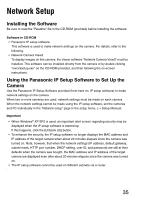 35
35 -
 36
36 -
 37
37 -
 38
38 -
 39
39 -
 40
40 -
 41
41 -
 42
42 -
 43
43 -
44
-
45
-
46
-
47
-
48
-
49
-
50
 |
 |
