Pentax 30 Operation Manual - Page 9
Contents of the Operating Manual, Getting Started, Common Operations
 |
UPC - 027075081147
View all Pentax 30 manuals
Add to My Manuals
Save this manual to your list of manuals |
Page 9 highlights
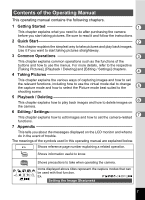
Contents of the Operating Manual This operating manual contains the following chapters. 1 Getting Started 1 This chapter explains what you need to do after purchasing the camera before you start taking pictures. Be sure to read it and follow the instructions. 2 Quick Start 2 This chapter explains the simplest way to take pictures and play back images. Use it if you want to start taking pictures straightaway. 3 Common Operations 3 This chapter explains common operations such as the functions of the buttons and how to use the menus. For more details, refer to the respective [Taking Pictures], [Playback / Deleting] and [Editing / Settings] chapters. 4 4 Taking Pictures This chapter explains the various ways of capturing images and how to set the relevant functions, including how to use the virtual mode dial to change the capture mode and how to select the Picture mode best suited to the 5 shooting scene. 5 Playback / Deleting This chapter explains how to play back images and how to delete images on 6 the camera. 6 Editing / Settings 7 This chapter explains how to edit images and how to set the camera-related functions. 7 Appendix This tells you about the messages displayed on the LCD monitor and what to do in the event of trouble. The meanings of the symbols used in this operating manual are explained below. Shows reference page number explaining a related operation. Shows information useful to know. Shows precautions to take when operating the camera. e,H,A,B,J, L,I,C,K,E, Icons displayed above titles represent the capture modes that can be used with that function. Ex. eHABJLICKEF C,F Setting the Image Sharpness 7
-
 1
1 -
2
-
3
-
 4
4 -
 5
5 -
 6
6 -
 7
7 -
 8
8 -
 9
9 -
 10
10 -
 11
11 -
 12
12 -
 13
13 -
 14
14 -
15
-
16
-
17
-
18
-
19
-
20
-
21
-
22
-
23
-
24
-
25
-
26
-
27
-
28
-
29
-
30
-
31
-
32
-
33
-
34
-
35
-
36
-
37
-
38
-
39
-
40
-
41
-
42
-
43
-
44
-
45
-
46
-
47
-
48
-
49
-
50
-
51
-
52
-
53
-
54
-
55
-
56
-
57
-
58
-
59
-
60
-
61
-
62
-
63
-
64
-
65
-
66
-
67
-
68
-
69
-
70
-
71
-
72
-
73
-
74
-
75
-
76
-
77
-
78
-
79
-
80
-
81
-
82
-
83
-
84
-
85
-
86
-
87
-
88
-
89
-
90
-
91
-
92
-
93
-
94
-
95
-
96
-
97
-
98
-
99
-
100
-
101
-
102
-
103
-
104
-
105
-
106
-
107
-
108
-
109
-
110
-
111
-
112
-
113
-
114
-
115
-
116
 |
 |