Pentax Optio Operation Manual - Page 128
Connecting the Camera to AV Equipment, External Input, Terminal
 |
UPC - 027075130647
View all Pentax Optio manuals
Add to My Manuals
Save this manual to your list of manuals |
Page 128 highlights
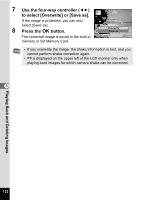
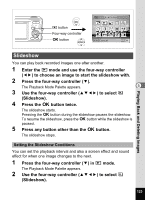
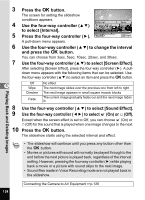
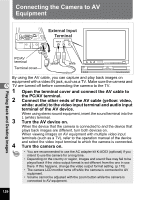
Connecting the Camera to AV Equipment External Input Terminal AUDIO VIDEO (L) (R) Playing Back and Deleting Images PC/AV terminal Terminal cover yellow white By using the AV cable, you can capture and play back images on equipment with a video IN jack, such as a TV. Make sure the camera and 5 TV are turned off before connecting the camera to the TV. 1 Open the terminal cover and connect the AV cable to the PC/AV terminal. 2 Connect the other ends of the AV cable (yellow: video, white: audio) to the video input terminal and audio input terminal of the AV device. When using stereo sound equipment, insert the sound terminal into the L (white) terminal. 3 Turn the AV device on. When the device that the camera is connected to and the device that plays back images are different, turn both devices on. When viewing images on AV equipment with multiple video input terminals (such as a TV), refer to the operation manual of the device and select the video input terminal to which the camera is connected. 4 Turn the camera on. • You are recommended to use the AC adapter kit K-AC63 (optional) if you intend to use the camera for a long time. • Depending on the country or region, images and sound files may fail to be played back if the video output format is set different from the one in use there. If this happens, change the video output format setting. (p.175) • The camera LCD monitor turns off while the camera is connected to AV equipment. • Volume cannot be adjusted with the zoom button while the camera is connected to AV equipment. 126
-
 1
1 -
2
-
3
-
4
-
5
-
6
-
7
-
8
-
9
-
10
-
11
-
12
-
13
-
14
-
15
-
16
-
17
-
18
-
19
-
20
-
21
-
22
-
23
-
24
-
25
-
26
-
27
-
28
-
29
-
30
-
31
-
32
-
33
-
34
-
35
-
36
-
37
-
38
-
39
-
40
-
41
-
42
-
43
-
44
-
45
-
46
-
47
-
48
-
49
-
50
-
51
-
52
-
53
-
54
-
55
-
56
-
57
-
58
-
59
-
60
-
61
-
62
-
63
-
64
-
65
-
66
-
67
-
68
-
69
-
70
-
71
-
72
-
73
-
74
-
75
-
76
-
77
-
78
-
79
-
80
-
81
-
82
-
83
-
84
-
85
-
86
-
87
-
88
-
89
-
90
-
91
-
92
-
93
-
94
-
95
-
96
-
97
-
98
-
99
-
100
-
101
-
102
-
103
-
104
-
105
-
106
-
107
-
108
-
109
-
110
-
111
-
112
-
113
-
114
-
115
-
116
-
117
-
118
-
119
-
120
-
121
-
122
-
 123
123 -
 124
124 -
 125
125 -
 126
126 -
 127
127 -
 128
128 -
 129
129 -
 130
130 -
 131
131 -
 132
132 -
 133
133 -
134
-
135
-
136
-
137
-
138
-
139
-
140
-
141
-
142
-
143
-
144
-
145
-
146
-
147
-
148
-
149
-
150
-
151
-
152
-
153
-
154
-
155
-
156
-
157
-
158
-
159
-
160
-
161
-
162
-
163
-
164
-
165
-
166
-
167
-
168
-
169
-
170
-
171
-
172
-
173
-
174
-
175
-
176
-
177
-
178
-
179
-
180
-
181
-
182
-
183
-
184
-
185
-
186
-
187
-
188
-
189
-
190
-
191
-
192
-
193
-
194
-
195
-
196
-
197
-
198
-
199
-
200
-
201
-
202
-
203
-
204
-
205
-
206
-
207
-
208
-
209
-
210
-
211
-
212
 |
 |
