Pentax PZ-70 PZ-70 Manual - Page 65
Pentax PZ-70 Manual
 |
View all Pentax PZ-70 manuals
Add to My Manuals
Save this manual to your list of manuals |
Page 65 highlights
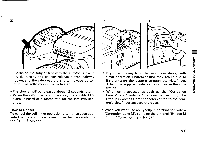
3 Tvbu 4Cr '..7/13.0o__ M 3. Adjust the desired aperture with the select dial. • The bar appears underneath the aperture in the viewfinder. • When using this mode, use a steady tripod to prevent camera shake and attach the optional "Cable Switch F" after detaching the Release Socket Cap FF. • Up to approx. 12 hours of time exposure are possible at room temperatures with a new lithium battery. How to Set With the lens aperture ring at a position other than "A" (auto) 1. Set the main switch to [ ON ] or [ PICT ]. 2. Turn the lens aperture ring to a position other than [ A ]. 3. While holding down the mode set button, turn the se- lect dial until [ M ] and [ bu ] appear on the LCD panel. • When the shutter release button is depressed halfway down, [ bu ] will be displayed in the viewfinder. • When the shutter release button is depressed with an F or FA lens is used, an approximate aperture will appear in the viewfinder and the LCD panel. With other lenses, no approximate aperture will appear. • When using this mode, use a steady tripod to prevent camera shake and attach the optional "Cable Switch F" after detaching the Release Socket Cap FF. • Up to approx. 12 hours of time exposure are possible at room temperatures with a new lithium battery. 61
-
 1
1 -
2
-
3
-
4
-
5
-
6
-
7
-
8
-
9
-
10
-
11
-
12
-
13
-
14
-
15
-
16
-
17
-
18
-
19
-
20
-
21
-
22
-
23
-
24
-
25
-
26
-
27
-
28
-
29
-
30
-
31
-
32
-
33
-
34
-
35
-
36
-
37
-
38
-
39
-
40
-
41
-
42
-
43
-
44
-
45
-
46
-
47
-
48
-
49
-
50
-
51
-
52
-
53
-
54
-
55
-
56
-
57
-
58
-
59
-
 60
60 -
 61
61 -
 62
62 -
 63
63 -
 64
64 -
 65
65 -
 66
66 -
 67
67 -
 68
68 -
 69
69 -
 70
70 -
71
-
72
-
73
-
74
-
75
-
76
-
77
-
78
-
79
-
80
-
81
-
82
-
83
-
84
-
85
-
86
-
87
-
88
-
89
-
90
-
91
-
92
-
93
-
94
-
95
-
96
-
97
-
98
 |
 |
