Pentax efina AF50 efina AF50 Manual - Page 10
replacement.
 |
View all Pentax efina AF50 manuals
Add to My Manuals
Save this manual to your list of manuals |
Page 10 highlights
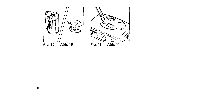
Attaching The Strap (Fig. 1) 1. Insert the small loop at the end of the Strap under the Strap Eyelet. 2. Insert the other end of the Strap through the loop to tie the Strap onto the Strap Eyelet. Inserting The Battery 1. Push the Battery Chamber Cover Latch in the direction of the arrow to open the cover. (Fig. 2) 2. Insert a 3V fresh Lithium Battery (Type CR2) into the battery chamber with (+) side toward cover. (Fig. 3) 3. Close the cover by pushing it back till it locks firmly in place with a click. • Only Type CR2 Battery (or equivalent) recommended for replacement. 9 • With the battery inserted correctly, the Battery Condition Symbol appears on the LCD Panel • Do not remove the battery from the camera until you are ready to replace it. Checking The Battery Condition 1. The ( WiW ) symbol is displayed on the LCD Panel when battery power is sufficient. 2. When the battery is nearly exhausted, the ( C J ) symbol will be displayed on the LCD Panel. Replace with a new battery as soon as possible. (Use of flash at this time is not recommended.) 3. When the battery is completely exhausted, the (= ) symbol will be blinked on the LCD Panel. The camera will inhibit all operation (Shutter release, film Advance and rewind, Self-timer„
-
 1
1 -
2
-
3
-
4
-
 5
5 -
 6
6 -
 7
7 -
 8
8 -
 9
9 -
 10
10 -
 11
11 -
 12
12 -
 13
13 -
 14
14 -
 15
15 -
16
-
17
-
18
-
19
-
20
-
21
-
22
-
23
-
24
-
25
-
26
-
27
-
28
-
29
-
30
-
31
-
32
-
33
-
34
-
35
-
36
-
37
-
38
-
39
-
40
-
41
-
42
-
43
-
44
-
45
-
46
-
47
-
48
-
49
-
50
-
51
-
52
-
53
-
54
-
55
-
56
-
57
-
58
-
59
-
60
-
61
-
62
-
63
-
64
-
65
-
66
-
67
-
68
-
69
-
70
-
71
-
72
-
73
-
74
-
75
-
76
-
77
-
78
-
79
-
80
-
81
-
82
-
83
-
84
-
85
-
86
-
87
-
88
-
89
-
90
-
91
-
92
-
93
-
94
-
95
-
96
-
97
-
98
-
99
-
100
-
101
-
102
-
103
-
104
-
105
-
106
-
107
-
108
-
109
-
110
-
111
-
112
-
113
-
114
-
115
-
116
-
117
-
118
-
119
-
120
-
121
-
122
-
123
-
124
 |
 |
