Pfaff 138 Owner's Manual - Page 6
Icase Ieats Icon
 |
View all Pfaff 138 manuals
Add to My Manuals
Save this manual to your list of manuals |
Page 6 highlights
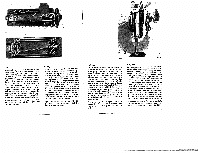
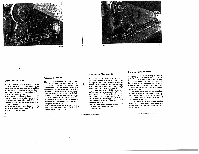
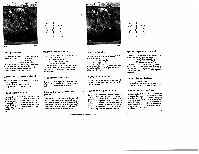
Threading and inserting the bobbin case Insert the bobbin into the bobbin case so that it turns in the direction of the arrow when the thread is pulled (Fig. 7). Draw the thread into slot 1 end pull it under the tension spring until it emerges at tip 2. SwItch off the machine. Turn the balance wheel to bring the take-up lever to its highest point. Lift the bobbin case latch and insert the bobbin case with the bobbin into the sewing hook. Close the latch and press against the bobbin case lightly until you hear it snap into place. :9 :, .1' /2 I Threading the needle Switch off the machine. Lead the thread through thread guide 1, then, as shown in Fig. 8, through guide 2, around wire 3, from the right between tensions discs 4, around guide disc 5, over thread check spring 6 and in sert in hook 7. Afterwards lead the thread from the right through the hole of thread lever 8, wires 9, 10 and II and thread the needle from front to back; pull about 6 or 7cm of thread through the needle eye. Enfilage et mise en place de Ia bofte a canette FO. 8 a Placer Ia canette gamin dens Ia boite canette de manière que le lii as déroule dans le sans indiqué par Ia flèche (fig. 7), enfilerle lii par Ia tents I • sous Ia tanguette 2 du ressort el engager Ia canette a fond. MaItre a machine hors circuit. Par rotation a du volant, placer Is levier releveur de I ii au point haut. Lever le loquet de Is bolts canette at placer cello-cl avec Ia cariette dana le crochet. Coucher le loquel at veiller a l'ernboilage perceptible de Ia a boite canelle. Il 161756 Enfilage du fil supérieur Mettre Ia machine hors circuit. Enfiter lo lit, venant de Ia bobine, parts broche 1, puis, salon fig. 8, par le guide-fil 2. sous létrie- 3, de Ia droite ontre lea disques de tension 4, autour du disque 5, cur Is reason contrôleur 6, sous le crochet 7. Ensuite, anther he releveur 8 de Ia droile, passer Ia III par es guide-fit 9, bet 11. Enfiler laiguille do lavant en laissant dépasser any, 7cm de III. Spulenkapsel einfädeln und einsetzen Spule so in die Spulenkapsel einsetzen, dalI eta sich bel Fadenabzug in Plellflchtung dreht (siehe Fig. 7) dabel den Faden in Schlitz 1 elnhflngen und unter die Federzunge 2 ziehen. Faden sotl Ca. 5 cr0 herausragen. Maschinie ausechallen. Am Handrad drehen bie Fadenhebel in höchster Stellung steht. Spulen kapsetklappe anheben und Kapsel mit Spule in den Greifenelnsetzen. KIappe umiegen und Ieicht nachdrlIcken bis die Kapsel httrbar einrastet. ColocaclOn y enhebrado de Ia cápsula de Ia canilla Coloque Is canitls en Ia cápsula de forma qua at tirar del hilo. Ia carlitla gire en el sentido de Ia flecha (V. fig. 7), y enganche al mierno tiempo el hito en Ia ranura I hasta que aparezca per detrás de Ia Iengueta etáatica 2. Deaconecle Ia maquina. Dire elvolanlehastaque a palanca tirahilos quede en su posiclôn superior. Levante Is bisagrita de Ia cépsula y coloque eats (unto con Ia canilla en el garflo. Suelte Ia bisagrita y presione ligeramente basis que Ia cépsula encaje perceptiblernente. Oberfaden einfädeln Macchine ausschatten. Den von der Gamrolle kommenden Faden durch den Fadenfithrungsstift I fédetn, denach wie in Fig. 8 gezeigt durch die Ftthrung 2, urn den Biigel 3, von rechts zwischen die Spannungsscheiben urn die FUhrungsscheibe 5, iiber die Fadenan zugsfeder 6 fUhreri und in den Haken 7 einhtin geri. Anschlie8end tien Faderi von rechts durch die Bobbing lm Fadenhebel 8, die Biigel 9, 10 und 11 ftthren und die Nadel von vome each hlnten sin fridein. Das Fadenende etwa 6-7cm durchziehen. Enhebrado del hilo superior Desconecle Ia mAquina. Pace el bib desde el carrels pot el guiahilos 1 y, como se mueslra en Ia fIg. 8, ports guia 2, alrede dor del muello 3, desde Ia derecha por afire los platitlos tenaores 4, alrededor del discos, por endma del muello recuperador 6y, enganchandolo en el gancho 7. páselo deeds Ia derecha pot el agujero dot tirahilos 8, pot las gulas 9, 10 y 11 y, deeds el frente, pot el 0(0 de Ia aguja. Baja un cabo de bib do unios 657cm. 11
-
 1
1 -
 2
2 -
 3
3 -
 4
4 -
 5
5 -
 6
6 -
 7
7 -
 8
8 -
 9
9 -
 10
10 -
 11
11 -
 12
12 -
13
-
14
-
15
-
16
-
17
-
18
-
19
-
20
-
21
 |
 |
