Pfaff creative 2134 Owner's Manual - Page 43
Function buttons for, embroidery
 |
View all Pfaff creative 2134 manuals
Add to My Manuals
Save this manual to your list of manuals |
Page 43 highlights
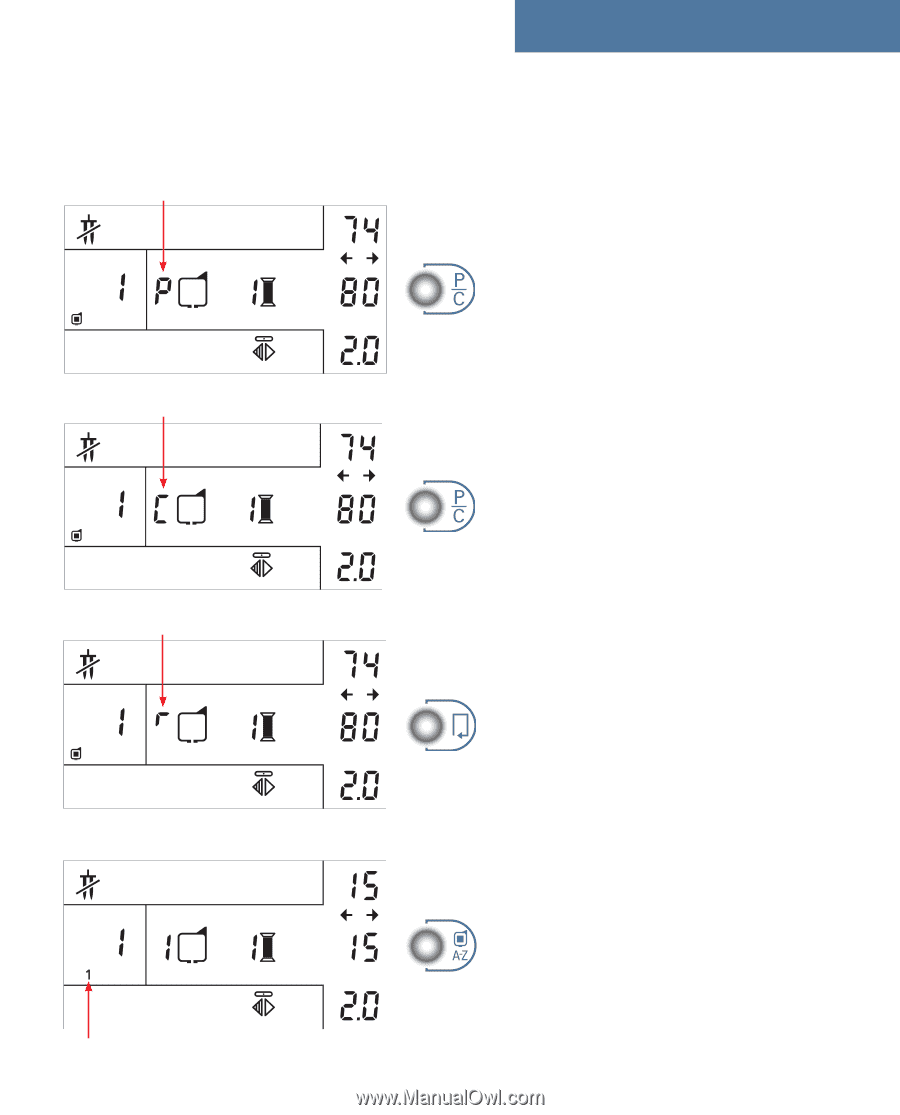
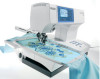
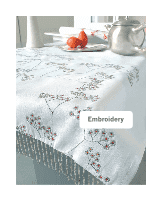
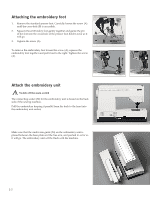
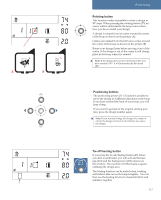
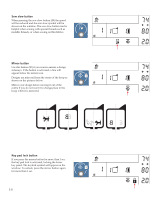
Embroidery Function buttons for embroidery This section contains the function buttons active when the machine is in embroidery mode (the embroidery unit is on). Park position The park/cut position button (65) is used for putting the embroidery unit in the correct position for storage or placing it in the embroidery case (optional accessory). The letter P will be shown on the window. Cut position If you press the park/cut position button two times quick the hoop will move forward to make it easier for you to cut jump stitches. This function can also be used when cutting away the fabric in an appliqué design, without having to slide off the hoop. The letter C will be shown on the window. Press the button one more time and the hoop will move back to the next stitch point in the embroidery. Orbiting button The orbiting function makes it possible for you to check the outlines of your design. For each touch of the orbiting button (66) the hoop will move to a corner starting with the upper left. An arrow will flash beside the hoop on the window showing you which corner the needle is in. Embroidery design/font select button The embroidery design/font select button (67) is used for switching between designs and fonts. If a card contains only fonts, a number for each font will be shown on the window. If a card contains only designs or both designs and fonts, the small hoop icon will be shown in the window when a design is selected. 3:5
-
 1
1 -
2
-
3
-
4
-
5
-
6
-
7
-
8
-
9
-
10
-
11
-
12
-
13
-
14
-
15
-
16
-
17
-
18
-
19
-
20
-
21
-
22
-
23
-
24
-
25
-
26
-
27
-
28
-
29
-
30
-
31
-
32
-
33
-
34
-
35
-
36
-
37
-
 38
38 -
 39
39 -
 40
40 -
 41
41 -
 42
42 -
 43
43 -
 44
44 -
 45
45 -
 46
46 -
 47
47 -
 48
48 -
49
-
50
-
51
-
52
-
53
-
54
-
55
-
56
-
57
-
58
-
59
-
60
-
61
-
62
-
63
-
64
-
65
-
66
-
67
-
68
-
69
-
70
-
71
-
72
-
73
-
74
-
75
-
76
-
77
-
78
-
79
-
80
-
81
-
82
-
83
-
84
-
85
-
86
-
87
-
88
-
89
-
90
-
91
-
92
-
93
-
94
-
95
-
96
-
97
-
98
 |
 |