Pfaff creative 2134 Owner's Manual - Page 70
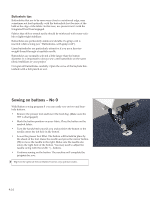
Sewing on buttons - No 0
 |
View all Pfaff creative 2134 manuals
Add to My Manuals
Save this manual to your list of manuals |
Page 70 highlights
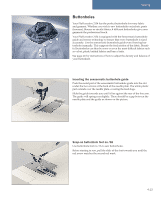
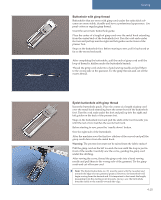
Buttonhole tips Buttonholes that are to be sewn very close to a reinforced edge, may sometimes not feed optimally with the buttonhole foot because of the bulk at the edge of the fabric. In this case, use presser foot 1 with the Integrated Dual Feed engaged. Fabrics that shift or stretch easily should be reinforced with water-soluble or lightweight stabilizer. Buttonholes are particularly stable and durable if a gimp cord is inserted while sewing (see " Buttonholes, with gimp cord"). Linen buttonholes are particularly attractive if you use a heavierweight thread through a topstitch needle. Buttonholes are normally selected a little larger than the button diameter. It is important to always sew a test buttonhole on the same fabric/stabilizer as your project. Cut open all buttonholes carefully. Open the curve of the keyhole buttonhole with a belt punch or awl. Sewing on buttons - No 0 With Button sewing program 0 you can easily sew on two and fourhole buttons. • Remove the presser foot and lower the feed dog. (Make sure the IDT is disengaged.) • Mark the button position on your fabric. Place the button on the marked fabric. • Turn the handwheel towards you and position the button so the needle enters the left hole in the button. • Lower the presser foot lifter. The button will be held in place by the shank of the foot. Raise the needle and press the mirror button (50) to move the needle to the right. Make sure the needle also enters the right hole of the button. You may need to adjust the needle swing with the width +/- buttons. • Continue sewing on the button. The machine will complete the program for you. Tip: Use the optional Sew-on Button Foot for easy optimal results. 4:16
-
 1
1 -
2
-
3
-
4
-
5
-
6
-
7
-
8
-
9
-
10
-
11
-
12
-
13
-
14
-
15
-
16
-
17
-
18
-
19
-
20
-
21
-
22
-
23
-
24
-
25
-
26
-
27
-
28
-
29
-
30
-
31
-
32
-
33
-
34
-
35
-
36
-
37
-
38
-
39
-
40
-
41
-
42
-
43
-
44
-
45
-
46
-
47
-
48
-
49
-
50
-
51
-
52
-
53
-
54
-
55
-
56
-
57
-
58
-
59
-
60
-
61
-
62
-
63
-
64
-
 65
65 -
 66
66 -
 67
67 -
 68
68 -
 69
69 -
 70
70 -
 71
71 -
 72
72 -
 73
73 -
 74
74 -
 75
75 -
76
-
77
-
78
-
79
-
80
-
81
-
82
-
83
-
84
-
85
-
86
-
87
-
88
-
89
-
90
-
91
-
92
-
93
-
94
-
95
-
96
-
97
-
98
 |
 |
