Pfaff creative 2134 Owner's Manual - Page 68
How to sew an, automatic buttonhole, How to sew a, buttonhole manually - test
 |
View all Pfaff creative 2134 manuals
Add to My Manuals
Save this manual to your list of manuals |
Page 68 highlights
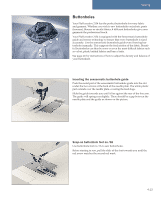
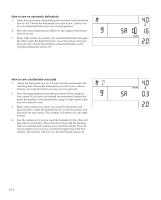
How to sew an automatic buttonhole 1. Insert the sensormatic buttonhole guide and attach the buttonhole foot no. 5A. Choose the buttonhole you wish to sew. Always test sew on scraps first before you sew on your garment. 2. Press the stitch length buttons (52) to set the length of the buttonhole slit in mm. 3. Mark, with a fabric pen, where you want the buttonhole and place the fabric under the buttonhole foot. Lower the presser foot and press the foot control. The machine will automatically sew the complete buttonhole and tie-off. How to sew a buttonhole manually 1. Attach the buttonhole foot no. 5A and insert the sensormatic but- tonhole guide. Choose the buttonhole you wish to sew. Always test sew on scraps first before you sew on your garment. 2. Press the single pattern/monochrome button (54) to change to man.-mode. If you have not inserted the sensormatic buttonhole guide the machine will automatically change to man.-mode when you have started to sew. 3. Mark, with a fabric pen, where you want the buttonhole and place the fabric under the buttonhole foot. Lower the presser foot and press the foot control. The machine will start to sew the right column. 4. Sew the column as far as you want the buttonhole to be. Stop and press the reverse button. Press the foot control, and the machine will sew a bartack and continue to sew the left column. Press the reverse button once you have reached the beginning of the first column. The machine will now sew the last bartack and tie-off. 4:14
-
 1
1 -
2
-
3
-
4
-
5
-
6
-
7
-
8
-
9
-
10
-
11
-
12
-
13
-
14
-
15
-
16
-
17
-
18
-
19
-
20
-
21
-
22
-
23
-
24
-
25
-
26
-
27
-
28
-
29
-
30
-
31
-
32
-
33
-
34
-
35
-
36
-
37
-
38
-
39
-
40
-
41
-
42
-
43
-
44
-
45
-
46
-
47
-
48
-
49
-
50
-
51
-
52
-
53
-
54
-
55
-
56
-
57
-
58
-
59
-
60
-
61
-
62
-
 63
63 -
 64
64 -
 65
65 -
 66
66 -
 67
67 -
 68
68 -
 69
69 -
 70
70 -
 71
71 -
 72
72 -
 73
73 -
74
-
75
-
76
-
77
-
78
-
79
-
80
-
81
-
82
-
83
-
84
-
85
-
86
-
87
-
88
-
89
-
90
-
91
-
92
-
93
-
94
-
95
-
96
-
97
-
98
 |
 |
