Pfaff powerquilter 16.0 Manual - Page 13
Setting Up the Table and Taking it, Down for Storage, Installing the Power Cord, Installing the Foot
 |
View all Pfaff powerquilter 16.0 manuals
Add to My Manuals
Save this manual to your list of manuals |
Page 13 highlights
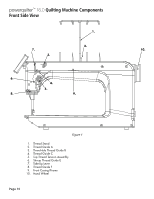
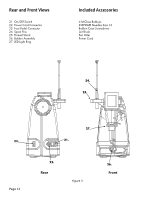
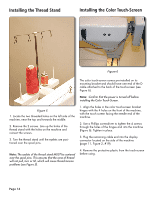
Setting Up the Table (and Taking it Down for Storage) The powerquilter™ 16.0 quilting machine table has been designed to accommodate the powerquilter™ 16.0 machine. It has folding legs that are height-adjustable and is heavy enough to provide stabilization for quilting at high speeds. Installing the Power Cord 1. Open the box and gently remove the table, taking care not to drop the table on the floor. The table weighs nearly 50 pounds, so it is recommended that you ask someone to help. 2. Remove the bracer. 3.Unfold the legs, pulling on the horizontal braces until the legs snap into place. Set the table upright. 4. Make the table taller by pinching the two heightadjustment tabs on each set of legs and lifting on table, while holding legs down with foot. Make the table shorter by pinching the same tabs and pushing down on the table. 5. To store the table, remove machine and return legs to their lowest position. 6. The legs are attached to the table top with brackets of two different sizes. One is longer than the other. Identify the long and the short leg brackets. 7. Fold in the short bracket leg first. Push on the horizontal braces to loosen the legs and push them back toward the table top. Figure 4 Check that the On/Off switch (page 12, Figure 3, #21) is turned off (the 0 setting). Plug the power cord into the power outlet on the back of the machine (Figure4). Do not plug the power cord into a power source at this time. Installing the Foot Pedal 1. Plug in the foot pedal cord end into the foot pedal connector (see page 12, Figure 3, #23). 2. Place the foot pedal under the table where operator can reach it from the front of the machine. 8. Repeat with the long bracket leg. Placing the Machine in the Table 1. We recommend having someone help lift and place the machine. 2. Lift the machine by putting one arm through the throat space. 3. Guide the machine from the back of the table into the slot. Machine is positioned correctly when the back of the machine is flush with the back of the table. Page 13
-
 1
1 -
2
-
3
-
4
-
5
-
6
-
7
-
 8
8 -
 9
9 -
 10
10 -
 11
11 -
 12
12 -
 13
13 -
 14
14 -
 15
15 -
 16
16 -
 17
17 -
 18
18 -
19
-
20
-
21
-
22
-
23
-
24
-
25
-
26
-
27
-
28
-
29
-
30
-
31
-
32
-
33
-
34
 |
 |
