Pfaff powerquilter 16.0 Manual - Page 19
Top Thread Tension Adjustment
 |
View all Pfaff powerquilter 16.0 manuals
Add to My Manuals
Save this manual to your list of manuals |
Page 19 highlights
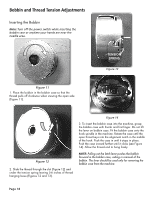
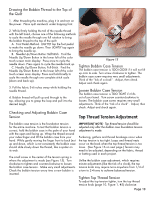
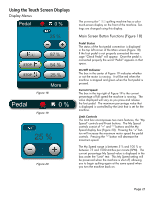
Drawing the Bobbin Thread to the Top of the Quilt 1. After threading the machine, plug it in and turn on the power. Place quilt sandwich under hopping foot. 2. While firmly holding the tail of the needle thread with the left hand, choose one of the following methods to cycle the needle through one full rotation to bring the bobbin thread to the top of the quilt. A. Foot Pedal Method. LIGHTLY tap the foot pedal to make the needle go down. Then LIGHTLY tap again to bring the needle up. B. Needle Up/Down Button Half-Stitch. Find the Needle Up/Down Button in the lower left of the color touch screen main display. Press once to cycle the needle down. Press again to cycle the needle back up. C. Needle Up/Down Button, Full-Stitch. Find the Needle Up/Down Button in the lower left of the color touch screen main display. Press and hold briefly to cycle the needle through one complete stitch cycle (down and back up). Figure 15 Tighten Bobbin Case Tension The bobbin case tension is TOO LOOSE if it will not lift up onto its side. Turn screw clockwise to tighten. The bobbin case screw requires very small adjustments. Think of the "tick of a clock" . Adjust, then check. Adjust and check again. 3. Pull the fabric 3-4 inches away while holding the needle thread. 4. Bobbin thread will pull up and through to the top, allowing you to grasp the loop and pull it to the desired length. Loosen Bobbin Case Tension The bobbin case tension is TOO TIGHT if it lifts out of your hand. Turn screw counter-clockwise to loosen. The bobbin case screw requires very small adjustments. Think of the "tick of a clock" . Adjust, then check. Adjust and check again. Checking and Adjusting Bobbin Case Tension Top Thread Tension Adjustment The bobbin case tension is the foundation tension for the entire machine. To test that bobbin tension is correct, hold the bobbin case in the palm of your hand with the open end facing up. Wrap the thread around your index finger and lift the bobbin case from your hand. While gently moving the finger front to back (not up and down, which is not consistent), the bobbin case should slide slowly down the thread, like a spider on its web. The small screw in the center of the tension spring is where the adjustment is made (see Figure 15). Turn clockwise to tighten and counter-clockwise to loosen the bobbin case tension. Make very small adjustments. Check the bobbin tension every time a new bobbin is inserted. IMPORTANT NOTE: Top thread tension should be adjusted only after the bobbin case foundation tension adjustment is made. Puckering, gathers and thread breakage occur when the top tension is too tight. Loops and thread nests occur on the back when the top thread tension is too loose. (See Figure 16 on next page.) Tension may need to be adjusted, depending on the fabric, thread or batting used in each project. Unlike the bobbin case adjustment, which requires minute adjustments (like the tick of a clock), the top tension knob may require turns anywhere from 1/4 of a turn to 2-4 turns to achieve balanced tension. Tighten Top Thread Tension To adjust the top tension tighter, turn the top thread tension knob (page 10, Figure 1, #5) clockwise. Page 19
-
 1
1 -
2
-
3
-
4
-
5
-
6
-
7
-
8
-
9
-
10
-
11
-
12
-
13
-
 14
14 -
 15
15 -
 16
16 -
 17
17 -
 18
18 -
 19
19 -
 20
20 -
 21
21 -
 22
22 -
 23
23 -
 24
24 -
25
-
26
-
27
-
28
-
29
-
30
-
31
-
32
-
33
-
34
 |
 |
