Pfaff powerquilter 16.0 Manual - Page 31
ONLY INSPIRA® bobbins
 |
View all Pfaff powerquilter 16.0 manuals
Add to My Manuals
Save this manual to your list of manuals |
Page 31 highlights
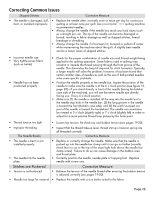
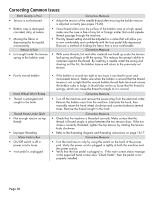
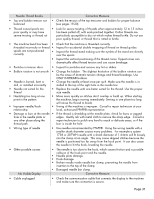
Needle Thread Breaks Corrective Measure • Top and bobbin tension not • Check the tension of the top tensioner and bobbin for proper balance balanced (see pages 19-20). • Thread cones/spools are poor quality or may have severe twisting or thread rot • Look for severe twisting of threads when approximately 12 to 15 inches has been pulled off, with ends pinched together. Cotton threads are particularly susceptible to dry rot which makes thread brittle. Do not use poor quality thread, or thread that is rotted or brittle. • The machine head has been • Check that the machine is threaded correctly. threaded incorrectly or thread • Inspect for accidental double wrapping of thread on thread guides. spools are not positioned correctly • Inspect the thread stand making sure the eyelets of the stand are directly over the spools. • Inspect the vertical positioning of the thread cones. Tipped cones can dramatically affect thread tension and can cause breakage. • Particles in tension discs • Inspect for particles and remove any lint or debris. • Bobbin rotation is not smooth • Change the bobbin. The slightest hesitation of the bobbin rotation can be the cause of dramatic tension change and thread breakage. Use ONLY Inspira® bobbins • Needle is burred, bent or • Change the needle at least once per quilt. Make sure the needle is in- dull, or installed incorrectly stalled to the top of the sight hole in the needle bar. • Needle not suited for the thread • Replace the needle with one better suited for the thread. Use the proper size needle. • Hesitating too long at one point in the pattern • Improper needle/hook relationship • Move more quickly so stitches don't overlap or build up. When starting the machine, begin moving immediately. Sewing in one place too long will cause the thread to break. • Timing of the machine is improper. Consult a repair technician at your local, authorized PFAFF® representative. • Damage or burr at the needle • If the thread is shredding at the needle plate, check for burrs or jagged hole in the needle plate or edges. Gently rub with metal cloth to remove the sharp edge. Consult a any other place along the repair technician to polish any hard to reach or delicate areas, or if the thread path burr is inside the hole. • Wrong type of needle • Use needles recommended by PFAFF®. Using the wrong needle with a smaller shank diameter causes many problems. For example a system 1738 or 287WH needle with a shank diameter of 1.64mm will fit loosely into the clamp at an angle. This may cause skipped stitches because the needle is positioned too far away from the hook point. It can also cause the needle to hit the hook, breaking the needle. • Other possible causes: No Visible Display • The needle is too close to the hook, which causes friction and a possible collision of the hook point and the needle. • Needle plate damage. • Hook damage. • Broken needle inside needle bar clamp, preventing the needle from insertion to the top of the clamp. • Damaged needle bar clamp. Corrective Measure • Cable unplugged • Check the communication cable that connects the display to the machine and make sure the connection is secure. Page 31
-
 1
1 -
2
-
3
-
4
-
5
-
6
-
7
-
8
-
9
-
10
-
11
-
12
-
13
-
14
-
15
-
16
-
17
-
18
-
19
-
20
-
21
-
22
-
23
-
24
-
25
-
 26
26 -
 27
27 -
 28
28 -
 29
29 -
 30
30 -
 31
31 -
 32
32 -
 33
33 -
 34
34
 |
 |
