Pfaff powerquilter 16.0 Manual - Page 14
Installing the Thread Stand, Installing the Color Touch-Screen
 |
View all Pfaff powerquilter 16.0 manuals
Add to My Manuals
Save this manual to your list of manuals |
Page 14 highlights
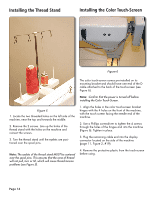
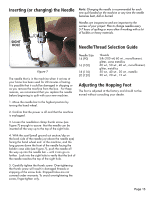
Installing the Thread Stand Installing the Color Touch-Screen Figure 6 The color touch-screen comes pre-installed on its mounting bracket and should have one end of the D cable attached to the back of the touch-screen (see Figure 6). Note: Confirm that the power is turned off before installing the Color Touch-Screen. Figure 5 1. Locate the two threaded holes on the left side of the machine, near the top and towards the middle. 2. Remove the 2 screws. Line up the holes of the thread stand with the holes on the machine and reinsert the screws. 3. Turn the thread stand until the eyelets are positioned over the spool pins. 1. Align the holes in the color touch-screen bracket hinges with the 4 holes on the front of the machine, with the touch screen facing the needle end of the machine. 2. Use a Phillips screwdriver to tighten the 4 screws through the holes of the hinges and into the machine (Figure 6). Tighten in place. 3. Plug the remaining cable end into the display connector located on the side of the machine (page 11, Figure 2, #19). Note: The eyelets of the thread stand MUST be centered over the spool pins. This ensures that the cone of thread will not pull, turn or tilt, which will cause thread tension problems (see Figure 5). 4. Remove the protective plastic from the touch-screen before using. Page 14
-
 1
1 -
2
-
3
-
4
-
5
-
6
-
7
-
8
-
 9
9 -
 10
10 -
 11
11 -
 12
12 -
 13
13 -
 14
14 -
 15
15 -
 16
16 -
 17
17 -
 18
18 -
 19
19 -
20
-
21
-
22
-
23
-
24
-
25
-
26
-
27
-
28
-
29
-
30
-
31
-
32
-
33
-
34
 |
 |
