Philips 32PFL4907/F7 User Manual - Page 38
IP con, guration, Manually enter your SSID - service manual
 |
View all Philips 32PFL4907/F7 manuals
Add to My Manuals
Save this manual to your list of manuals |
Page 38 highlights
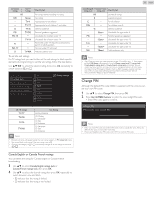
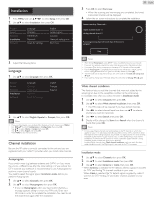
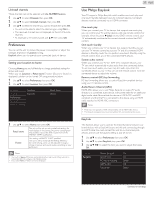
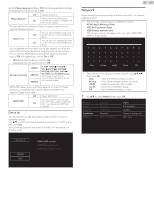
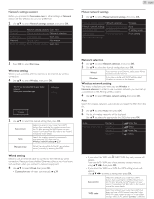
Manual If your wireless network with authentication setting (WEP, WPA-PSK or WPA2-PSK), WEP / WPA Key entry screen will appear. Enter the WEP / WPA key of the selected wireless network using then press OK. • Confirmation message will appear. Select OK to complete the settings. Note • For a wireless network with authentication setting, key icon appears to the right hand of the SSID. • Signal icon shows the strength of the signal. • WEP / WPA key appears as asterisks on the confirmation screen. • The wireless LAN supports following specifications. - Wireless standards : IEEE 802.11 b/g/n - Frequency spectrum : 2.4GHz - Security protocol : WEP / WPA / WPA2 Manually enter your SSID Set up the connection to the AP (e.g. wireless router) manually by entering the SSID. 5 Use ▲▼ to select Manually enter your SSID, then press OK. • AP(e.g. wireless router) SSID entry screen will appear. Enter the SSID using then press OK. 6 Use ▲▼ to select the authentication setting of the selected wireless network. • For a wireless network with authentication setting, select the authentication setting, according to the security type of the wireless network. Select security type for "Router 1" None WEP WPA-PSK WPA2-PSK Back None WEP WPA-PSK WPA2-PSK Set the authentication setting to None. Set the authentication setting to WEP. Set the authentication setting to WPA-PSK. Set the authentication setting to WPA2-PSK. • For a wireless network without authentication setting, select None. • If you select WEP, WPA-PSK or WPA2-PSK, WEP / WPA Key entry screen will appear. Enter the WEP / WPA key of the selected wireless network using then press OK. • Confirmation message will appear. Select Yes to complete the settings. 38 English IP configuration In following cases, select IP configuration to set each setting as necessary. - When connection test failed with the setting of Connection test. - When instructed by your Internet service provider to make specific settings in accordance with your network environment. 5 Use ▲▼ to select IP configuration, then press OK. 6 Use ▲▼ to select a setting, then press OK. Network selection IP setting mode Wireless network setting IP address IP configuration Subnet mask Proxy configuration Default gateway Primary DNS Secondary DNS MAC address Manual 192.168.11.3 255.255.255.0 192.168.11.1 192.168.11.1 0.0.0.0 00:12:0E:10:09:15 IP setting mode Auto Manual IP address *1, 3 Subnet mask *1, 3 Default gateway *1, 3 Sets the IP setting automatically. Sets the IP setting manually. A set of numbers which are assigned to devices participating in a computer network. A mask which is used to determine what subnet an IP address belongs to. IP address of the network device (such as router) which provides Internet access. DNS setting mode Auto Manual Sets the DNS setting automatically. Sets the DNS setting manually. Primary DNS *2, 3 A server which handles the name and IP address over the Internet. Secondary DNS *2, 3 A server which handles the name and IP address over the Internet. MAC address An address which recognizes the devices connecting to the network. It is also called Hardware Address. *1 Items can be selected only when IP setting mode is set to Manual. *2 Items can be selected only when DNS setting mode is set to Manual. *3 Use ▲▼ or the NUMBER buttons to input numbers.When you use ▲▼ to input numbers, then press OK or input the triple digits by using the NUMBER buttons, the cursor moves to the next entry field.When you use ▲▼ to input numbers, then press OK or input the triple digits by using the NUMBER buttons at the rightmost entry field, numbers will be stored and go back to the previous menu. Note • The range of input numbers is between 0 and 255. • If you enter a number larger than 255, the number will automatically be 255. • The manually entered number will be saved even if you change the setting to Auto. • If you want to enter 1 or 2 digit number in one cell, press OK to move on to the next cell. • If the entered IP address or the default gateway or primary DNS number is same as the default setting, IP address setting will be set to Auto. (The manually entered number will be saved). • When IP address setting is set to Manual, the setting of DNS setting will automatically be Manual and when IP address setting is set to Auto, you can set either Auto or Manual for DNS setting.
-
 1
1 -
2
-
3
-
4
-
5
-
6
-
7
-
8
-
9
-
10
-
11
-
12
-
13
-
14
-
15
-
16
-
17
-
18
-
19
-
20
-
21
-
22
-
23
-
24
-
25
-
26
-
27
-
28
-
29
-
30
-
31
-
32
-
 33
33 -
 34
34 -
 35
35 -
 36
36 -
 37
37 -
 38
38 -
 39
39 -
 40
40 -
 41
41 -
 42
42 -
 43
43 -
44
-
45
-
46
-
47
-
48
-
49
-
50
-
51
-
52
-
53
-
54
-
55
-
56
-
57
-
58
-
59
-
60
-
61
-
62
-
63
-
64
 |
 |