Philips 50PFP5332D User manual - Page 7
English, Español - remote
 |
UPC - 609585123427
View all Philips 50PFP5332D manuals
Add to My Manuals
Save this manual to your list of manuals |
Page 7 highlights
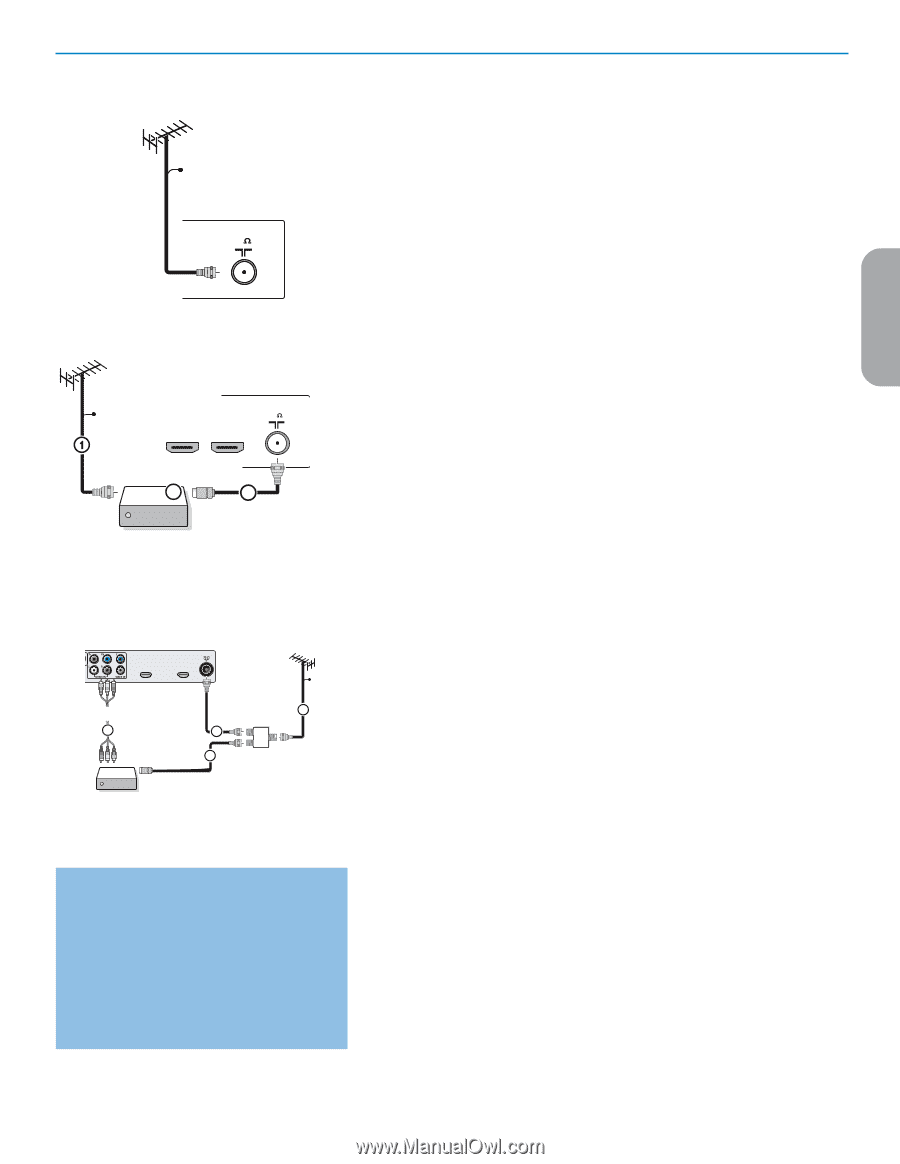
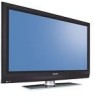
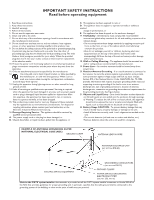
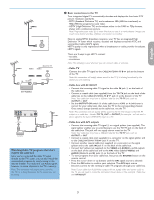
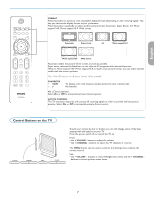
English CABLE 75 CABLE HDMI 1 Back of the TV HDMI 2 75 TV IN OUTPUT 3 2 Set-Top Box CABLE / ANTENNA HDMI 2 HDMI 1 T AV1 : L + R + VIDEO 4 OUT IN Set-Top Box 2 3 SIGNAL SPLITTER CABLE 1 Watching Cable TV programs that don't require the cable box Since you've connected the cable TV signal directly to the TV's tuner, you can also watch the unscrambled programs by simply tuning to the desired channel. You must first use Autoprogram, however, to store channels in the TV's memory. Note: This connection will supply stereo sound to the TV if it is being broadcast by the station you are watching. & Basic connections to the TV Your integrated digital TV automatically decodes and displays the four basic DTV picture resolution standards. - SDTV (Standard Definition TV) are broadcast as 480i (480-line interlaced) or 480p (480-line progressive scan) video. - HDTV (High-Definition TV) are broadcast either in the 1080i or 720p formats, always with a widescreen picture. Note: Progressive scan video (p) is more like that you see in a movie theater. Images are much more distinct and free of flicker, and motion is smoother. Next to analog NTSC broadcast reception, your TV has an integrated High Definition TV tuner which receives, decodes and displays terrestrial ATSC and unscrambled cable (QAM) signals. HDTV quality is only reproduced when a broadcaster or cable provider broadcasts HDTV signals. There are 2 ways to get HDTV content: - via cable, - via antenna. Note: This drawing is used wherever you can connect cable or antenna. - Cable TV Connect the cable TV signal to the CABLE/ANTENNA 75 Ω : jack at the bottom of the TV. Note: this connection will supply stereo sound to the TV if it is being broadcast by the station you are watching. - Cable box with RF IN/OUT • Connect the incoming cable TV signal to the cable IN jack 1 on the back of the cable box. • Connect a coaxial cable (not supplied) from the TO TV jack on the back of the cable box to the CABLE/ANTENNA 75 Ω : jack 2 at the bottom of the TV. Note: Your cable box may have a different label for the TO TV jack, such as OUTPUT or OUT. • Set the OUTPUT CH switch 3 of the cable box to CH 3 or 4 (whichever is correct for your cable box), then tune the TV to the corresponding channel. Once tuned, change channels at the cable box, not the TV. Note: This connection will not supply stereo sound to the TV. The reason is that the RF output on a cable box - labeled TO TV, OUT or OUTPUT for example - will not send a stereo signal to the tuner (VHF/UHF) input on a TV. - Cable box with A/V outputs • Connect the incoming cable TV signal 1 to a signal splitter (not supplied). The signal splitter enables you to avoid having to use the TO TV jack on the back of the cable box. This jack will not supply stereo sound to the TV. Note: Your cable box may have a different label for the TO TV jack, such as OUTPUT or OUT. • Connect a coaxial cable (not supplied) to a connector on the signal splitter and to the CABLE/ANTENNA 75 Ω : jack 2 on the TV. • Connect another coaxial cable (not supplied) to a connector on the signal splitter and to the cable IN jack 3 on the back of the cable box. • Connect A/V cables (not supplied) to the VIDEO and AUDIO L and R outputs on the back of the cable box and to the AV2 video (labeled VIDEO) and AUDIO (labeled L and R) jacks 4 on the back of the TV. • To view programs from your cable box, first press the SOURCE button on the remote control. • Press the cursor down or up buttons until the AV2 signal source is selected. • Press the OK button to confirm your selection. The AV2 input source becomes current for the viewing of cable TV programs through your cable box. Note: If your cable box Audio/Video outputs will not supply video and stereo audio to the TV, you will need to make the connection shown above in the example "Cable box with RF IN/OUT". Español 3
-
 1
1 -
 2
2 -
 3
3 -
 4
4 -
 5
5 -
 6
6 -
 7
7 -
 8
8 -
 9
9 -
 10
10 -
 11
11 -
 12
12 -
13
-
14
-
15
-
16
-
17
-
18
-
19
-
20
-
21
-
22
-
23
-
24
-
25
-
26
-
27
-
28
-
29
-
30
-
31
-
32
-
33
-
34
-
35
-
36
-
37
-
38
-
39
-
40
-
41
-
42
-
43
-
44
-
45
-
46
-
47
-
48
-
49
-
50
-
51
-
52
-
53
-
54
-
55
-
56
-
57
-
58
-
59
-
60
-
61
-
62
-
63
-
64
-
65
-
66
-
67
-
68
-
69
-
70
-
71
-
72
-
73
-
74
-
75
-
76
-
77
-
78
-
79
-
80
-
81
-
82
-
83
-
84
-
85
-
86
-
87
-
88
-
89
-
90
-
91
-
92
-
93
-
94
-
95
-
96
-
97
-
98
-
99
-
100
-
101
-
102
-
103
-
104
-
105
-
106
-
107
-
108
-
109
-
110
-
111
-
112
-
113
-
114
-
115
-
116
-
117
-
118
-
119
-
120
-
121
-
122
-
123
-
124
 |
 |