Philips DVP3570 User manual - Page 23
Setups
 |
UPC - 609585188402
View all Philips DVP3570 manuals
Add to My Manuals
Save this manual to your list of manuals |
Page 23 highlights
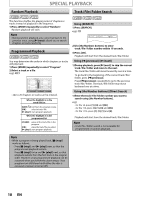
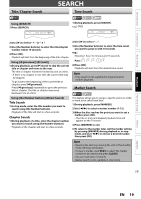
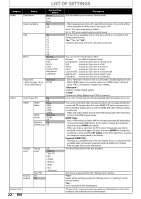
Introduction Connections Basic Setup SETUPS TV Aspect SETUP "Video" "TV Aspect" Use this feature to adjust the aspect ratio of the video source which is different from your TV's ratio to fit your TV monitor without distorting the picture. Descriptions of each setting are as follows: Video Your source TV Option 16:9 Wide 16:9 4:3 Normal 16:9 4:3 4:3 Crop Description To enjoy 16:9 picture on 16:9 monitor: Select this setting when you want to enjoy 16:9 picture on the 16:9 TV. To enjoy 16:9 picture on 4:3 monitor: 16:9 picture is scaled down until the both sides of the picture fits the 4:3 TV. To enjoy 16:9 picture on 4:3 monitor: Both sides of the picture are trimmed to fit the 4:3 TV without distorting the aspect ratio of the picture. Progressive Scan SETUP "Video" "Progressive Scan" You can set "Progressive Scan" to "Off" in "Video" menu or press and hold [B (play)] on the front of the unit for more than 5 seconds during playback. Changing "Progressive Scan" setting is not available while HDMI cable is connected. When "Progressive Scan" is "On", video signals from the unit's VIDEO OUT and S-VIDEO OUT jacks will be distorted or not be output at all. 5) Select "Yes" using [K / L] then press [OK]. 6) Press [OK] to complete "Progressive Scan" setting. Note • If there is no picture or you do not press any buttons for 15 seconds, "Progressive Scan" will switch to "Off" and it will exit the "Progressive Scan" setting. EasyLink (HDMI CEC) SETUP "Other" "EasyLink (HDMI CEC)" EasyLink (HDMI CEC) function allows your TV (limited to PHILIPS brand EasyLink TV) to act in conjunction with this unit, or vice versa. When "EasyLink (HDMI CEC)" setting is set to "On", functions listed below will be available. One Touch Play When this unit is turned on, the TV also is turned on and the appropriate external input channel will be selected automatically. The appropriate external input channel can also be selected on your TV automatically when you press [B (play)], [ (previous)], [ (next)], [SETUP], [the Number buttons] or [INFO ] when the unit's power is on. Standby When you press and hold [y (standby-on)] for 2 seconds, it turns off the power of the TV first and then turns off the power of this unit also. System Information Get & Set Menu Language The unit recognizes the OSD language set for the TV and automatically sets the same language as the player menu language (OSD menu language) for this unit. Refer to the "Player Menu" on page 21 for available languages. Playback Function Setup Others Español 1)With "Video" selected in the "SETUP" menu, press [OK]. 2) Select "Progressive Scan" to "On". 3) Press [OK]. 4) Select "Yes" using [K / L] then press [OK]. Before proceeding... Make sure your TV supports the selected item. Connect with component video cable. NOTE: If a blank screen appears, wait for 15 seconds for auto-recovery. Activate? Yes Progressive On No Select: K / L Set:OK EN 23
-
 1
1 -
2
-
3
-
4
-
5
-
6
-
7
-
8
-
9
-
10
-
11
-
12
-
13
-
14
-
15
-
16
-
17
-
 18
18 -
 19
19 -
 20
20 -
 21
21 -
 22
22 -
 23
23 -
 24
24 -
 25
25 -
 26
26 -
 27
27 -
 28
28 -
29
-
30
-
31
-
32
 |
 |
