Philips PCVC720K User manual - Page 18
Qvwdoolqj²wkh²fdphud, 8qlqvwdoolqj²wkh²fdphud, 8vlqj²pruh²wkdq²rqh²fdphud, Ulyhu²vriwzduh²fkhfn - 17
 |
View all Philips PCVC720K manuals
Add to My Manuals
Save this manual to your list of manuals |
Page 18 highlights
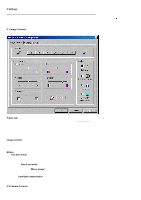
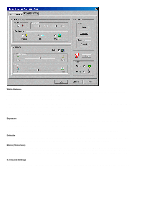
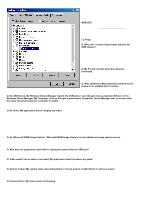
• Always use the Philips installation CD-ROM to install the correct camera drivers as described below. Do not connect the camera to a USB port before installing the Philips drivers. If you do this, Windows will try to install its own drivers, which might be less compatible with the camera than the Philips drivers. You must have Windows running and have the Windows CDROM to hand. • Your USB controller should be working correctly. You can check this in the Windows Device Manager (Click on the My Computer icon on your desktop, right-click Properties, then click on the Device Manager tab). An icon with the name 'Universal serial bus controller' should be visible. Click on this icon and Windows will tell you if this part of your computer system is operating correctly. • Uninstall the driver software by using the Add/Remove option in the Start - Settings - Control Panel - Software window. • For the Windows 2000 operating system you will get a message to delete the camera within the Device Manager manually before you will be able to reinstall the 'ToUcam Drivers and Tools' by using the Setup program from the installation CD-ROM. The reason for this is that the InstallShield cannot remove certain registry entries. If the installation program asks you to place a different CD-ROM in the CD-ROM drive, for instance the installation CD-ROM or the Windows CD-ROM, always wait until: • the 'busy' cursor icon (usually an hour-glass icon) has disappeared from your screen, and • the 'busy' LED on your CD-ROM drive extinguishes, before you press the eject button on the CD-ROM drive. This prevents the appearance of a blue screen Windows error message prompting you to replace the last CD-ROM into the drive. Should you encounter this Windows error message, correct the blue screen error by replacing the CDROM you just removed and wait for Windows to stop reading from the CD-ROM. In CIF resolution this digital USB PC Camera provides a large data stream that needs to be processed in real-time by the application you are using. Although the camera will perform satisfactorily on a Pentium I at the lower resolutions, we recommend a more powerful computer, e.g. a Pentium II with 32 MB RAM, for optimum performance at the highest resolution. We regret that optimum camera performance cannot be guaranteed if the computer meets only the minimum system requirements. If two or more Philips cameras of the same type are connected to your computer, only one of these cameras can be used at any one time. You can connect the camera to any USB port on your computer. You do not have to switch off the computer. USB ports are 'hotswappable', which means that you do not have to restart Windows every time you connect a new USB device. The USB driver will detect the camera as new hardware. It can be used within a few seconds without the need to restart the computer. If you unplug the camera while it is actively providing a video stream to an application on your computer, the computer may crash. To avoid problems, first close all applications that use video from the camera before unplugging your Philips USB PC Camera. You can determine if the camera is installed correctly, and if it is being recognized by the operating system by checking the Device Manager menu in the System Properties. 1. Access this menu by right-clicking the 'My Computer' icon in the top left-hand corner of your desktop, then click Properties. Alternatively, click Start / Settings / Control Panel, then double-click System to access this menu. 2. Click the Device Manager tab to see the list of installed devices. If the USB PC Camera has been installed correctly and it is plugged into a USB port, you should see the Philips ToUcam XS listed under the Imaging Device type in this window (double-click on the device to see its specifications):
-
 1
1 -
2
-
3
-
4
-
5
-
6
-
7
-
8
-
9
-
10
-
11
-
12
-
 13
13 -
 14
14 -
 15
15 -
 16
16 -
 17
17 -
 18
18 -
 19
19 -
 20
20 -
 21
21 -
 22
22 -
 23
23 -
24
-
25
-
26
 |
 |