Pioneer 614MX Operating Instructions
Pioneer 614MX - PDP - 61" Plasma Panel Manual
 |
UPC - 012562732336
View all Pioneer 614MX manuals
Add to My Manuals
Save this manual to your list of manuals |
Pioneer 614MX manual content summary:
- Pioneer 614MX | Operating Instructions - Page 1
Display Écran à plasma PDP-614MX +*4 D50-5-10-1_Ja Published by Pioneer Corporation. Copyright © 2004 Pioneer Corporation. All rights reserved. PIONEER CORPORATION 4-1, Meguro 1-Chome, Meguro-ku, Tokyo 153-8654, Japan PIONEER ELECTRONICS (USA) INC. P. O. BOX 1540, Long Beach - Pioneer 614MX | Operating Instructions - Page 2
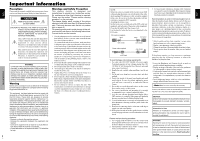
much for purchasing this PIONEER product. Before using your Plasma Display, please carefully read the "Important Information" and these "Operating Instructions" so you will know how to operate the Plasma Display properly. Keep this manual in a safe place. You will find it useful in the future. Notes - Pioneer 614MX | Operating Instructions - Page 3
cool the monitor. If the problem persists, contact your dealer for service. 2. Do not use this unit's polarized plug with extension cords or outlets unless the prongs can be completely inserted. 3. Do not expose the unit to water or moisture. 4. Avoid damage to the power cord, and do not attempt to - Pioneer 614MX | Operating Instructions - Page 4
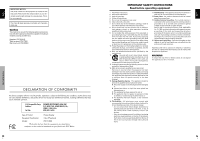
Canadian ICES-003. Caution This model is for use with the following optional accessories. Use with other optional accessories is capable of resulting in instability causing possible injury. Speakers: PDP-S29-LR Table top stand: PDK-TS06 Wall mount unit: PDK-WM03 Important Information DECLARATION - Pioneer 614MX | Operating Instructions - Page 5
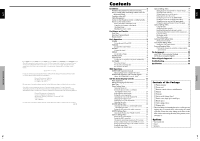
(Analog 29 DVI-D 24-pin connector (Digital 29 Table of Signals Supported 30 Troubleshooting 32 Specifications 33 Contents of the Package Ⅺ Plasma monitor Ⅺ Power cord Ⅺ Remote control with two AAA Batteries Ⅺ Manual Ⅺ Warranty Ⅺ Safety metal fittings (2pcs)* Ⅺ Ferrite cores (large 2pcs, small - Pioneer 614MX | Operating Instructions - Page 6
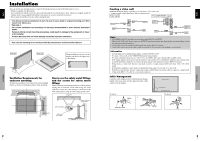
be installed on its own. Be sure to use a stand or original mounting unit. (Wall mount unit, Stand, etc.) * See page 1. • For correct installation and mounting it is strongly recommended to use a trained, authorized dealer. Failure to follow correct mounting procedures could result in damage to the - Pioneer 614MX | Operating Instructions - Page 7
or environmental public instruction's rules that apply in your country/area. 4 * The 1/8 Stereo Mini cable must be purchased separately. En Part Names and Function Front View English Part Names and Function q Power ( ) Turns the monitor's power on and off. w Remote sensor window Receives - Pioneer 614MX | Operating Instructions - Page 8
Rear View/ Terminal Board English Part Names and Function A AC IN Connect the included power cord here. B EXT SPEAKER L and R Connect speakers (optional) here. Maintain the correct polarity. Connect the (positive) speaker wire to the EXT SPEAKER terminal and the (negative) speaker wire to the EXT - Pioneer 614MX | Operating Instructions - Page 9
power cord into an active AC power outlet. 2. Press the Power button (on the unit). The monitor's STANDBY/ON indicator turns red and the standby mode is set. 3. Press the POWER ON button (on the remote SCREEN SIZE Operation (manual) With this function, different ratios. * Use this for watching normal - Pioneer 614MX | Operating Instructions - Page 10
set to "OFF" * This cannot be set in some models. "DOT BY DOT" will not be displayed in such cases for RGB SELECT mode referring to the"Table of Signals Supported" on page 30. * "VGA", "SVGA" and setting of the selected item by using the cursor buttons ᮤ ᮣ on the remote control. 5. The adjustments or - Pioneer 614MX | Operating Instructions - Page 11
OFF@AON ABL AUTO/LOCK 1/LOCK 2/LOCK 3 ORBITER AUTO 1 AUTO 2 MANUAL H-DOT/V-LINE/TIME OFF INVERSE OFF ON WORKING TIME/WAITING TIME WHITE SCREEN WIPER OPTION3 Sub menu TIMER PWR. ON MODE KEY LOCK IR REMOTE LOOP OUT ID NUMBER VIDEO WALL Sub menu 2 Sub menu 3 Sub menu 4 PRESENT TIME - Pioneer 614MX | Operating Instructions - Page 12
DNR : HIGH Information Ⅵ DNR * "DNR" stands for Digital Noise Reduction. * This function reduces . Setting the color temperature Use this procedure to set color tone produced by the plasma display. Example: Setting "HIGH LOW B.LOW RESET : OFF R.HIGH 70 SEL. ADJ. EXIT RETURN Information Ⅵ - Pioneer 614MX | Operating Instructions - Page 13
manually. * If PHASE can't be adjusted, set Auto Picture to OFF and adjust manually will not be shown. The DISPLAY button on the remote control will not function either. Ⅵ OSD ADJUST settings input signals supported by this system" on page 30. STILL: To display VESA standard signals. (Use this mode - Pioneer 614MX | Operating Instructions - Page 14
tuner are not properly connected, the system is set to the off state. * For instructions on using the computer's power management function, refer to the computer's operating instructions. Ⅵ Power management settings ON: In this mode the power management function is turned on. OFF: In this mode the - Pioneer 614MX | Operating Instructions - Page 15
or bigger. Adjust the ORBITER function manually Set the amount of shift and STAND BY. [Example] WORKING TIME: 01H30M WAITING TIME: 02H00M @ - Pioneer 614MX | Operating Instructions - Page 16
level appears gray. 22 En SEL. ADJ. EXIT RETURN English Option3 Settings Menu Using the timer This function sets the monitor to turn ON/OFF automatically at a set time at which the power will be switched ON/OFF as well as the input mode. Example: Setting so that the power will be switched on - Pioneer 614MX | Operating Instructions - Page 17
. SET button on the remote control. The "ID NO. SET" screen appears. On "ID NUMBER" of "ID NO. SET" menu, select "2". ID NO.SET POSITION : 1 ID NUMBER : 2 Note: A contingency method of shutting off the electric power should be used in cases of emergency during video wall setup. DIVIDER Set the - Pioneer 614MX | Operating Instructions - Page 18
as the SCREEN menu on page 16. P. ON DELAY (Power on delay) Use this function to activate power-on delay. Turn on the AUTO ID before the following wall. Note: The remote control can be operated unless the IR REMOTE is set to "OFF". REPEAT TIMER Use this to set two timers. Each timer can use - Pioneer 614MX | Operating Instructions - Page 19
is equipped with a type of connector commonly used for digital. (This cannot be used for an analog input.) (TMDS can be used for one link only.) PC 3 12345678 9 Data 1 + T.M.D.S Data 1 Shield No connection No connection +5V Power Ground Hot Plug Detect T.M.D.S Data 0 T.M.D.S Data 0 + T.M.D.S Data - Pioneer 614MX | Operating Instructions - Page 20
supported by this system Model 70.1 59.9 72.8 75.0 85.0 100.4 120.4 60.0 60.0 56.3 60.3 72.2 75.0 85.1 99.8 120.0 60.0 70 YES YES YES YES - - YES 41 61.3 NEG NEG YES YES YES YES YES YES*7 MOTION NO 32 *1 Only when using a graphic accelerator board that is capable of mean the PDP is not - Pioneer 614MX | Operating Instructions - Page 21
. • Is the monitor's power cord plugged into a power • Plug the monitor's power cord into a power outlet. outlet? • Is the volume set at the minimum? • Increase the volume. • Is the MUTING mode set? • Press the remote control's MUTING button. • Are the speakers properly connected? • Connect
-
 1
1 -
 2
2 -
 3
3 -
 4
4 -
 5
5 -
 6
6 -
 7
7 -
8
-
9
-
10
-
11
-
12
-
13
-
14
-
15
-
16
-
17
-
18
-
19
-
20
-
21
 |
 |
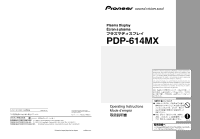
プラズマディスプレイ
PDP-614MX
Plasma Display
Écran à plasma
Operating Instructions
Mode d’emploi
Contents related to system specifications, power requirements,
accessories, and other information differ with respect to the
country where this unit is purchased. For customers living in the
U.S.A. or Canada, please use and refer to the instructions written
in either English or French. For customers in Japan, please use
and refer to the instructions written in Japanese.
Les caractéristiques, les spécifications d'alimentation, les
accessoires et d'autres informations diffèrent d'un pays à l'autre.
Si vous vivez au Canada ou aux États-Unis, reportez-vous aux
instructions en français ou en anglais. Si vous vivez au Japon,
reportez-vous aux instructions en japonais.
電源、付属品などの差異がありますので、日本国内でご購入・ ご
使用の際は、本書の日本語ページをご覧ください。その他の
国、地域でご購入・ ご使用の際は、英語またはフランス語ページ
をご覧ください。
販売店様へ
この取扱説明書は据え付け終了後お客様に必ずお渡し
して、取り扱い方法の説明を行ってください。
「据付工事」について
●
●
K042_Ja
本機は十分な技術・技能を有する専門
業者が据付けを行うことを前提に販売
されているものです。据付け・取付け
は必ず工事専門業者または販売店にご
依頼ください。
なお、据付け・取付けの不備、誤使用、
改造、天災などによる事故損傷につい
ては、弊社は一切責任を負いません。
Printed in Japan/ Imprimé au Japon
<7S801711>
Published by Pioneer Corporation.
Copyright © 2004 Pioneer Corporation.
All rights reserved.
©
2004
パイオニア株式会社
禁無断転載
この取扱説明書は再生紙を使用しています。
153-8654 東京都目黒区目黒1丁目4番1号
PIONEER CORPORATION
4-1, Meguro 1-Chome, Meguro-ku, Tokyo 153-8654, Japan
PIONEER ELECTRONICS (USA) INC.
P. O. BOX 1540, Long Beach, California 90801-1540, U.S.A. TEL: 1-310-952-2111
PIONEER ELECTRONICS OF CANADA INC.
300 Allstate Parkway, Markham, Ontario L3R OP2, Canada
TEL: 1-905-479-4411
JIS C 61000-3-2適合品
D50-5-10-1_Ja