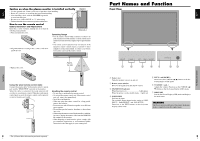
Pioneer 614MX Operating Instructions - Page 10
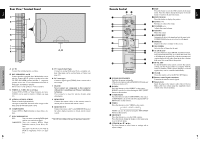
Controls - model
 |
UPC - 012562732336
View all Pioneer 614MX manuals
Add to My Manuals
Save this manual to your list of manuals |
Page 10 highlights
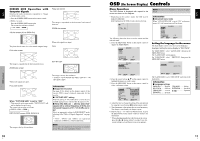
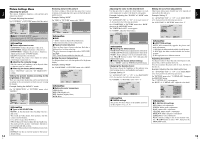
English SCREEN SIZE Operation with Computer Signals Switch to the wide screen mode to expand the 4 : 3 image to fill the entire screen. 1. Press the SCREEN SIZE button on the remote control. 2. Within 3 seconds ... Press the SCREEN SIZE button again. The screen size switches as follows: A 4:3 A FULL A ZOOM 4:3 size screen (4:3 or SXGA 5:4) FULL size screen The image is expanded in the horizontal and vertical direction. ZOOM size screen The picture has the same size as the normal computer image. FULL size screen When wide signals are input. FULL The image is expanded in the horizontal direction. ZOOM size screen DOT BY DOT WIDE Operations When wide signals are input. FULL size screen When "PICTURE SIZE" is set to "OFF" * This cannot be set in some models. "DOT BY DOT" will not be displayed in such cases. The screen size switches as follows: A D BY D A FULL A ZOOM DOT BY DOT screen (VGA, SVGA 4:3) The image is dot by dot resolution. The image is dot by dot resolution. * "D BY D" can be switched only when a 1280 dot ן768 line signal is input. Information Ⅵ Supported resolution See page 30 for details on the display output of the various VESA signal standards supported by the monitor. Ⅵ "PICTURE SIZE" setting When the setting of "PICTURE SIZE" is OFF, the size of RGB-input pictures will be D BY D in place of 4:3. Ⅵ When 852 (848) dot ן480 line wide VGA* signals with a vertical frequency of 60 Hz and horizontal frequency of 31.7 (31.0) kHz are input Select an appropriate setting for RGB SELECT mode referring to the"Table of Signals Supported" on page 30. * "VGA", "SVGA" and "SXGA" are registered trademarks of IBM, Inc. of the United States. Note: Do not allow the displayed in 4:3 mode for an extended period. This can cause a phosphor burn-in. 10 En English OSD (On Screen Display) Controls Menu Operations The OSD window is displayed with respect to the screen as shown on the diagram. * Depending on the screen's mode, the OSD may be displayed differently. In the explanation, the OSD section is shown close up. MAIN MENU 1 / 2 PICTURE SOUND SCREEN OPTION1 ADVANCED OSD NEXT PAGE SEL. MENU OK : OFF EXIT EXIT The following describes how to use the menus and the selected items. 1. Press the MENU/SET button on the remote control to display the MAIN MENU. MAIN MENU 1 / 2 PICTURE SOUND SCREEN OPTION1 ADVANCED OSD NEXT PAGE SEL. MENU OK : OFF EXIT EXIT MAIN MENU 2 / 2 PREVIOUS PAGE LANGUAGE COLOR SYSTEM SOURCE INFORMATION Note: The main menu disappears by pressing the EXIT button. Information Ⅵ Advanced menu mode When "ADVANCED OSD" is set to "ON" in the main menu (1/2), full menu items will be shown. MAIN MENU 1 / 2 PICTURE SOUND SCREEN OPTION1 OPTION2 OPTION3 ADVANCED OSD : ON NEXT PAGE SEL. MENU OK EXIT EXIT Setting the language for the menus The menu display can be set to one of seven languages. Example: Setting the menu display to "DEUTSCH" On "MAIN MENU", select "LANGUAGE", then press the MENU/SET button. The "LANGUAGE" screen appears. On "LANGUAGE", select " DEUTSCH", then press the MENU/SET button. LANGUAGE LANGUAGE : DEUTSCH SEL. MENU OK EXIT EXIT 2. Press the cursor buttons L M on the remote control to highlight the menu you wish to enter. 3. Press the MENU/SET button on the remote control to select a sub menu or item. PICTURE 1 / 2 CONTRAST BRIGHTNESS SHARPNESS COLOR TINT AV SELECTION : STD DNR : OFF NEXT PAGE SEL. ADJ. EXIT RETURN 4. Adjust the level or change the setting of the selected item by using the cursor buttons ᮤ ᮣ on the remote control. 5. The adjustments or the settings that are stored in memory. The change is stored until you change it again. 6. Repeat steps 2 - 5 to adjust an additional item, or press the EXIT button on the remote control to return to the main menu. * When adjusting using the bar at the bottom of the screen, press the ᮤ or ᮣ button within 5 seconds. If not, the current setting is set and the previous screen appears. ADJ. MENU OK EXIT RETURN The "LANGUAGE" is set to "DEUTSCH" and return to the main menu. Information Ⅵ Language settings ENGLISH ........ English DEUTSCH ....... German FRANÇAIS ...... French ESPAÑOL ....... Spanish ITALIANO ........ Italian SVENSKA ....... Swedish Japanese OSD (On Screen Display) Controls 11 En
-
 1
1 -
2
-
3
-
4
-
 5
5 -
 6
6 -
 7
7 -
 8
8 -
 9
9 -
 10
10 -
 11
11 -
 12
12 -
 13
13 -
 14
14 -
 15
15 -
16
-
17
-
18
-
19
-
20
-
21
 |
 |