Pioneer 614MX Operating Instructions - Page 5

Contents - speakers

Page 5 highlights

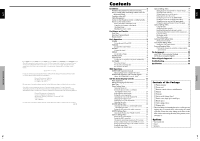
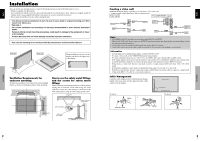
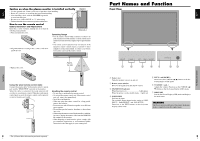
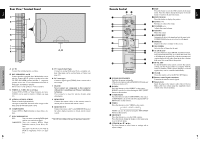
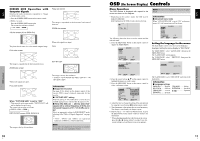
Important Information English Should this product require service in the U.S.A. and you wish to locate the nearest Pioneer Authorized Independent Service Company, or if you wish to purchase replacement parts, operating instructions, service manuals, or accessories, please call the number shown below. 8 0 0 - 4 2 1 - 1 6 2 5 Please do not ship your product to Pioneer without first calling Pioneer Electronics (USA) Inc. at the above listed number for assistance. Pioneer Electronics (USA) Inc. P.O. BOX 1760, Long Beach, CA 90801-1760, U.S.A. For warranty information please see the Limited Warranty sheet included with your product. Should this product require service in Canada, please contact a Pioneer Canadian Authorized Dealer to locate the nearest Pioneer Authorized Service Company in Canada. Alternatively, please contact the Customer Satisfaction Department at the following address: Pioneer Electronics of Canada, Inc. Customer Satisfaction Department 300 Allstate Parkway, Markham, Ontario L3R OP2 (905)479-4411 1(877)283-5901 For warranty information please see the Limited Warranty sheet included with your product. S021_EF 6v En English Contents Installation 2 Ventilation Requirements for enclosure mounting .......... 2 How to use the safety metal fittings and the screws for safety metal fittings 2 Creating a video wall 3 Cable Management 3 Caution on when the plasma monitor is installed vertically ... 4 How to use the remote control 4 Battery Installation and Replacement 4 Using the wired remote control mode 4 Operating Range 4 Handling the remote control 4 Part Names and Function 5 Front View 5 Rear View/ Terminal Board 6 Remote Control 7 Basic Operations 8 POWER 8 To turn the unit ON and OFF 8 VOLUME 8 To adjust the sound volume 8 MUTING 8 To mute the sound 8 DISPLAY 8 To check the settings 8 DIGITAL ZOOM 8 AUTO SET UP 8 To adjust the size or quality of the picture automatically: ...... 8 OFF TIMER 8 To set the off timer 8 To check the remaining time 8 To cancel the off timer 8 WIDE Operations 9 SCREEN SIZE Operation (manual 9 When viewing videos or digital video discs 9 SCREEN SIZE Operation with Computer Signals ........ 10 When "PICTURE SIZE" is set to "OFF 10 OSD (On Screen Display) Controls 11 Menu Operations 11 Setting the language for the menus 11 Menu Tree 12 Picture Settings Menu 14 Adjusting the picture 14 Setting the picture modes according to the brightness of the room 14 Reducing noise in the picture 14 Setting the color temperature 14 Adjusting the color to the desired level 15 Changing the Gamma Curve 15 Making the Low Tone adjustments 15 Adjusting the colors 15 SOUND Settings Menu 16 Adjusting the treble, bass and left/right balance and audio input select 16 Setting the allocation of the audio connectors 16 SCREEN Settings Menu 16 Adjusting the Position, Size, PHASE, CLOCK 16 Option1 Settings Menu 17 Setting the on-screen display 17 Setting the BNC connectors 17 Checking the signal being transmitted to PC1 terminal ....... 17 Setting a computer image to the correct RGB select screen ...... 17 Setting high definition images to the suitable screen size .... 18 Setting the Input Skip 18 Resetting to the default values 18 Option2 Settings Menu 19 Setting the power management for computer images ..... 19 STANDBY/ON indicator 19 Setting the picture to suit the movie 19 Reducing burn-in of the screen 19 Setting the gray level for the SIDE MASK 21 Setting the screen size for S1/S2 video input 22 Setting the picture size for RGB input signals 22 Setting the signal and black level for DVI signal ........ 22 Option3 Settings Menu 23 Using the timer 23 Setting the power on mode 24 Enabling/disabling the front panel controls 24 Enabling/disabling remote control wireless transmission .... 24 Loop Out setting 24 ID number setting 25 Video Wall setting 25 Advanced OSD Settings Menu 27 Setting the menu mode 27 Color System Settings Menu 28 Setting the video signal format 28 Source Information Menu 28 Checking the frequencies, polarities of input signals, and resolution 28 Pin Assignments 29 mini D-Sub 15-pin connector (Analog 29 DVI-D 24-pin connector (Digital 29 Table of Signals Supported 30 Troubleshooting 32 Specifications 33 Contents of the Package Ⅺ Plasma monitor Ⅺ Power cord Ⅺ Remote control with two AAA Batteries Ⅺ Manual Ⅺ Warranty Ⅺ Safety metal fittings (2pcs)* Ⅺ Ferrite cores (large 2pcs, small 2pcs) Ⅺ Bands (2pcs) Ⅺ Cable clamps (5pcs) Ⅺ Wiping cloth * These are fittings for fastening the unit to a wall to prevent tipping due to external shock when using the stand (optional). Fasten the safety fittings to the holes in the back of the monitor using the safety fitting mount screws (see page 2). Options • Wall mount unit • Stand • Speakers Contents 1 En

  • 1
  • 2
  • 3
  • 4
  • 5
  • 6
  • 7
  • 8
  • 9
  • 10
  • 11
  • 12
  • 13
  • 14
  • 15
  • 16
  • 17
  • 18
  • 19
  • 20
  • 21

English
Important Information
Should this product require service in the U.S.A. and you wish to locate the nearest Pioneer
Authorized Independent Service Company, or if you wish to purchase replacement parts,
operating instructions, service manuals, or accessories, please call the number shown
below.
8 0 0 – 4 2 1 – 1 6 2 5
Please do not ship your product to Pioneer without first calling Pioneer Electronics (USA)
Inc. at the above listed number for assistance.
Pioneer Electronics (USA) Inc.
P.O. BOX 1760, Long Beach,
CA 90801-1760, U.S.A.
For warranty information please see the Limited Warranty sheet included with your product.
Should this product require service in Canada, please contact a Pioneer Canadian
Authorized Dealer to locate the nearest Pioneer Authorized Service Company in Canada.
Alternatively, please contact the Customer Satisfaction Department at the following address:
Pioneer Electronics of Canada, Inc.
Customer Satisfaction Department
300 Allstate Parkway, Markham, Ontario L3R OP2
(905)479-4411
1(877)283-5901
For warranty information please see the Limited Warranty sheet included with your product.
S021_EF
v
En
English
Contents
1
En
Contents
Installation
......................................................
2
Ventilation Requirements for enclosure mounting
..........
2
How to use the safety metal fittings and the screws for
safety metal fittings
................................................
2
Creating a video wall
...............................................
3
Cable Management
..................................................
3
Caution on when the plasma monitor is installed vertically ...
4
How to use the remote control
....................................
4
Battery Installation and Replacement
...........................
4
Using the wired remote control mode
..........................
4
Operating Range
..........................................................
4
Handling the remote control
.........................................
4
Part Names and Function
..................................
5
Front View
..............................................................
5
Rear View/ Terminal Board
.......................................
6
Remote Control
........................................................
7
Basic Operations
...............................................
8
POWER
..................................................................
8
To turn the unit ON and OFF:
......................................
8
VOLUME
................................................................
8
To adjust the sound volume:
.........................................
8
MUTING
.................................................................
8
To mute the sound:
.......................................................
8
DISPLAY
..................................................................
8
To check the settings:
...................................................
8
DIGITAL ZOOM
.......................................................
8
AUTO SET UP
..........................................................
8
To adjust the size or quality of the picture automatically:
......
8
OFF TIMER
..............................................................
8
To set the off timer:
......................................................
8
To check the remaining time:
.......................................
8
To cancel the off timer:
................................................
8
WIDE Operations
...............................................
9
SCREEN SIZE Operation (manual)
.............................
9
When viewing videos or digital video discs
.................
9
SCREEN SIZE Operation with Computer Signals
........
10
When “PICTURE SIZE” is set to “OFF”
...................
10
OSD (On Screen Display) Controls
.....................
11
Menu Operations
...................................................
11
Setting the language for the menus
...........................
11
Menu Tree
.............................................................
12
Picture Settings Menu
..............................................
14
Adjusting the picture
..................................................
14
Setting the picture modes according to
the brightness of the room
.......................................
14
Reducing noise in the picture
.....................................
14
Setting the color temperature
.....................................
14
Adjusting the color to the desired level
......................
15
Changing the Gamma Curve
......................................
15
Making the Low Tone adjustments
............................
15
Adjusting the colors
...................................................
15
SOUND Settings Menu
...........................................
16
Adjusting the treble, bass and left/right balance
and audio input select
..............................................
16
Setting the allocation of the audio connectors
............
16
SCREEN Settings Menu
...........................................
16
Adjusting the Position, Size, PHASE, CLOCK
................
16
Option1 Settings Menu
...........................................
17
Setting the on-screen display
......................................
17
Setting the BNC connectors
.......................................
17
Checking the signal being transmitted to PC1 terminal
.......
17
Setting a computer image to the correct RGB select screen
......
17
Setting high definition images to the suitable screen size
....
18
Setting the Input Skip
.................................................
18
Resetting to the default values
....................................
18
Option2 Settings Menu
...........................................
19
Setting the power management for computer images
.....
19
STANDBY/ON indicator
...........................................
19
Setting the picture to suit the movie
...........................
19
Reducing burn-in of the screen
..................................
19
Setting the gray level for the SIDE MASK
................
21
Setting the screen size for S1/S2 video input
..............
22
Setting the picture size for RGB input signals
............
22
Setting the signal and black level for DVI signal
........
22
Option3 Settings Menu
...........................................
23
Using the timer
..........................................................
23
Setting the power on mode
.........................................
24
Enabling/disabling the front panel controls
................
24
Enabling/disabling remote control wireless transmission
....
24
Loop Out setting
........................................................
24
ID number setting
......................................................
25
Video Wall setting
......................................................
25
Advanced OSD Settings Menu
.................................
27
Setting the menu mode
..............................................
27
Color System Settings Menu
....................................
28
Setting the video signal format
...................................
28
Source Information Menu
........................................
28
Checking the frequencies, polarities of input signals,
and resolution
..........................................................
28
Pin Assignments
.............................................
29
mini D-Sub 15-pin connector (Analog)
.....................
29
DVI-D 24-pin connector (Digital)
..............................
29
Table of Signals Supported
..............................
30
Troubleshooting
..............................................
32
Specifications
.................................................
33
Contents of the Package
±
Plasma monitor
±
Power cord
±
Remote control with two AAA Batteries
±
Manual
±
Warranty
±
Safety metal fittings (2pcs)
*
±
Ferrite cores (large 2pcs, small 2pcs)
±
Bands (2pcs)
±
Cable clamps (5pcs)
±
Wiping cloth
*
These are fittings for fastening the unit to a wall to prevent
tipping due to external shock when using the stand
(optional). Fasten the safety fittings to the holes in the
back of the monitor using the safety fitting mount screws
(see page 2).
Options
• Wall mount unit
• Stand
• Speakers