Pioneer 614MX Operating Instructions - Page 12
Picture Settings Menu
 |
UPC - 012562732336
View all Pioneer 614MX manuals
Add to My Manuals
Save this manual to your list of manuals |
Page 12 highlights
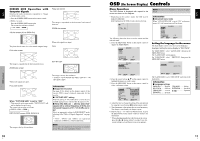
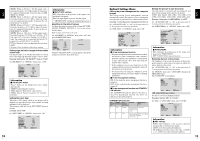
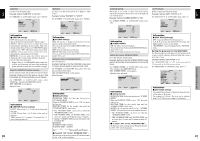
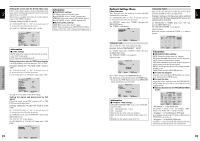
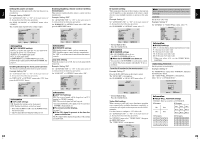
English Picture Settings Menu Adjusting the picture The contrast, brightness, sharpness, color and tint can be adjusted as desired. Example: Adjusting the contrast On "CONTRAST" of "PICTURE" menu, adjust the contrast. PICTURE 1 / 2 CONTRAST BRIGHTNESS SHARPNESS COLOR TINT AV SELECTION : STD DNR : OFF NEXT PAGE CONTRAST 52 SEL. ADJ. EXIT RETURN Note: If "CAN NOT ADJUST" appears ... When trying to enter the PICTURE submenu, make sure AV SELECTION is not set to DEFAULT. Information Ⅵ Picture adjustment screen CONTRAST: Changes the picture's white level. BRIGHTNESS: Changes the picture's black level. SHARPNESS: Changes the picture's sharpness. Adjusts picture detail of VIDEO display. COLOR: Changes the color density. TINT: Changes the picture's tint. Adjust for natural colored skin, background, etc. Ⅵ Adjusting the computer image Only the contrast and brightness can be adjusted when a computer signal is connected. Ⅵ Restoring the factory default settings Select "DEFAULT" under the "AV SELECTION" settings. Setting the picture modes according to the brightness of the room There are four picture modes that can be used effectively according to the environment in which you are viewing the display. Example: Setting the "MOVIE 1" mode On "AV SELECTION" of "PICTURE" menu, select "MOVIE 1". PICTURE 1 / 2 CONTRAST BRIGHTNESS SHARPNESS COLOR TINT AV SELECTION : STD DNR : OFF NEXT PAGE SEL. ADJ. EXIT RETURN AV SELECTION : MOVIE 1 Reducing noise in the picture Use these settings if the picture has noise due to poor reception or when playing video tapes on which the picture quality is poor. Example: Setting "HIGH" On "DNR" of "PICTURE" menu, select "HIGH". PICTURE 1 / 2 CONTRAST BRIGHTNESS SHARPNESS COLOR TINT AV SELECTION : STD DNR : OFF NEXT PAGE SEL. ADJ. EXIT RETURN DNR : HIGH Information Ⅵ DNR * "DNR" stands for Digital Noise Reduction. * This function reduces noise in the picture. Ⅵ Types of noise reduction There are three types of noise reduction. Each has a different level of noise reduction. The effect increases stronger in the order of LOW, MID and High. OFF: Turns the noise reduction function off. Setting the color temperature Use this procedure to set color tone produced by the plasma display. Example: Setting "HIGH" On "COLOR TEMP." of "PICTURE" menu, select "HIGH". PICTURE 2 / 2 PREVIOUS PAGE COLOR TEMP. : HIGH GAMMA : 2 LOW TONE : AUTO C.DETAIL ADJ. SEL. ADJ. EXIT RETURN Information Ⅵ Setting the color temperature LOW: Redder MID LOW: Slightly red MID: Standard (slightly bluer) HIGH: Bluer OSD (On Screen Display) Controls Information Ⅵ Types of AV SELECTIONs MOVIE 1, 2: Set this mode when watching video in a dark room. This mode provides darker, finer pictures, like the screen in movie theaters. For a darker image, select MOVIE 2. STD: Set this mode when watching video in a bright room. This mode provides pictures with distinct differences between light and dark sections. DYNAMIC: This mode provides brighter pictures than STD. DEFAULT: Use this to reset the picture to the factory default settings. 14 En English Adjusting the color to the desired level Use this procedure to adjust the white balance for each color temperature to achieve the desired color quality. Example: Adjusting the "R.HIGH" of "HIGH" color temperature Set "ADVANCED OSD" to "ON" in the main menu (1/ 2), then perform the following operations. On "COLOR TEMP." of "PICTURE" menu, select "HIGH", then press the MENU/SET button. The "WHITE BALANCE" screen appears. On "R.HIGH", adjust the white balance. WHITE BALANCE COLOR TEMP. HIGH R.HIGH G.HIGH B.HIGH R.LOW G.LOW B.LOW RESET : OFF R.HIGH 70 SEL. ADJ. EXIT RETURN Information Ⅵ Adjusting the white balance R/G/B.HIGH: White balance adjustment for white level R/G/B.LOW: White balance adjustment for black level RESET: Resets settings to the factory default values. Use ᮤ and ᮣ buttons to select "ON", then press the MENU/SET button. Ⅵ Restoring the factory default settings Select "RESET" under the WHITE BALANCE menu. Changing the Gamma Curve This feature adjusts the brightness of the midtone areas while keeping shadows and highlights unchanged. Example: Setting "3" Set "ADVANCED OSD" to "ON" in the MAIN MENU (1/2), then perform the following operations. On "GAMMA" of "PICTURE" menu, select "3". PICTURE 2 / 2 PREVIOUS PAGE COLOR TEMP. : MID GAMMA : 3 LOW TONE : AUTO C.DETAIL ADJ. SEL. ADJ. EXIT RETURN Information Ⅵ GAMMA settings The picture becomes darker as the number increases (in the sequence of 1, 2, 3, 4). Making the Low Tone adjustments This feature allows more detailed tone to be reproduced especially in the dark area. Example: Setting "2" Set "ADVANCED OSD" to "ON" in the MAIN MENU (1/2), then perform the following operations. On "LOW TONE" of "PICTURE" menu, select "2". PICTURE 2 / 2 PREVIOUS PAGE COLOR TEMP. : MID GAMMA : 2 LOW TONE : 2 C.DETAIL ADJ. SEL. ADJ. EXIT RETURN Information Ⅵ LOW TONE settings AUTO: Will automatically appraise the picture and make adjustments. 1: Will apply the dither method suitable for still pictures. 2: Will apply the dither method suitable for motion pictures. 3: Will apply the error diffusion method. Adjusting the colors Use this procedure to adjust hue and color density for red, green, blue, yellow, magenta and cyan. You can accentuate the green color of trees, the blue of the sky, etc. Example: Adjusting the color detail adj for blue Set "ADVANCED OSD" to "ON" in the MAIN MENU (1/2), then perform the following operations. On "PICTURE" menu, select "C. DETAIL ADJ", then press the MENU/SET button. The "C. DETAIL ADJ" screen appears. On "BLUE" of "C. DETAIL ADJ", adjust the color detail. C.DETAIL ADJ. RED Y M GREEN C Y BLUE M C YELLOW G R MAGENTA R B CYAN B G RESET : OFF SEL. ADJ. EXIT RETURN Information Ⅵ C. DETAIL ADJ settings RED: Makes red's adjustment GREEN: Makes green's adjustment BLUE: Makes blue's adjustment YELLOW: Makes yellow's adjustment MAGENTA: Makes magenta's adjustment CYAN: Makes cyan's adjustment RESET: Resets settings to the factory default value. Use ᮤ and ᮣ buttons to select "ON", then press the MENU/SET button. OSD (On Screen Display) Controls 15 En
-
 1
1 -
2
-
3
-
4
-
5
-
6
-
 7
7 -
 8
8 -
 9
9 -
 10
10 -
 11
11 -
 12
12 -
 13
13 -
 14
14 -
 15
15 -
 16
16 -
 17
17 -
18
-
19
-
20
-
21
 |
 |