Pioneer AVIC-8100NEX Owner's Manual - Page 149
Activating iDatalink Maestro, Starting procedure, Using iDatalink - head unit
 |
View all Pioneer AVIC-8100NEX manuals
Add to My Manuals
Save this manual to your list of manuals |
Page 149 highlights
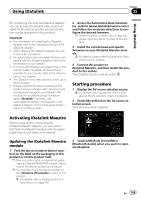
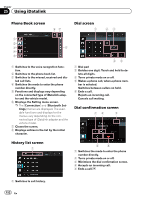
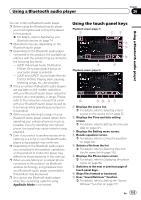
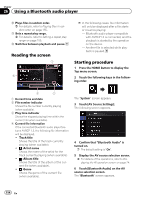
Using iDatalink Chapter 25 Using iDatalink By connecting the optional iDatalink adapter, you can access the satellite radio source provided for the vehicle and the vehicle information can be displayed on this product. Important ! For information on installing the iDatalink adapter, refer to the operating manual of the iDatalink adapter. ! After installing the iDatalink adapter, be sure to check the operations. ! For details about vehicle models that are compatible with the iDatalink adapter, refer to the information on our website. ! Functions and displays vary depending on the vehicle model. For details of the functions available for each model, refer to the information on our website. ! The iDatalink list screen can be scrolled up or down by page. ! Please note that the device number of this product and a computer with internet access are required to program your Maestro RR module. For troubleshooting information about "iDatalink" functions, visit www.idatalinkmaestro.com/support or call iDatalink Maestro Technical Support toll-free at 877.212.6169 ext 7900. 2 Access the Automotive Data Solutions Inc. website (www.idatalinkmaestro.com/) and follow the on-screen directions to configure the desired firmware. p When the serial number input is required, please input the device number of this product. 3 Install the vehicle/head unit specific firmware on your iDatalink Maestro module. = For details, please refer to Automotive Data Solutions Inc. website. 4 Connect this product to iDatalink Maestro, and then install this product to the vehicle. The iDatalink function will be active. Starting procedure 1 Display the AV source selection screen. = For details of the operations, refer to Displaying the AV operation screen on page 24. 2 Touch [My Vehicle] on the AV source selection screen. The following screen appears. Activating iDatalink Maestro Before using and/or connecting the iDatalink Maestro adapter, you will need to first flash the Maestro module with the appropriate vehicle and head unit firmware. Updating the iDatalink Maestro module 1 Find the last six numbers (device number) on the label on the packaging of this product or on this product itself. p Device number input is required for updating the iDatalink MAESTRO module. Take a note of the device number as necessary. p You can also check the device number on the "Firmware Information" screen of this product. = For details, refer to Displaying the firmware version on page 190. 3 Touch [USB/iPod], [SiriusXM] or [Bluetooth Audio] when you want to operate iDatalink. En 149
-
 1
1 -
2
-
3
-
4
-
5
-
6
-
7
-
8
-
9
-
10
-
11
-
12
-
13
-
14
-
15
-
16
-
17
-
18
-
19
-
20
-
21
-
22
-
23
-
24
-
25
-
26
-
27
-
28
-
29
-
30
-
31
-
32
-
33
-
34
-
35
-
36
-
37
-
38
-
39
-
40
-
41
-
42
-
43
-
44
-
45
-
46
-
47
-
48
-
49
-
50
-
51
-
52
-
53
-
54
-
55
-
56
-
57
-
58
-
59
-
60
-
61
-
62
-
63
-
64
-
65
-
66
-
67
-
68
-
69
-
70
-
71
-
72
-
73
-
74
-
75
-
76
-
77
-
78
-
79
-
80
-
81
-
82
-
83
-
84
-
85
-
86
-
87
-
88
-
89
-
90
-
91
-
92
-
93
-
94
-
95
-
96
-
97
-
98
-
99
-
100
-
101
-
102
-
103
-
104
-
105
-
106
-
107
-
108
-
109
-
110
-
111
-
112
-
113
-
114
-
115
-
116
-
117
-
118
-
119
-
120
-
121
-
122
-
123
-
124
-
125
-
126
-
127
-
128
-
129
-
130
-
131
-
132
-
133
-
134
-
135
-
136
-
137
-
138
-
139
-
140
-
141
-
142
-
143
-
 144
144 -
 145
145 -
 146
146 -
 147
147 -
 148
148 -
 149
149 -
 150
150 -
 151
151 -
 152
152 -
 153
153 -
 154
154 -
155
-
156
-
157
-
158
-
159
-
160
-
161
-
162
-
163
-
164
-
165
-
166
-
167
-
168
-
169
-
170
-
171
-
172
-
173
-
174
-
175
-
176
-
177
-
178
-
179
-
180
-
181
-
182
-
183
-
184
-
185
-
186
-
187
-
188
-
189
-
190
-
191
-
192
-
193
-
194
-
195
-
196
-
197
-
198
-
199
-
200
-
201
-
202
-
203
-
204
-
205
-
206
-
207
-
208
-
209
-
210
-
211
-
212
-
213
-
214
-
215
-
216
-
217
-
218
-
219
-
220
-
221
-
222
-
223
-
224
-
225
-
226
-
227
-
228
-
229
-
230
-
231
-
232
-
233
-
234
-
235
-
236
-
237
-
238
-
239
-
240
-
241
-
242
-
243
-
244
-
245
-
246
-
247
-
248
-
249
-
250
-
251
-
252
-
253
-
254
-
255
-
256
-
257
-
258
-
259
-
260
-
261
-
262
-
263
-
264
 |
 |
