Pioneer AVIC-8100NEX Owner's Manual - Page 17
Adjusting the LCD panel angle, Inserting/ejecting, connecting media, Basic operation
 |
View all Pioneer AVIC-8100NEX manuals
Add to My Manuals
Save this manual to your list of manuals |
Page 17 highlights
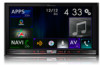
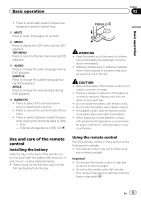
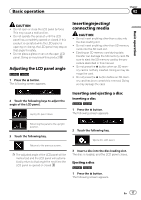
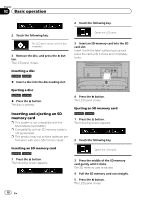
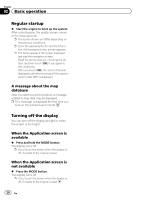
Basic operation Chapter 02 Basic operation CAUTION ! Do not open or close the LCD panel by force. This may cause a malfunction. ! Do not operate this product until the LCD panel has completely opened or closed. If this product is operated while the LCD panel is opening or closing, the LCD panel may stop at that angle for safety. ! Do not place a glass or can on the open LCD panel. Doing so may break this product. Adjusting the LCD panel angle 8100NEX 7100NEX 1 Press the h button. The following screen appears. Inserting/ejecting/ connecting media CAUTION ! Do not insert anything other than a disc into the disc-loading slot. ! Do not insert anything other than SD memory cards into the SD card slot. ! Ejecting an SD memory card during data transfer can damage the SD memory card. Be sure to eject the SD memory card by the procedure described in this manual. ! Do not press the h button when an SD memory card is not fully inserted. Doing so may damage the card. ! Do not press the h button before an SD memory card has been completely removed. Doing so may damage the card. 2 Touch the following keys to adjust the angle of the LCD panel. Laying the panel down. Inserting and ejecting a disc Inserting a disc 8100NEX 7100NEX 1 Press the h button. The following screen appears. Returning the panel to the upright position. 3 Touch the following key. Returns to the previous screen. p The adjusted angle of the LCD panel will be memorized and the LCD panel will automatically return to that angle the next time the LCD panel is opened or closed. 2 Touch the following key. Opens the LCD panel. 3 Insert a disc into the disc-loading slot. The disc is loaded, and the LCD panel closes. Ejecting a disc 8100NEX 7100NEX 1 Press the h button. The following screen appears. En 17
-
 1
1 -
2
-
3
-
4
-
5
-
6
-
7
-
8
-
9
-
10
-
11
-
 12
12 -
 13
13 -
 14
14 -
 15
15 -
 16
16 -
 17
17 -
 18
18 -
 19
19 -
 20
20 -
 21
21 -
 22
22 -
23
-
24
-
25
-
26
-
27
-
28
-
29
-
30
-
31
-
32
-
33
-
34
-
35
-
36
-
37
-
38
-
39
-
40
-
41
-
42
-
43
-
44
-
45
-
46
-
47
-
48
-
49
-
50
-
51
-
52
-
53
-
54
-
55
-
56
-
57
-
58
-
59
-
60
-
61
-
62
-
63
-
64
-
65
-
66
-
67
-
68
-
69
-
70
-
71
-
72
-
73
-
74
-
75
-
76
-
77
-
78
-
79
-
80
-
81
-
82
-
83
-
84
-
85
-
86
-
87
-
88
-
89
-
90
-
91
-
92
-
93
-
94
-
95
-
96
-
97
-
98
-
99
-
100
-
101
-
102
-
103
-
104
-
105
-
106
-
107
-
108
-
109
-
110
-
111
-
112
-
113
-
114
-
115
-
116
-
117
-
118
-
119
-
120
-
121
-
122
-
123
-
124
-
125
-
126
-
127
-
128
-
129
-
130
-
131
-
132
-
133
-
134
-
135
-
136
-
137
-
138
-
139
-
140
-
141
-
142
-
143
-
144
-
145
-
146
-
147
-
148
-
149
-
150
-
151
-
152
-
153
-
154
-
155
-
156
-
157
-
158
-
159
-
160
-
161
-
162
-
163
-
164
-
165
-
166
-
167
-
168
-
169
-
170
-
171
-
172
-
173
-
174
-
175
-
176
-
177
-
178
-
179
-
180
-
181
-
182
-
183
-
184
-
185
-
186
-
187
-
188
-
189
-
190
-
191
-
192
-
193
-
194
-
195
-
196
-
197
-
198
-
199
-
200
-
201
-
202
-
203
-
204
-
205
-
206
-
207
-
208
-
209
-
210
-
211
-
212
-
213
-
214
-
215
-
216
-
217
-
218
-
219
-
220
-
221
-
222
-
223
-
224
-
225
-
226
-
227
-
228
-
229
-
230
-
231
-
232
-
233
-
234
-
235
-
236
-
237
-
238
-
239
-
240
-
241
-
242
-
243
-
244
-
245
-
246
-
247
-
248
-
249
-
250
-
251
-
252
-
253
-
254
-
255
-
256
-
257
-
258
-
259
-
260
-
261
-
262
-
263
-
264
 |
 |
