Pioneer AVIC-88DVD Owner's Manual - Page 22
Navi Or Pos
 |
View all Pioneer AVIC-88DVD manuals
Add to My Manuals
Save this manual to your list of manuals |
Page 22 highlights
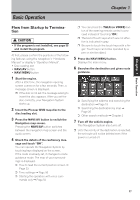
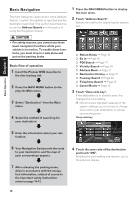
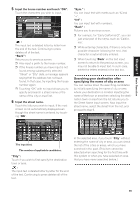
7 Touch the street from the list. ❒ If the selected street is very long, and passes through several cities or area, the screen for entering the name of the city or area appears. Basic Operation Chapter 1 Scroll bar Touching the or on the scroll bar scrolls you through the list and allows you to view the remaining items. ➲ Searching the destination by map ➞ Page 26 In the case of an item that cannot be displayed in a single line, touching the to the right of the item allows you to see the whole line. ❒ If only one location is found from the list, route calculation starts after pressing the item. • Touching the specifies the selected street and streets intersecting it, allowing you to set an intersection as your destination. This is useful when you don't know the house number of your destination or cannot input the house number of the specified street. • Touching the displays a map of the place you have selected. (Candidate place names may appear in the list screen.) 8 Input the destination town or area. If the list screen is displayed, proceed to step 9. 9 Touch the city or area where your destina- tion is located. Route calculation starts. When the route calculation is completed, the map of your surroundings appears. (The route is displayed in green.) If you did not input the house number in Step 5, the house number input screen comes up after the "Street" and "City" are determined. You should now input the house number (perform Step 5). ❒ If there is more than one place for the house number input, or if there is no such house number in that place, displays a list of a certain range. To start the route calculation, touch the range within the list you wish to specify as the destination. ❒ You can also see the destination on the map by touching the to the right of the list. ➲ Searching the destination by map ➞ Page 26 ❒ If you press the NAVI (or POS) button during route calculation, the calculation is canceled and the map display appears. ❒ When performing a destination search with the route already set, select whether to make the specified area your destination and search for a new route, or search for a route via that area. ➲ Adding way points to the route ➞ Page 35 ➲ Once searched for, a location is automati- cally stored in the "Destination History" ➞ Page 38 10Drive in accordance with the screen and voice information. Your Navigation System gives you the following information with the timing adjusted to the speed of your vehicle: • Distance to the next turning point • Direction of travel • Road number of the freeway • Way point (If this is set) • Your destination ➲ How to view the screen ➞ Page 23 ➲ Searching for another route ➞ Page 34 ➲ Canceling route guidance ➞ Page 35 20
-
 1
1 -
2
-
3
-
4
-
5
-
6
-
7
-
8
-
9
-
10
-
11
-
12
-
13
-
14
-
15
-
16
-
 17
17 -
 18
18 -
 19
19 -
 20
20 -
 21
21 -
 22
22 -
 23
23 -
 24
24 -
 25
25 -
 26
26 -
 27
27 -
28
-
29
-
30
-
31
-
32
-
33
-
34
-
35
-
36
-
37
-
38
-
39
-
40
-
41
-
42
-
43
-
44
-
45
-
46
-
47
-
48
-
49
-
50
-
51
-
52
-
53
-
54
-
55
-
56
-
57
-
58
-
59
-
60
-
61
-
62
-
63
-
64
-
65
-
66
-
67
-
68
-
69
-
70
-
71
-
72
-
73
-
74
 |
 |
