Pioneer AVIC N2 Other Manual - Page 14
When connecting to separately sold power amp
 |
UPC - 012562735191
View all Pioneer AVIC N2 manuals
Add to My Manuals
Save this manual to your list of manuals |
Page 14 highlights
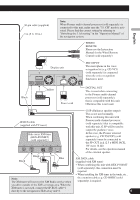
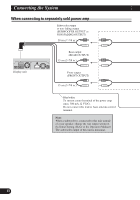
Connecting the System When connecting to separately sold power amp Subwoofer output or non-fading output (SUBWOOFER OUTPUT or NON-FADING OUTPUT) 20 cm (7-7/8 in.) Display unit Rear output (REAR OUTPUT) 15 cm (5-7/8 in.) Front output (FRONT OUTPUT) 15 cm (5-7/8 in.) Blue/white To system control terminal of the power amp (max. 300 mA 12 V DC). Do not connect this lead to Auto-antenna control terminal. Note: When a subwoofer is connected to this unit instead of a rear speaker, change the rear output setting in the Initial Setting. (Refer to the Operation Manual.) The subwoofer output of this unit is monaural. 13
-
 1
1 -
2
-
3
-
4
-
5
-
6
-
7
-
8
-
 9
9 -
 10
10 -
 11
11 -
 12
12 -
 13
13 -
 14
14 -
 15
15 -
 16
16 -
 17
17 -
 18
18 -
 19
19 -
20
-
21
-
22
-
23
-
24
-
25
-
26
-
27
-
28
-
29
-
30
-
31
-
32
-
33
-
34
-
35
-
36
-
37
-
38
-
39
-
40
-
41
-
42
-
43
-
44
-
45
-
46
-
47
-
48
-
49
-
50
-
51
-
52
-
53
-
54
-
55
-
56
-
57
-
58
-
59
-
60
-
61
 |
 |

13
Connecting the System
When connecting to separately sold power amp
Display unit
Front output
(FRONT OUTPUT)
Subwoofer output
or non-fading output
(SUBWOOFER OUTPUT or
NON-FADING OUTPUT)
Rear output
(REAR OUTPUT)
15 cm (5
–
7/8 in.)
20 cm (7
–
7/8 in.)
Blue/white
To system control terminal of the power amp
(max. 300 mA 12 V DC).
Do not connect this lead to Auto-antenna control
terminal.
Note:
When a subwoofer is connected to this unit instead
of a rear speaker, change the rear output setting in
the Initial Setting. (Refer to the Operation Manual.)
The subwoofer output of this unit is monaural.
15 cm (5
–
7/8 in.)