Pioneer AVIC N2 Other Manual - Page 26
DIN Rear-mount, Fixing the front panel
 |
UPC - 012562735191
View all Pioneer AVIC N2 manuals
Add to My Manuals
Save this manual to your list of manuals |
Page 26 highlights
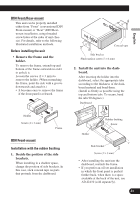
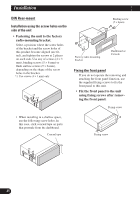
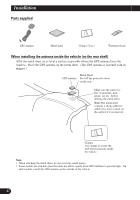
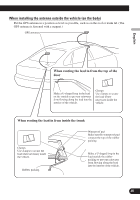
Installation DIN Rear-mount Installation using the screw holes on the side of the unit • Fastening the unit to the factory radio-mounting bracket. Select a position where the screw holes of the bracket and the screw holes of this product become aligned (are fitted), and tighten the screws at 2 places on each side. Use any of screws (4 × 3 mm), binding screws (5 × 6 mm) or flush surface screws (5 × 6 mm), depending on the shape of the screw holes in the bracket. *1 Use screws (4 × 3 mm) only. *1 *1 Binding screw (5 × 6mm) Factory radio mounting bracket Dashboard or Console Fixing the front panel If you do not operate the removing and attaching the front panel function, use the supplied fixing screws to fix the front panel to this unit. • Fix the front panel to the unit using fixing screws after removing the front panel. Fixing screw • When installing in a shallow space, use the following screw holes. In this case, stick conceal tape on parts that protrude from the dashboard. Conceal tape Fixing screw *1 *1 25
-
 1
1 -
2
-
3
-
4
-
5
-
6
-
7
-
8
-
9
-
10
-
11
-
12
-
13
-
14
-
15
-
16
-
17
-
18
-
19
-
20
-
 21
21 -
 22
22 -
 23
23 -
 24
24 -
 25
25 -
 26
26 -
 27
27 -
 28
28 -
 29
29 -
 30
30 -
 31
31 -
32
-
33
-
34
-
35
-
36
-
37
-
38
-
39
-
40
-
41
-
42
-
43
-
44
-
45
-
46
-
47
-
48
-
49
-
50
-
51
-
52
-
53
-
54
-
55
-
56
-
57
-
58
-
59
-
60
-
61
 |
 |
