Pioneer CMX-3000 Owner's Manual - Page 10
Connections - control cable
 |
UPC - 012562575025
View all Pioneer CMX-3000 manuals
Add to My Manuals
Save this manual to your list of manuals |
Page 10 highlights
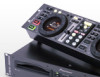
Read before use CONNECTIONS Before connecting or disconnecting any cables, be sure to first turn off the power switch and remove the power cord from its socket. The CD player may be damaged if cables are connected when the power is on. 1. Connecting the player to the remote control unit First connect the CD player to the remote control unit. Remote control unit Specialized connection cable Player 2. Connecting the system to a DJ mixer (DJM-300, DJM-500, or DJM-600) (connecting audio output and control jack cables) Using the audio cables provided with your CMX-3000 CD player system, insert the white plugs into the left (L) jacks and the red plugs into the right (R) jacks. Note that it is also possible to use the CMX-3000 control cord to control the CMX-3000 from a mixer to make it possible to use fader startup or back cueing. (This does not apply, however, during relay playback.) Player L L PHONO LINE PHONO LINE R PHONO2 LINE3 CONTROL /LINE4 CH - 2 R PHONO1 LINE1 CONTROL /LINE2 CH - 1 CMX-3000 control CMX-3000 cord control cord CMX-3000 audio cable CMX-3000 audio cable ¶ When connecting to a DJM-300, DJM-500 or DJM-600 mixer, use the CMX-3000 audio cables to connect CD1 to A PLAYER and CD2 to B PLAYER as indicated in the diagram above. 3. Connecting the CMX-3000 to other devices A Connecting the CMX-3000 to other mixers To connect the CMX-3000 to other mixers, connect the CMX-3000 AUDIO OUT jacks to the line input jacks or AUX jacks of the mixer. (Do not connect to PHONO jacks, as doing so would result in the sound being distorted and in being unable to obtain normal playback quality.) 10
-
 1
1 -
2
-
3
-
4
-
 5
5 -
 6
6 -
 7
7 -
 8
8 -
 9
9 -
 10
10 -
 11
11 -
 12
12 -
 13
13 -
 14
14 -
 15
15 -
16
-
17
-
18
-
19
-
20
 |
 |
