Pioneer CMX-3000 Owner's Manual - Page 11
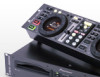
Disc Loading/unloading - case
 |
UPC - 012562575025
View all Pioneer CMX-3000 manuals
Add to My Manuals
Save this manual to your list of manuals |
Page 11 highlights
Read before use (Connections) B Connecting the CMX-3000 to stereo amplifiers (when not using a DJ mixer) Stereo amplifier Connect audio cable to CD or AUX input jacks. (Do not connect to PHONO input jacks.) INPUT CD L R CMX-3000 audio cable C Connecting the CMX-3000 to devices with digital input jacks Player CD recorder or other device with digital input amplifier DIGITAL INPUT OPTICAL COAXIAL Digital signal cable Player ¶ When using the digital output jacks, the DIGITAL MODE switch must be set to 'ON'. Note: Turning the DIGITAL MODE switch 'ON' causes all DJ features (i.e., CUE, LOOP, RELOOP, TEMPO CONTROL, MASTER TEMPO, increase/reduce speed by the jog dial or HOT CUE) to be disabled. Also note that when using digital output pausing results not in a start playback pause but in a silent pause instead. 4. Connecting the power cord When all connections have been made, connect the power cord to the AC inlet on the rear panel of the player and connect the power plug to an AC wall outlet or to a power receptacle on the rear panel of the amplifier. DISC LOADING/UNLOADING Label surface up Insert straight POWER switch 1. Press POWER switch on front of player to turn power on. Do not force a disc into the unit when the POWER switch is set to OFF as this may damage the disc and the unit. 2. Insert a disc. ¶ Hold the disc with label surface upwards, and insert into the front panel disc insertion slot . ¶ When playing an 3 inch/8 cm disc, place the disc in a commercially available CD adapter before inserting in the insertion slot. ¶ Each insertion slot can only accommodate one disc at a time. Never attempt to load more than one disc at the same time, or attempt to load a second disc when one disc has already been loaded. ¶ When loading a disc, do not placing any twisting force on the disc, or try to force the disc into the slot. Also, do not attempt to interrupt or defeat the motion of the disc when the player begins to draw a disc into the slot or to eject a disc, since damage to the disc or player could occur. 3. During playback, press the PLAY/PAUSE button (38) or if a cue point has been specified press the CUE button to back-cue before pressing the EJECT button (0) to eject a disc ¶ When the EJECT button is pressed, disc rotation stops and the disc is ejected from the loading slot. ¶ If the disc fails to be ejected when the EJECT button is pressed, the accessory forced eject pin can be inserted into the front-panel's forced eject hole to eject the disc. (see p. 5) CAUTION: Do not attempt to press a disc back into the slot when the EJECT indicator appears. Pressing a disc back into the slot while the EJECT indicator appears may cause the player to stop. In this case, press the EJECT button again and wait until the EJECT indicator goes out before reinserting the disc. 11
-
 1
1 -
2
-
3
-
4
-
5
-
 6
6 -
 7
7 -
 8
8 -
 9
9 -
 10
10 -
 11
11 -
 12
12 -
 13
13 -
 14
14 -
 15
15 -
 16
16 -
17
-
18
-
19
-
20
 |
 |
