Pioneer CMX-3000 Owner's Manual - Page 18
Fader Start Playback, Relay Play Using Two Players, Data Copy - cable
 |
UPC - 012562575025
View all Pioneer CMX-3000 manuals
Add to My Manuals
Save this manual to your list of manuals |
Page 18 highlights
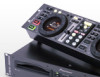
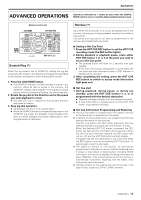
Applications (Advanced operations) Remote control unit PITCH BEND+,- MASTER TEMPO RELAY PLAY BPM SYNC TRACK SEARCH (4,¢) CUE PLAY/ PAUSE (3 8) Jog dial Tempo control slide Press the BPM SYNC button. ¶ The BPM SYNC button will flash and the player enters the BPM synchro playback mode. ¶ If both players are currently in playback mode, no synchronization is possible until playback is stopped on one of the players. When one player is stopped, the player still playing back is considered the master. ¶ If start is begun when the BPM on the slave player is unknown, synchro playback will begin at the point the slave's BPM value is measured. ¶ During BPM synchro, the MASTER indicator will light on the "master" player's display. On the slave player, the tempo control range display will turn off and the tempo change rate display will show the tempo compensation value. ¶ During BPM synchro, the slave player's tempo will change to match any tempo changes on the master side. In this case, the tempo and pitch bend of the slave player cannot be independently adjusted. ¶ If playback is interrupted on the master player, the slave player will become the master. When this occurs, if the tempo control of the new master player is at a different setting from the tempo of the currently playing track, the display will alternately show the message dEc (or Inc), and the amount of tempo deviation. To reduce the tempo deviation to zero, move the tempo control slide to the "-" side if dEc is displayed, and to the "+" side if Inc is displayed. Speed control using the tempo control slide becomes possible when the tempo has been adjusted. 7 Correcting beat timing ¶ When beat is detected during BPM synchro, the ring display will light to graphically indicate the four-beat timing. ¶ The four-beat timing of the currently playing track on players A, B can be designated by tapping the TAP button with that timing once on each of the two players. The beat timing of the slave player will be automatically brought into correspondence with that of the master player, so as to match the designated beat timing. NOTES: ¶ It may not be possible to correctly measure the BPM value for some tracks. If this happens, press the TAP button in time with the beat to enable a more accurate BPM synchro playback. However, if the BPM synchro range is outside the adjustable range of the player, appropriate BPM synchro playback may not be possible. ¶ During BPM synchro, the tempo control slide and pitch bend operations are disabled on the slave player. Fader Start Playback (*) The provided control cable may be used to connect the control jack on the CMX-3000 to a control jack on a DJM-300, DJM-500, or DJM-600 mixer, thus making it possible to exit from cueing standby mode and to start playback immediately by raising the DJ mixer CHANNEL FADER. The CROSS FADER may also be used to perform fading starts on the player as well. The fader may also be returned to its original position to return the player to the cueing point (i.e., to perform back cueing). (This does not apply, however, during auto playback.) (See p. 10 for instructions on how to connect the player and mixer.) 18 Relay Play Using Two Players (*) ÷ Set both player's auto cue function to ON (the A. CUE indicators will light in the displays). ÷ Set your DJ mixer's fader control to its center position. 1. Press the RELAY PLAY button to blink the button indicator. 2. Begin playback on the first player. 3. When the currently playing track ends, playback will begin automatically on the standby player. 4. The first player will enter cue standby mode at the beginning of the next track on its disc. ¶ By repeating this operation, the two players can be used to perform continuous relay play. ¶ By loading new discs on the standby player, you can construct a continuous program of whatever tracks you wish. ¶ By setting a Cue point on the standby player, you can perform relay to any desired Cue point on the selected track (see page 13: Cueing Point Settings). NOTES: ÷ Fader start and relay play cannot be performed simultane- ously. ÷ When the Auto Cue function is off, replay will be performed of the entire disc. Data Copy WAVE and other data recorded in this unit can be copied to another CMX-3000 if desired. 1. With the unit power off, use a control cord to connect the two player's DATA IN/OUT connectors. 2. On each CMX-3000, turn on power while simultaneously pressing the EJECT buttons on players A and B. (The remote control unit's EJECT button cannot be used for this operation.) ÷ The power will turn on, and data copy mode (slave mode) will be established; the display will show "SLAVE M". 3. With both units in the data copy mode ("slave mode"), press the CD TEXT/WAVE button on the player A holding the WAVE data you wish to copy. Hold the button depressed for one second. ÷ This unit will enter the master mode and the display will show "MASTER." 4. Press the PLAY/PAUSE button (38) of Player A on the "master" unit. ÷ Data copying will begin, and the 38 indictor will flash. ÷ About ten minutes will be required for the copy operation. END is displayed on the master when copying is completed. 5. Turn off the power on both units and disconnect the control cord. ÷ When power is turned on again, operation will return to normal mode. NOTES: ÷ Do not turn off the power or disconnect cables during copying to prevent corruption of the copying data. ÷ If the ERROR message is displayed during data copy, check your connections and perform the data copy function again.
-
 1
1 -
2
-
3
-
4
-
5
-
6
-
7
-
8
-
9
-
10
-
11
-
12
-
 13
13 -
 14
14 -
 15
15 -
 16
16 -
 17
17 -
 18
18 -
 19
19 -
 20
20
 |
 |
