Pioneer CMX-3000 Owner's Manual - Page 13
Fast Forward and Rewind, Cueing Point Settings, Changing Playback Speed, Setting a Master Tempo - dj
 |
UPC - 012562575025
View all Pioneer CMX-3000 manuals
Add to My Manuals
Save this manual to your list of manuals |
Page 13 highlights
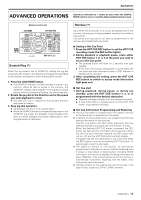
Basic Operation (DJ player operation) 7 Super-fast track searching Turn the jog dial while pressing either TRACK SEARCH button (4, ¢). ¶ Turning the jog dial in the direction you wish to skip while pressing the forward or reverse TRACK SEARCH button (4, ¢) will cause the player to enter high-speed skipping mode, with the speed being adjusted in accordance with the degree to which the jog dial is turned. ¶ Tracks will be skipped in the same direction as that in which the jog dial is rotated. The direction indicated by the TRACK SEARCH button actually pressed will be ignored. ¶ Releasing the TRACK SEARCH button causes the player to leave high-speed skipping mode. Fast Forward and Rewind 7 Using the SEARCH button (1, ¡) to fast forward or rewind During playback, press the forward or reverse SEARCH button (1, ¡). Pressing the forward SEARCH button (¡) and keeping it pressed will cause the CD to fast-forward. Pressing the reverse SEARCH button (1) and keeping it pressed will cause the CD to rewind. 7 Super-fast searching Turn the jog dial while pressing either SEARCH button (1, ¡). ¶ Turning the jog dial in the direction you wish to search while pressing the forward or reverse SEARCH button (1, ¡) will cause the player to enter high-speed fastforward or high-speed reverse mode. ¶ CD will be searched in the same direction as that in which the jog dial is rotated. The direction indicated by the SEARCH button actually pressed will be ignored. ¶ Playback will resume when the jog dial is no longer being turned. ¶ Releasing the SEARCH button causes the player to leave high-speed search mode. Cueing Point Settings (*) Once a cueing point has been stored in memory, it can be used to place the player in a state where it is ready to begin playback from the cueing point by pressing the CUE button. 7 Manual cueing 1. During playback, press the PLAY/PAUSE button (38) to pause playback at the point from which you wish to begin playback. 2. Search for the precise position of the cueing point. 7 Using frame numbers to specify cueing points Cueing points may be specified in 1-frame units (where 75 frames are equivalent to 1 second). Use the jog dial or the forward or reverse SEARCH button (1, ¡) to advance to the desired frame. Rotating the jog dial once causes the player to advance or rewind 75 frames in the specified direction. Similarly, pressing the forward or reverse SEARCH button causes the player to advance or rewind 1 frame in the specified direction. 7 Listen to the sound at the current frame to determine the cueing point Turn the jog dial slowly and then return it to just before the point from which you wish to begin playback. (The cueing point thus defined will consist of that point directly after the sound which can be heard during a cueing pause.) 3. Press the CUE button when you reach the desired frame number or hear the sound at the point from which you wish to begin cueing. ¶ When the sound is muted and the cueing indicator (CUE) lights up, the cueing point will have been stored to memory. ¶ Each time a new cueing point is stored to memory, the previous cueing point will be cleared from memory. 7 Real-time cueing During playback, press the LOOP IN/REALTIME CUE button at the desired cueing point. This point will then be recorded as the new cueing point. 7 Checking cueing points (Cueing point sampler) After specifying a cueing point, press the CUE button. ¶ The sound at the specified cueing point will continue to play as long as the CUE button is pressed. 7 Returning to a cueing point (Back cueing) 1. During playback, press the CUE button. ¶ The player will return to the specified cueing point. 2. Press the PLAY/PAUSE button (38). ¶ Playback will begin immediately from the specified cueing point. 7 Changing cueing points (Cueing point adjust) 1. During playback, press the CUE button. ¶ The player will return to the currently specified cueing point. 2. Press the forward or reverse SEARCH button (1, ¡). ¶ The cueing point will be shifted forward or backward in 1-frame units. ¶ The cueing point may also be shifted forward or backward by pressing the forward or reverse SEARCH button (1, ¡) and then turning the jog dial. 3. Press the CUE button. ¶ The point where the CUE button is pressed will become the new cueing point. Changing Playback Speed (*) Pull the tempo control slide towards you. Slide the knob towards you (+) to increase the tempo and slide it away from you (-) to decrease it. ¶ The rate of change in playback speed (tempo) is shown in the display. ¶ The playback speed can be changed without changing the pitch ( "Setting a Master Tempo"). 7 Selecting the tempo adjust range Press the TEMPO RANGE button. Each time the button is pressed, the range of adjustment possible with the tempo control slide changes (±6%, ±10%, ±16%, WIDE). At ±6%, the adjustment unit is 0.05%, at ±10% and ±16%, the adjustment unit is 0.1%. When set to WIDE and the tempo can be set in adjustment units of 0.5% in the range ±100%. ¶ The selected variable adjustment range is shown on the display. Setting a Master Tempo (*) During playback, press the MASTER TEMPO button. When this is done, the MASTER TEMPO will light, and even if the tempo control slide is used to change the speed (tempo), the sound (key, pitch) will not change. ¶ Since sound is produced digitally in this mode, the sound quality will change. 13
-
 1
1 -
2
-
3
-
4
-
5
-
6
-
7
-
 8
8 -
 9
9 -
 10
10 -
 11
11 -
 12
12 -
 13
13 -
 14
14 -
 15
15 -
 16
16 -
 17
17 -
 18
18 -
19
-
20
 |
 |