Pioneer CMX-3000 Owner's Manual - Page 8
Panel Facilities - controller
 |
UPC - 012562575025
View all Pioneer CMX-3000 manuals
Add to My Manuals
Save this manual to your list of manuals |
Page 8 highlights
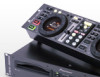
Read before use PANEL FACILITIES Player Operation buttons indicated by an asterisk (*) are not supported in digital mode. 1 Manual ejection hole (see p. 5) 2 Disc insertion slot (see p. 11) When using 3 inch/8 cm discs, discs must be inserted in the commercially available CD adapter before insertion. 3 Disc loading indicator This indicator flashes when a disc is being inserted into or ejected from the disc insertion slot and lights up when a disc has been inserted. 4 EJECT button (0) Pressing this button while cueing is on standby or play is paused will eject the disc from the player. 5 DIGITAL MODE switch (see p. 11) Set to On when the digital output is to be used. When set to On, the DJ functions do not function. (Functions marked * do not operate in this mode.) And the muted pause mode is used instead of the audible pause mode. 6 POWER switch and indicator The following settings are maintained in the internal memory even when the power is turned off: ÷ TEMPO RANGE ÷ AUTO CUE ÷ CD TEXT/WAVE ÷ TIME MODE ÷ MASTER TEMPO ÷ AUTO CUE LEVEL Remote Control Unit 1 EJECT button (0) 2 CD TEXT/WAVE button (see p. 16) Each time the button is pressed the function changes alternately as follows: 3 WAVE display 3 CD TEXT 3 CD TEXT disc title display track title display During digital mode, switches between CD TEXT 2 3 CD TEXT disc title display track title display 3 LOOP control buttons (*) (see p. 16) 4 EMERGENCY LOOP button (*) (see p. 16) When this button is pressed, the current point is set as the loop in-point, and loop play begins with an automatically set out-point. 8 5 TEMPO controls (*) (see p. 13) Tempo control range button (TEMPO RANGE): Pressing this button causes the variable range of the tempo control slide to change each time the button is pressed. MASTER TEMPO button and indicator: Pressing this button causes the master tempo feature to be powered on or off each time it is pressed. Tempo control slide: Moving this slider in the positive (+) direction away from the center position (normal playback tempo) causes the tempo to become faster, and moving it in the negative (-) direction causes the tempo to become slower. PITCH BEND buttons (+, -): When pressed during playback, causes pitch bend. Pressing the "+" button causes pitch to accelerate, while pressing the "-" button causes pitch to decelerate.
-
 1
1 -
2
-
 3
3 -
 4
4 -
 5
5 -
 6
6 -
 7
7 -
 8
8 -
 9
9 -
 10
10 -
 11
11 -
 12
12 -
 13
13 -
14
-
15
-
16
-
17
-
18
-
19
-
20
 |
 |
