Pioneer CMX-3000 Owner's Manual - Page 16
Loop Playback, WAVE Display, CD TEXT Display
 |
UPC - 012562575025
View all Pioneer CMX-3000 manuals
Add to My Manuals
Save this manual to your list of manuals |
Page 16 highlights
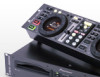
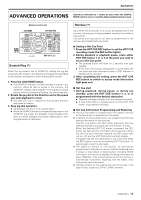
Applications (Advanced operations) Remote control unit LOOP IN/ REALTIME CUE LOOP OUT /OUT ADJ EXIT/ RELOOP EMERGENCY LOOP SEARCH (1,¡) PLAY/ PAUSE (3 8) Jog dial Loop Playback (*) 7 Defining a loop 1. Press the PLAY/PAUSE button (3 8) to begin playback. 2. During playback, press the LOOP IN/REALTIME CUE button at the point from which you wish to start the loop. ¶ Note that this operation need not be performed if a prerecorded cueing point is to be used as the loop inpoint. 3. During playback, press the LOOP OUT/OUT ADJ button at the point from which you wish to end the loop. ¶ Loop playback will begin, with playback looping from the loop in-point to the loop out-point. 7 Stopping loop playback During loop playback, press the EXIT/RELOOP button. ¶ Once this has been done, playback will continue in sequence from the loop out-point without returning to the loop in-point. 7 Changing the loop out-point 1. During loop playback, press the LOOP OUT/OUT ADJ button. ¶ The loop out-point time will be displayed on the display panel, the LOOP OUT/OUT ADJ button will begin flashing rapidly, and the IN/REALTIME CUE button will be unlit. 2. Press the forward or reverse SEARCH button (1, ¡) or turn the Jog dial. ¶ The loop out-point will be shifted forward or backward in 1-frame units. ¶ Pressing the LOOP OUT/OUT ADJ button or waiting for 30 seconds or longer will cause the player to exit from update loop input point mode and to resume loop playback. 7 Returning to loop playback After loop playback has been stopped, press the EXIT/ RELOOP button during playback to return to loop playback. ¶ The player will return to the currently defined loop in-point and begin loop playback (i.e., relooping) again from that point. 7 To program Loop play information Loop play information can be programmed into a HOT CUE button to allow one-touch loop play. See the section "Hot Cue" (p. 15). 7 To automatically set loop end (Emergency Loop) During playback, press the EMERGENCY LOOP button. ¶ Normal loop play display occurs (button flashes and LOOP indicator lights), and EMERGENCY LOOP indicator flashes. ¶ The point at which the button is pressed becomes the loop in-point, and a loop out-point will be set automatically as follows: ¶ If the immediately preceding BPM value is known, the loop out-point will be set 4 beats after the loop in-point. ¶ If the immediately preceding BPM value is not known, the loop out-point will be set 4 seconds after the loop in-point. ¶ If either of the above conditions (4 beats later or 4 seconds later) occurs later than the track end, the track end will be set as the loop out-point. ¶ If the EXIT/RELOOP button is pressed, loop playback is canceled and normal playback resumes. WAVE Display (*) This display shows the track's low tone beats (bass drum, etc.), thus letting you know the track's break points and end points. ¶ Together with playback of the current track, the WAVE is displayed. Once displayed, the WAVE information is memorized, so that it will be displayed immediately next time. Setting contents for the original disc cannot be read, however, in the case of discs copied to CD-R or CD-RW. ¶ Up to 99 tracks can be memorized for each disc. ¶ In the event a track has little change in low-register beat levels, the break point may not be displayed correctly. ¶ During playback, if operations such as scan, jog dial, or pause are attempted, the WAVE data may fail to be recorded in the vicinity where the said operation was attempted. In that case, rerecording of the WAVE data is required. CD TEXT Display CDs supporting CD TEXT function will show a consecutively scrolling display of the disc title and track title (limited to alphanumerics and certain symbol characters). During display of the disc title, the disc mark lights. 16
-
 1
1 -
2
-
3
-
4
-
5
-
6
-
7
-
8
-
9
-
10
-
 11
11 -
 12
12 -
 13
13 -
 14
14 -
 15
15 -
 16
16 -
 17
17 -
 18
18 -
 19
19 -
 20
20
 |
 |
