Pioneer CMX-3000 Owner's Manual - Page 12
Dj Player Operation
 |
UPC - 012562575025
View all Pioneer CMX-3000 manuals
Add to My Manuals
Save this manual to your list of manuals |
Page 12 highlights
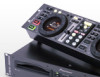
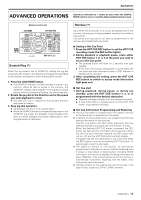
Basic Operation DJ PLAYER OPERATION Playing discs on Player A (Operation identical for Player B) JOG MODE TIME MODE EJECT /AUTO CUE TRACK SEARCH (4,¢) SEARCH (1,¡) CUE PLAY/ PAUSE (3 8) Remote control unit LOOP IN/ PITCH MASTER TEMPO REALTIME CUE BEND TEMPO RANGE Jog dial Tempo control slide Disc insertion slot EJECT Player Auto Cueing (*) Auto cueing is used to automatically specify the cueing point (see p. 13) to be used before sound actually begins to play when inserting a disc or when performing track searching. ¶ Turning auto cueing on and off Pressing the TIME MODE/AUTO CUE button and holding it down for a second or more causes auto cueing to be alternately turned on and off. When auto cueing is on, the auto cueing indicator (A. CUE) will be lit up. ¶ AUTO CUE on/off status is stored in memory and persists even when the power is turned off. ¶ The Auto Cue level can be changed. 7 Varying the Auto Cue Level 1. Hold the TIME MODE/AUTO CUE button depressed for 5 seconds or more. ¶ The display will show "A.CUE - 60" (when default setting). 2. Press the PITCH BEND buttons (+, -) to change the value. ¶ The value can be changed to either -42 dB, -48 dB, -54 dB, or -60 dB. ¶ Either press the TIME MODE/AUTO CUE button or else wait for 15 seconds; the variable level mode will be cancel. ¶ This setting is written to non-volatile memory, and will not be changed when power is interrupted or disconnected. Starting Playback 1. Insert a disc into Player A or Player B. 2. If auto cueing is on, press the PLAY/PAUSE button (38). ¶ Wait for the CUE button indicator to light up before pressing the button. The silent portion at the beginning of the displayed track will be skipped and playback will begin instantaneously from the first bars of the track. 12 Operations indicated by * cannot be used when the DIGITAL MODE switch is set to on (and the digital output terminal is used). Once the first track has been played, the player will automatically search for the beginning of the next track to be played. The cueing indicator (CUE) will light up, the PLAY/ PAUSE button indicator will flash, and the player will then wait for the PLAY/PAUSE button (38) to be pressed before beginning playback of the next track. 3. If auto cueing is off, playback will begin automati- cally from the first track. ¶ When auto cueing is off, playback will continue after the first track has been played, with all subsequent tracks being played in sequence. ¶ When playback of the final track is complete, playback will automatically come to an end. Stopping Playback During playback, press the PLAY/PAUSE button (38) or if a cue point has been specified press the CUE button to back-cue before pressing the EJECT button (0) to eject the disc. ¶ Disc rotation stops and the disc is ejected. ¶ Note that the CMX-3000 does not come with a stop button. ¶ Pressing the EJECT button during playback has no effect. Pausing Playback To pause playback, press the PLAY/PAUSE button (38). ¶ The PLAY/PAUSE button indicator and cueing indicator (CUE) will flash and playback will pause. ¶ Pressing the PLAY/PAUSE button again will then cause the button indicator to light up and for playback to be resumed. ¶ In the CDJ mode broken sound will still be audible during the standby mode; if you wish to stop all sound, lower the output sound volume on your audio mixer. ¶ If no operator whatsoever is performed for 80 minutes or more after pausing playback, the rotation of the disc will be automatically brought to a halt. Pressing the PLAY/PAUSE button at this time will then cause playback to be resumed. Skipping Tracks 7 Skipping tracks using the TRACK SEARCH buttons (4, ¢) Press the forward or reverse TRACK SEARCH button (4, ¢). ¶ Each time the button is pressed, the player will skip to the next track in the specified direction. (To skip to the previous track while a track is being played, press the reverse TRACK SEARCH button (4) two times in succession.) ¶ Pressing the forward or reverse TRACK SEARCH button (4, ¢) and holding down on the button will cause multiple tracks to be skipped in succession. Holding down the button for two seconds or more will cause the forward/reverse skipping speed to increase. ¶ Pressing the reverse TRACK SEARCH button (4) at the beginning of the first track will cause the player to skip to the final track. ¶ Pressing the forward TRACK SEARCH button (¢) from the last track will cause the player to skip to the first track (i.e., Track No. 1).
-
 1
1 -
2
-
3
-
4
-
5
-
6
-
 7
7 -
 8
8 -
 9
9 -
 10
10 -
 11
11 -
 12
12 -
 13
13 -
 14
14 -
 15
15 -
 16
16 -
 17
17 -
18
-
19
-
20
 |
 |
