Pioneer DV-47A Owner's Manual - Page 51
Creating your own setting 2, Still Picture, Angle Indicator
 |
View all Pioneer DV-47A manuals
Add to My Manuals
Save this manual to your list of manuals |
Page 51 highlights
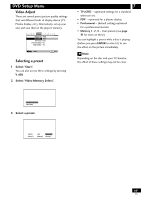
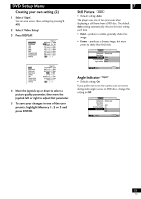
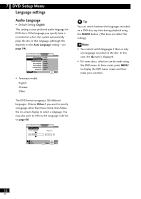
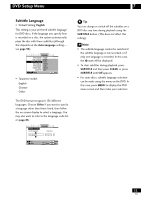
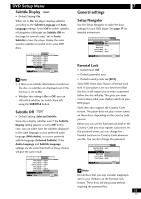
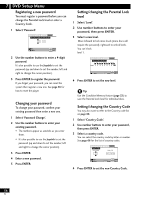
DVD Setup Menu Creating your own setting (2) 1 Select 'Start'. You can also access these settings by pressing V. ADJ. 2 Select 'Video Setup' 3 Press DISPLAY. Prog. Motion PureCinema YNR CNR MNR BNR Sharpness High Sharpness Mid Memory Page 1/2 fast slow Auto1 Auto2 On Off off max off max off max off max soft fine soft fine Off 1 2 3 Detail White Level Black Level Black Setup Gamma Hue Chroma Level Chroma Delay Memory Page 2/2 off slow min max min max 0 IRE 7.5 IRE - + green red min max - + Off 1 2 3 4 Move the Joystick up or down to select a picture quality parameter, then move the Joystick left or right to adjust that parameter. 5 To save your changes in one of the user presets, highlight Memory 1, 2 or 3 and press ENTER. 7 Still Picture • Default setting: Auto The player uses one of two processes when displaying a still frame from a DVD disc. The default Auto setting automatically chooses the best setting each time. • Field - produces a stable, generally shake-free image. • Frame - produces a sharper image, but more prone to shake than field stills. Audio1 A2 V1 Video2 Language General Background - Pioneer Logo Video Adjust Still Picture - Field On Screen Display Frame Angle Indicator Auto Move SETUP Exit Angle Indicator • Default setting: On If you prefer not to see the camera icon on-screen during multi-angle scenes on DVD discs, change this setting to Off. Audio1 A2 V1 Video2 Language General Background - Pioneer Logo Video Adjust Still Picture - Auto On Screen Display - On Angle Indicator - On Off Move SETUP Exit 51 En
-
 1
1 -
2
-
3
-
4
-
5
-
6
-
7
-
8
-
9
-
10
-
11
-
12
-
13
-
14
-
15
-
16
-
17
-
18
-
19
-
20
-
21
-
22
-
23
-
24
-
25
-
26
-
27
-
28
-
29
-
30
-
31
-
32
-
33
-
34
-
35
-
36
-
37
-
38
-
39
-
40
-
41
-
42
-
43
-
44
-
45
-
 46
46 -
 47
47 -
 48
48 -
 49
49 -
 50
50 -
 51
51 -
 52
52 -
 53
53 -
 54
54 -
 55
55 -
 56
56 -
57
-
58
-
59
-
60
-
61
-
62
-
63
-
64
-
65
-
66
-
67
-
68
-
69
-
70
-
71
-
72
 |
 |
