Pioneer DV-525 Owner's Manual
Pioneer DV-525 Manual
 |
View all Pioneer DV-525 manuals
Add to My Manuals
Save this manual to your list of manuals |
Pioneer DV-525 manual content summary:
- Pioneer DV-525 | Owner's Manual - Page 1
DVD PLAYER DV-525 Operating Instructions - Pioneer DV-525 | Owner's Manual - Page 2
ON YOUR PURCHASE OF THIS FINE PIONEER PRODUCT. Pioneer is on the leading edge of DVD research for consumer products and this unit incorporates the latest technological developments. We are sure you will be fully satisfied with the DVD player. Thank you for your support. WARNING: TO PREVENT FIRE OR - Pioneer DV-525 | Owner's Manual - Page 3
COVER (OR BACK). NO USER-SERVICEABLE PARTS INSIDE. REFER SERVICING TO QUALIFIED SERVICE PERSONNEL. The exclamation point within an equilateral triangle is intended to alert the user to the presence of important operating and maintenance (servicing) instructions in the literature accompanying the - Pioneer DV-525 | Owner's Manual - Page 4
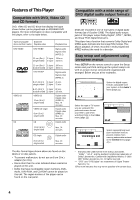
. This player has a function that converts Dolby Digital and MPEG audio formats into the linear PCM format. This allows playback of DVDs recorded in Dolby Digital and MPEG without the need for a decoder. Easy setup and adjustment using on-screen menus Press SETUP on the remote control to open - Pioneer DV-525 | Owner's Manual - Page 5
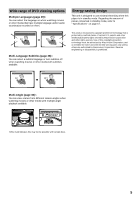
Wide range of DVD viewing options Multiple Languages (page 29) You can select the language on when watching movies or other media that have multiple language and/or audio soundtracks recorded on them. Audio Dolby Digital : 1 English 5.1CH HELLO Audio : 2 Spanish HOLA Multi-Language Subtitles - Pioneer DV-525 | Owner's Manual - Page 6
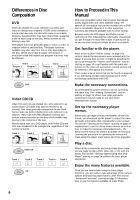
familiar with the parts and buttons on the main unit and remote control as they will be referred to throughout this manual. There is also a list of terms that can be found on page 54 if you are having trouble understanding some of the terminology associated with DVD. Make the necessary connections - Pioneer DV-525 | Owner's Manual - Page 7
10 Display Window 11 Rear Panel 12 Remote Control 13 Making Connections 15 Connecting Your DVD Player 15 Audio Connections 16 Video Connections 17 System Control Connections 18 Setting Up the Player 19 Using the Setup Screen Menus 19 Changing the Setup Screen Menu Mode ...... 20 Setting - Pioneer DV-525 | Owner's Manual - Page 8
Insert batteries. Make sure to match the plus (+) and minus (-) polarity guides on the batteries with the marks inside the battery compartment. Remote control unit 3 Close the cover. AA/R6P batteries Operating instructions (this manual) Notes • Do not mix old and new batteries. • When replacing - Pioneer DV-525 | Owner's Manual - Page 9
to direct sunlight or strong light may cause faulty operation. • If the CONTROL IN jack on the player's rear panel is connected to the CONTROL OUT jack of another component, point the remote control at the other component to operate the player. Operation will not be possible when pointed at this - Pioneer DV-525 | Owner's Manual - Page 10
(pages 24 and 27). 2 Display window Displays system information (page 11). 3 Remote sensor Point the remote control toward the remote sensor to operate the player (page 9). 4 0 (open/close) button Press to open and close the disc tray (pages 24 and 27). 5 7 (stop) button Press to stop playback - Pioneer DV-525 | Owner's Manual - Page 11
a chapter or track number is being displayed. 5 ANGLE indicator Indicates Multi-Angle playback is in progress (page 36). 6 REMAIN indicator Indicates that DVD (page 45). 9 DOLBY DIGITAL indicator Indicates Dolby Digital audio playback. 0 TOTAL indicator Indicates that the disc in the player - Pioneer DV-525 | Owner's Manual - Page 12
another component bearing the Pioneer Î mark. This lets you control this unit as though it were a component in a system. Player operations are then performed by pointing the remote control at the component that the player is connect to (page 18). 3 TV SYSTEM switch Use to change the TV signal mode - Pioneer DV-525 | Owner's Manual - Page 13
Remote Control 1 2 3 4 5 6 7 8 9 0 = ~ ! OPEN/CLOSE 0 AUDIO player on or to put in standby (pages 24 and 27). 2 AUDIO button @ Press repeatedly to select one of the audio languages and/or audio formats programmed on a # DVD (page 29). For Video CD and CD, each press changes the audio - Pioneer DV-525 | Owner's Manual - Page 14
maximum of 24 steps. Additionally, DVD programs for up to 24 discs can be stored in the player's memory for future use ( the disc tray (pages 24 and 27). # SUBTITLE button Press repeatedly are maintained). Use RETURN when you do not want to change the option setting in a menu (pages 19, 25, and - Pioneer DV-525 | Owner's Manual - Page 15
with this player. Use this illustration as a guide to setting up your home system. An explanation of each type of audio and video connection available can be found on the following pages. To determine the best audio and video connection setup for your system, refer to the manuals supplied with - Pioneer DV-525 | Owner's Manual - Page 16
jacks. • Use the supplied audio cable to connect the AUDIO OUT on the player to the audio input on the stereo amplifier or receiver. • When making analog audio connections, be sure to match the color of the plugs with the color of the jacks (red and white). DV-525 Stereo amplifier or receiver - Pioneer DV-525 | Owner's Manual - Page 17
Connections This player features S-video, composite video, and component video output possibilities. Check the manual supplied with your OUT SELECT switch on the rear panel of the player to the left to assign S-video output. TV or monitor DV-525 S-VIDEO OUT VIDEO OUT SELECT S-VIDEO IN VIDEO OUT - Pioneer DV-525 | Owner's Manual - Page 18
. • When controlling as a system, be sure to make a connection to the amplifier using an audio or video cord, even when using only digital components. • For details, refer to the operation manuals of the connected components. DV-525 Pioneer component with Î mark. CONTROL IN CONTROL OUT 18 - Pioneer DV-525 | Owner's Manual - Page 19
manual. The procedure on this page provides a basic outline for using the Setup screen menus. When setting up for the first time Some DVDs start playing automatically when loaded in the player. It is therefore recommended to set the Audio the setting you want to change. The options available for each - Pioneer DV-525 | Owner's Manual - Page 20
performance of the player. Though it doesn't require an expert to use the "Expert" menu mode, selecting the "Basic" menu mode may make setting up easier to do. In this manual, functions that are contained in the "Expert " menu mode are identified by the Expert icon. Make changes to the [Setup - Pioneer DV-525 | Owner's Manual - Page 21
(DAC). Notes • If you have made digital audio audio for DVDs recorded in DTS. When this player is connected to an AV component that has a built-in DTS decoder, select "DTS". If your system is not equipped to decode DTS, select "Off". Refer to the operating instructions supplied with your audio - Pioneer DV-525 | Owner's Manual - Page 22
stretched effect) If you are viewing a standard screen format DVD on a wide screen TV, the picture may appear 'stretched' on the screen. To remedy this condition, change your wide screen TV to display a standard (4:3) screen. Refer to the instructions supplied with your wide screen TV or monitor for - Pioneer DV-525 | Owner's Manual - Page 23
that operation indicators and on-screen messages and operations display. Change this setting in the Setup screen Language menu [OSD Language] setting. Audio1 2 Video Language General OSD Language EEnngglilsishh Audio Language - EFnrganlisçhais Subtitle Language - JEasppaanñeosle Auto Language - On - Pioneer DV-525 | Owner's Manual - Page 24
the player to enjoy DVDs, Video CDs, and CDs. 1 2 5 5 5 5 4 ¢ 5 4 1 3 ¡ 8 7 e E 5 1 Press ( STANDBY/ON on the front panel). 2 Press OPEN/CLOSE 0 (0 on the front panel). The disc tray comes out. 3 Load a disc. Load a disc with the label side facing up, using the disc tray guide to - Pioneer DV-525 | Owner's Manual - Page 25
MENU RETURN Cursor buttons NEXT ¢ Number buttons To navigate a menu screen • Although individual DVD titles may differ, when a menu screen is displayed, use the cursor buttons (2/ 3/5/∞) and ENTER on the remote control. The cursor buttons are used to move around the options on the screen and ENTER - Pioneer DV-525 | Owner's Manual - Page 26
). STANDBY/ON 0 41 ¡¢ 7 8 3 41 ¡¢ Forward and Reverse Scanning - DVD/Video CD/CD • Press once to skip back to the start of the chapter ( . Normal playback resumes. • When the "Scan" indicator on the screen changes from flashing to lit, fast reverse scanning will continue even if the button - Pioneer DV-525 | Owner's Manual - Page 27
out. 3 Remove the disc. 0 3 ¢ ¡ 1 8 4 7 4 Press ( STANDBY/ON on the front panel). The disc tray goes back in. Resuming playback from where you stopped -- DVD/Video CD With this player, it is possible to resume play of a DVD even when play has been stopped. Press STOP 7 once to enable play to - Pioneer DV-525 | Owner's Manual - Page 28
with this player. In this section, you'll be able to: • Select one of the subtitle languages programmed on a DVD or turn the subtitles off using the remote control (this page). • Select one of the languages programmed on a DVD using the remote control (page 29). • Change the audio output type - Pioneer DV-525 | Owner's Manual - Page 29
SETTING THE LANGUAGE OPTIONS 5 Changing the Audio Language (Multi-Language Function) - DVD Dolby Digital, PCM, and other audio data can be recorded on DVDs in a number of languages or audio tracks, letting you choose the desired language or audio. Audio Dolby Digital : 1 English 5.1CH HELLO - Pioneer DV-525 | Owner's Manual - Page 30
to can be selected from the various audio languages on a DVD. Even when the audio language is changed during playback by pressing AUDIO, the language selected at this setting will be selected as the default when the DVD is changed. Make changes to the [Audio Language] setting in the Setup screen - Pioneer DV-525 | Owner's Manual - Page 31
Audio Language EEnngglilsishh Subtitle Language - JFarepnacnhese Auto Language - ESnpgalnisishh Other Move ENTER Select SETUP Exit If you select "Code", use the cursor buttons (5/∞) to input the numbers of the input code. Use the cursor buttons (2/3) to change . Make changes to the [DVD Language] - Pioneer DV-525 | Owner's Manual - Page 32
changes to the [Subtitle Display] setting in the Setup screen Language menu in the "Expert" menu mode (page 20). Forcing subtitles to be displayed Expert This setting allows you to force subtitles to be displayed with DVDs that do not automatically display them on the screen. Select "With Audio - Pioneer DV-525 | Owner's Manual - Page 33
for titles, chapters, tracks or locations on a disc (page 35). • Change the angle of playback when viewing DVDs with multi-angle programming (page 36). • Repeat an entire title, chapter, or track, or just a specified part (page 37). • Play DVD titles or chapters, or Video CD/CD tracks in random - Pioneer DV-525 | Owner's Manual - Page 34
This function lets you view a clear still-image when DVD playback is paused. Make changes in the [Still Picture] setting in the Setup screen one frame each time the button is pressed. STEP e: The picture backs up a DVD a few frames each time the button is pressed. To return to normal playback When - Pioneer DV-525 | Owner's Manual - Page 35
MODE repeatedly to select the type of search. The type of search changes which each press as follows. 3 Title 3 Chapter/Track Off 2 Time 2 2 Press the number button(s) of the desired title, chapter or track or of the specific time where you would like to begin playback. • To select number - Pioneer DV-525 | Owner's Manual - Page 36
in the display panel of the player lights during multi-angle playback. Therefore, it is possible to know when the multi-angle function can be used without during playback. The camera angle changes each time you press the button. Notes • You can use the Multi-Angle function only with discs featuring - Pioneer DV-525 | Owner's Manual - Page 37
ADVANCED FUNCTIONS 5 Repeat Play - DVD/Video CD/CD You can repeat an entire title, chapter or track, or just a part. 5 5 5 4 ¢ 1 3 ¡ 8 7 e E REPEAT A-B Repeat play of a chapter/track Press REPEAT once during playback of the chapter or track you want to repeat. Repeat play of a title - Pioneer DV-525 | Owner's Manual - Page 38
Random Play - DVD/Video CD/CD Play titles, chapters, or tracks on a disc in random order. 5 5 5 5 4 ¢ 1 3 ¡ 8 7 e E RANDOM To change titles, chapters, or tracks during random play • Press NEXT ¢ and the next randomly selected track starts playing. • Press PREVIOUS 4 and playback of - Pioneer DV-525 | Owner's Manual - Page 39
use the number buttons to enter the numbers of the titles or chapters in the order you want to program them in. • To program DVD titles/chapters 9, 7, and 18 in order, press 9, 7, +10 and 8. Program Chapter Program Title Current: Title Title 7 Chapter 1 1 (Chapter 1~ 18) 09 07 18 Program - Pioneer DV-525 | Owner's Manual - Page 40
current program. On a DVD, select the program type (title or chapter) with the cursor buttons (2/3). The current DVD title or chapter program program screen. Notes • The complete program will be deleted even if the disc tray is open. • Pressing CLEAR when the disc is stopped will clear all programs - Pioneer DV-525 | Owner's Manual - Page 41
can be held in memory is exceeded. To prevent the player from erasing older programs that you may still use regularly, or when you don't want to use a program anymore, it is possible to manually erase programs stored in memory. 1 Load a DVD that has a program stored in memory. 2 Press PROGRAM. The - Pioneer DV-525 | Owner's Manual - Page 42
Change (For information, refer to "Changing the Password" on the following page.) When a DVD with a set Parental Lock level is loaded Playback cannot be started until the code password. To reset the system, see 'Resetting the Player to System Settings' (page 48). Please note that this procedure resets - Pioneer DV-525 | Owner's Manual - Page 43
to their content rather than a set level for all DVDs. Audio1 2 Video Language General Parental Lock: Level Change Level 1 2 3 4 5 6 7 8 Move RETURN Return ENTER Select SETUP Exit 1 Select "Level Change" in the [Parental Lock] setting. The screen changes to the password input screen. If you have - Pioneer DV-525 | Owner's Manual - Page 44
only one Video CD at a time as the function is only effective until the Video CD is removed from the player. 1 Load a disc that has a Last Memory point memorized. Some DVDs will start playback automatically when loaded. In this case, press STOP 7 to stop playback. 2 Press LAST MEMORY while in the - Pioneer DV-525 | Owner's Manual - Page 45
the settings of the most recently played disc are used. • If you make changes to any of the settings memorized in Condition Memory, press CONDITION MEMORY during playback to memorize new settings. • Switching of the multi-language mode etc., is automatic on some discs. Press CONDITION MEMORY during - Pioneer DV-525 | Owner's Manual - Page 46
on the format and type of disc being used, not all screens may be displayed. The display changes for each type of disc as follows each time the button is pressed. DVD Play Title 2-1 0.24 -0.05/ 0.29 « Play Chapter 1-1 1.19 1.19/ 2.18 « Play 1-1 1.19 Chapter -0.59/ 2.18 « Play Tr - Pioneer DV-525 | Owner's Manual - Page 47
number, total elapsed time of Video CD Bottom Row: track time, total time of track Press DISPLAY during while a disc is stopped to display DVD title and chapter information or Video CD and CD track information. Press DISPLAY again to turn the display off. Information about the titles and chapters - Pioneer DV-525 | Owner's Manual - Page 48
the Background Color of the Screen Expert You can select a blue or black background to appear when the player is in the stop mode. Make changes to the [Background Color] setting in the Setup screen General menu in the "Expert" menu mode (page 20). Audio1 2 Video Language General Setup Menu Mode - Pioneer DV-525 | Owner's Manual - Page 49
such as benzine, or thinner, etc. LENS CLEANER The player's pickup lens should not become dirty in normal use, but if for some reason it should malfunction due to soiling, contact your nearest PIONEER authorized service center. Lens cleaners are commercially available, but special care should - Pioneer DV-525 | Owner's Manual - Page 50
authorized service center or your dealer for a replacement. CAUTION: WHEN PLACING THE UNIT IN A STEREO RACK WITH GLASS DOORS Be sure there is ample space between the unit and the glass doors when opening the disc table using the remote control. If the disc table opens against strong resistance - Pioneer DV-525 | Owner's Manual - Page 51
Language Code List Language codes are used when setting the audio and subtitle language preferences. (See page 30) Panjabi pa Polish pl Pashto, Pushto ps Portuguese pt Quechua qu Rhaeto-Romance rm Input-code 0809 0818 0821 0825 0901 0905 0911 0914 0919 0923 1009 1023 1101 1111 1112 1113 - Pioneer DV-525 | Owner's Manual - Page 52
Tsonga ts Tatar tt Twi tw Ukrainian uk Urdu ur Uzbek uz Vietnamese vi Volapuk vo Wolof wo Xhosa xh Yoruba yo Zulu zu Input-code 1814 1815 1823 1901 1904 1907 1908 1909 1911 1912 1913 1914 1915 1917 1918 1919 1920 1921 1922 1923 2001 2005 2007 2008 2009 - Pioneer DV-525 | Owner's Manual - Page 53
recording or cause picture problems. Remote control operation is not possible. The rear panel control input jack on the player is being used. \ Point the remote control at the component that the player is connected to (page 18). The remote control is too far from the player, or the angle with - Pioneer DV-525 | Owner's Manual - Page 54
if it is selected for DVD playback. The DVD or CD is recorded in DTS audio. \ DTS audio is only output from the digital output jacks. Connect the digital output on the player to the digital input on . If this does not correct the problem, please consult your nearest PIONEER service center. 54 - Pioneer DV-525 | Owner's Manual - Page 55
encoded discs, the digital output jack (either coaxial or optical) of this player needs to be connected to an AV amplifier or receiver or to a DTS for compression of moving images. On some DVDs, digital audio has been compressed and recorded in this format. Multi-angle When you watch a TV program, - Pioneer DV-525 | Owner's Manual - Page 56
still images. Regional restriction codes (region number) Regional restriction codes are built in to DVD players and DVD discs for each sales region. If the regional code of the DVD player does not match one of the regional codes of the DVD disc, playback is not possible. The region number can be - Pioneer DV-525 | Owner's Manual - Page 57
terminals CONTROL IN Minijack (3.5 ø) Accessories Remote control unit 1 AA (R6P) dry cell batteries 2 Audio cord 1 Video cord 1 Power cord (except for U.S. and Canadian models) ...... 1 Operating Instructions 1 Note The specifications and design of this product are subject to change without - Pioneer DV-525 | Owner's Manual - Page 58
1924 SSOCIATIO We Want You LISTENING For A Lifetime Selecting fine audio equipment such as the unit you've just purchased is only level BEFORE your hearing adapts. To establish a safe level: • Start your volume control at a low setting. • Slowly increase the sound until you can hear it comfortably - Pioneer DV-525 | Owner's Manual - Page 59
59 - Pioneer DV-525 | Owner's Manual - Page 60
ELECTRONICS AUSTRALIA PTY. LTD. 178-184 Boundary Road, Braeside, Victoria 3195, Australia, TEL: 03-9586-6300 PIONEER ELECTRONICS DE MEXICO S.A. DE C.V. San Lorenzo Num 1009 3er piso Desp. 302 Col. Del Valle, Mexico D.F. C.P. 03100 TEL: 5-688-52-90 60 Printed in
-
 1
1 -
 2
2 -
 3
3 -
 4
4 -
 5
5 -
 6
6 -
 7
7 -
8
-
9
-
10
-
11
-
12
-
13
-
14
-
15
-
16
-
17
-
18
-
19
-
20
-
21
-
22
-
23
-
24
-
25
-
26
-
27
-
28
-
29
-
30
-
31
-
32
-
33
-
34
-
35
-
36
-
37
-
38
-
39
-
40
-
41
-
42
-
43
-
44
-
45
-
46
-
47
-
48
-
49
-
50
-
51
-
52
-
53
-
54
-
55
-
56
-
57
-
58
-
59
-
60
 |
 |

DV-525
Operating Instructions
DVD PLAYER