Pioneer DV-525 Owner's Manual - Page 12
Rear Panel - audio
 |
View all Pioneer DV-525 manuals
Add to My Manuals
Save this manual to your list of manuals |
Page 12 highlights
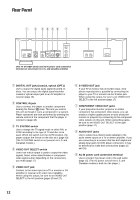
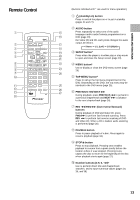
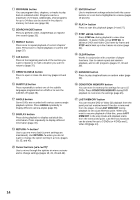
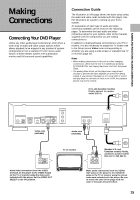
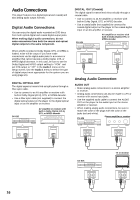
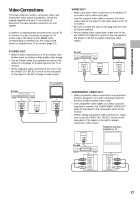
Rear Panel 1 2 3456 7 8 9 DIGITAL OUT OPT. CONTROL IN TV SYSTEM PAL NTSC AUTO VIDEO OUT SELECT VIDEO OUT S-VIDEO OUT COMPONENT VIDEO OUT Y PB PR (The TV SYSTEM switch and AC IN power cord connection terminal are not present on U.S. and Canadian models) AUDIO OUT R L AC IN 1 DIGITAL OUT jacks (coaxial, optical (OPT.)) Use to output the digital audio signal recorded on discs. You can output the digital signal via either coaxial or optical output jack to an AV amplifier or receiver (page 16). 2 CONTROL IN jack Use to connect this player to another component bearing the Pioneer Î mark. This lets you control this unit as though it were a component in a system. Player operations are then performed by pointing the remote control at the component that the player is connect to (page 18). 3 TV SYSTEM switch Use to change the TV signal mode to either PAL or NTSC according to the type of TV and disc to be used. When the switch is in the AUTO position, the player outputs the format on the disc as is (page 18). (The TV SYSTEM switch is not present on U.S. and Canadian models.) 4 VIDEO OUT SELECT switch Use to set which output is used to output the video signals. Select either video/S-video or component video signal output depending on the connections you make (page 17). 5 VIDEO OUT jack Connect to the video input on a TV or monitor or AV amplifier or receiver with video input capability. When using this output, be sure to set VIDEO OUT SELECT to the left position (pages 15 and 17). 6 S-VIDEO OUT jack If your TV or monitor has an S-video input, clear picture reproduction is possible by connecting the player to your TV or monitor via the S-Video jack. When using this output, be sure to set VIDEO OUT SELECT to the left position (page 17). 7 COMPONENT VIDEO OUT jacks If your projection monitor, projector or similar component has component video inputs, you can produce a higher quality picture on your projection monitor or projector by connecting to the component video outputs on this unit. When using these jacks, be sure to set VIDEO OUT SELECT to the right position (page 17). 8 AUDIO OUT jacks Use to output two-channel audio (analog) to the audio stereo inputs on a TV or stereo amplifier. If you are connecting to a receiver that has both digital and analog input jacks for DVD player connection, it may be beneficial to make both connections (pages 15 and 16). 9 AC IN power cord connection terminal Use to connect the power cord to the wall outlet (page 15). (The AC power cord of the U.S. and Canadian models is built into the player.) 12
-
 1
1 -
2
-
3
-
4
-
5
-
6
-
 7
7 -
 8
8 -
 9
9 -
 10
10 -
 11
11 -
 12
12 -
 13
13 -
 14
14 -
 15
15 -
 16
16 -
 17
17 -
18
-
19
-
20
-
21
-
22
-
23
-
24
-
25
-
26
-
27
-
28
-
29
-
30
-
31
-
32
-
33
-
34
-
35
-
36
-
37
-
38
-
39
-
40
-
41
-
42
-
43
-
44
-
45
-
46
-
47
-
48
-
49
-
50
-
51
-
52
-
53
-
54
-
55
-
56
-
57
-
58
-
59
-
60
 |
 |
